
Monday, July 28, 2014
Nothing to see here, move along
A coworker was sent to our Malaysia facility for three weeks, and I'm kind of a jerk sometimes so...
Also, I discovered a new unit of measurement. Turns out Vipers have a 70 Flamingo trunk.

Monday, July 21, 2014
Fail #2
Learn from my fail #2. The last "replace it because it's going to fail eventually" on the Viper is in the power steering system. The stock plastic pulley has a tendency to disintegrate, and the pump bracket is known to crack. Either will ruin your day pretty quick. When I bought my shifter from Ipsco, I also bought some upgraded billet aluminum parts to prevent both of these problems. I painted the pulley a few posts back, and the bracket has been resting happily in the box until now.
First things first, I had to get the stock pulley off the pump. I didn't want to mess with power steering fluid all over the place, so I decided to leave the pump in the car. Like most modern cars, the pulley is just pressed onto the shaft of the pump. With the pump unbolted and the airbox off, you can get a puller on the pulley. The first one I used is one that I had already. It hooks into the groove on the pulley, and grabs around 60% of the way around the groove. I clamped a vice grips over it to keep the jaws tight in the groove.
 No dice with that one. The pulley didn't budge. Rather than continuing with the exercise in futility, I went to the local Advance Auto Parts and borrowed one of their loaner tools. This one was the full circle style puller that grabs the pulley groove all the way around to spread the load over the whole surface.
 I started tightening the puller, and heard a "Pop" which usually means that the pulley came loose and started pulling off. Nope.
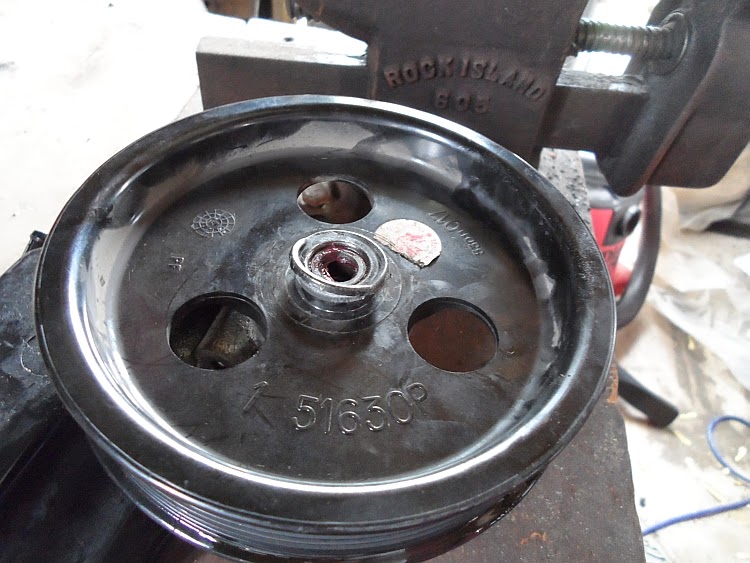 Yeah, the puller actually broke the groove on the pulley. The Pop wasn't the pulley sliding, it was the groove breaking. Sigh... With the groove broken, there was nothing for the puller to grab onto anymore. So I had to take the pump off the car for a "last resort" pulley removal. It starts by removing the plastic portion of the pulley from the steel hub. A hammer and chisel are the tools of choice here.

With the hub bare, there are once again grooves you can hook a puller into. This time I used the vice to keep the jaws clamped together and prevent slipping.
 That didn't work either. This thing was seriously stuck. I had one more trick up my sleeve, and that was to cut the hub off. This was an absolute last resort because you risk damaging the pump shaft. Using a Dremel with a cut off wheel, what you have to do is start grinding through the hub. You want to grind the whole thing evenly, and NOT cut down into the shaft. When you get it ground down far enough, the hub will split on it's own because of the press fit tension it's under.

After it's split like that, it slides off pretty easily. It was after this point when installing the new pulley hub that I realized I'd really effed up. In my efforts to remove the pulley, I'd actually broken my pump. Somehow, while trying to pull the pulley off, I managed to push the shaft into the pump housing, and I actually cracked the rear cover of the housing. Here's the area that broke(pic stolen from the internet)
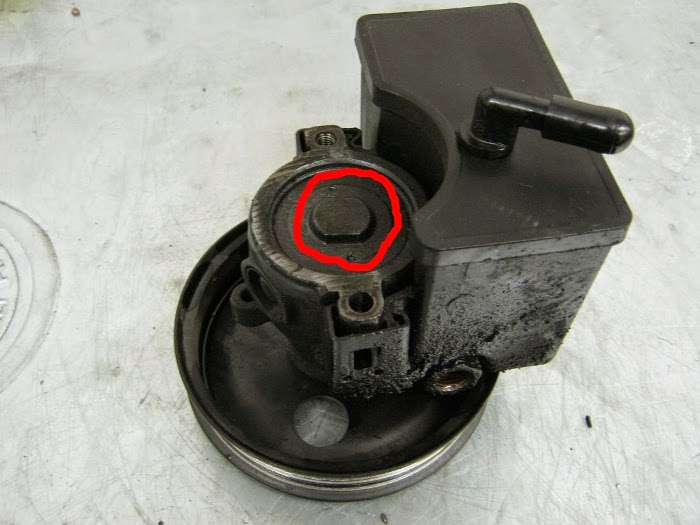 Looking back, it happened while the pump was still on the car, and NOT when I was hammering the pulley off. So, I needed a new pump. Fortunately, this is a very common PS pump. Nearly all manufacturers have used it in one form or another. The Viper shares it with Jeeps, so a rebuilt pump from Napa was only $60, no Viper Tax on this one. The new pump didn't come with a reservoir(they generally don't), so I had to transfer mine over. It's held onto the pump body with two clippy things.They're pretty easy to get off. just hook a screwdriver into the lock tab, pry up slightly, and lightly tap it off. You can also see in this pic the broken rear cover.

With the pump and pulley out of the way, the other piece of the puzzle is the bracket. The new Ipsco billet bracket is significantly beefier than the original. Seeing the two together, it's pretty clear why the original ones can crack.

Installing the bracket is so straight forward that Ipsco barely covers it in their otherwise very well written pulley/bracket instructions. Take three bolts off, swap bracket, put three bolts back on. You don't even need to remove the pump from the car to do it. Here's where it sits on the engine.
 And finally, everything is back together. The bracket is down low, and with my pulley painted black, everything still looks factory until you notice that the pulley is bolted on instead of pressed on.

While I was at it, I flushed my PS fluid too. It's easy to get most of it changed. Suck the fluid out of the reservoir with a turkey baster, fill with fresh fluid, run car for 30 seconds, repeat as necessary until the fluid is is running clean. You won't get absolutely all the old fluid out this way, but you'll get enough and it's far easier and less messy than the "pull off the return hose and run it into a bucket" method.
First things first, I had to get the stock pulley off the pump. I didn't want to mess with power steering fluid all over the place, so I decided to leave the pump in the car. Like most modern cars, the pulley is just pressed onto the shaft of the pump. With the pump unbolted and the airbox off, you can get a puller on the pulley. The first one I used is one that I had already. It hooks into the groove on the pulley, and grabs around 60% of the way around the groove. I clamped a vice grips over it to keep the jaws tight in the groove.
With the hub bare, there are once again grooves you can hook a puller into. This time I used the vice to keep the jaws clamped together and prevent slipping.
After it's split like that, it slides off pretty easily. It was after this point when installing the new pulley hub that I realized I'd really effed up. In my efforts to remove the pulley, I'd actually broken my pump. Somehow, while trying to pull the pulley off, I managed to push the shaft into the pump housing, and I actually cracked the rear cover of the housing. Here's the area that broke(pic stolen from the internet)
With the pump and pulley out of the way, the other piece of the puzzle is the bracket. The new Ipsco billet bracket is significantly beefier than the original. Seeing the two together, it's pretty clear why the original ones can crack.
Installing the bracket is so straight forward that Ipsco barely covers it in their otherwise very well written pulley/bracket instructions. Take three bolts off, swap bracket, put three bolts back on. You don't even need to remove the pump from the car to do it. Here's where it sits on the engine.
While I was at it, I flushed my PS fluid too. It's easy to get most of it changed. Suck the fluid out of the reservoir with a turkey baster, fill with fresh fluid, run car for 30 seconds, repeat as necessary until the fluid is is running clean. You won't get absolutely all the old fluid out this way, but you'll get enough and it's far easier and less messy than the "pull off the return hose and run it into a bucket" method.
Wednesday, July 9, 2014
Shift. Shift shift shift.
I hate drilling holes. Absolutely hate it. Especially when it involves hand drills. If I never had to drill another hole in my life, I could die happy. Here's reason 1,847. If you remember a while back, I bought an aftermarket shifter for the Viper. I finally had time to install it. Step one after removing the console is to drill out the rivets holding the inner shift boot in. Chrysler, much to my chagrin, used steel rivets. In the process of drilling them out, the bit slipped, hit the rubber boot, and this happened:
 That was how the project started. Fortunately, being rubber, it super glues back together very well. The white haze you see around the seam is from the kicker I used to make the glue set up faster. It looks terrible, but it works and fortunately you can't see it with the car assembled.
 With the boot out of the way, we have access to the shifter. Here's the hole we have to work with:
 The instructions say to locate and drill some holes in the console for bolt access. I didn't want to drill any holes in my perfectly good car. It turns out that you can get to all the bolts for removal and installation without drilling holes or lowering the trans, but it takes a stubby wrench, a 1/4" drive u-joint with socket, and nimble fingers. Since I had to put a trans mount in anyway, I just lowered the trans. It makes things MUCH easier. Here's the new Ipsco STS shifter next to the original. It's MUCH higher quality:
 Like I said, I wanted to swap the trans mount to the new Woodhouse urethane mount while I was at it. Here's the new mount next to the old:
 Once the belly pan is off, it's a pretty simple swap. Just jack up the trans, undo some bolts, and swap the mount. Since the shifter was the primary job, with the trans mount removed, I lowered the trans to give myself more room to work, then installed the new mount:
 Here's our new shifter installed and ready for a test drive:
 The car shifts MUCH cleaner with the new shifter. It's nearly impossible to do the accidental 3-2 instead of 3-4 shift. Downshifting is greatly improved too. The throw is shorter than stock even with the tall stock shift knob. It is a bit stiffer than stock, but the more precise shifts are worth it. Between the Woodhouse mounts and STS shifter, the car shifts better than ever. It's a pretty straight forward install, and the provided instructions are very well written. Honestly, the hardest part was drilling out the shift boot rivets and if you don't have a hate-hate relationship with drill bits like I do, it's not a big deal.
The end is near
We're in the home stretch now. With the receiver complete and barrel installed, all the other parts can be installed on the AK. Everything is still unpainted, I wanted to get it test fired before paint just in case I had to tweak anything. Here's how it looks when it's all assembled except for the front hand guards:
 Since I want it to look nice when I'm done, I started reworking the stock too. The Polish plywood is much better than some of the other AKMs from other countries, but still leaves a lot to be desired too. My kit is based on a 1970 rifle, so it's got 40 years of dings and scrapes to take care of. Here's the wood(minus upper handguard) all sanded up and ready for some polyurethane:
 With everything assembled, it was ready for test firing. Now, I may look stupid, but I'm not dumb. There was no was I was going to hold what amounts to a home made gun in my hand and pull the trigger. While I didn't expect any trouble, I was still minorly concerned about the headspace being wrong, and the gun blowing up. More specifically, I was concerned about the dust cover being blown off the top and into my face. On an AK, all that stands between you and the bolt slamming back and forth is some sheetmetal. So out came the ratchet straps and a very long rope...

Thursday, June 26, 2014
Laying down The Law
We as a country do a lot to try and curb the acquisition and use of "non-sporting" rifles(that is, military style rifles), particularly imported ones like the AK. There is a subsection of the Gun Control Act passed in 1968 called 922r. Basically, it says that any imported "non-sporting" rifle can have no more than 10 imported parts from a list of 20 parts set down by the AFT. On the AK 47, there are 16 parts that qualify for the 922r compliance list. For my build, using a US made magazine, I am well in the clear with only 7 imported parts from the list. If I switch to a metal imported magazine, I am right at 10 imported parts and will switch out the pistol grip for a US made part to bring it back down(although it is still legal with 10 imported parts, I like the extra buffer). So that there is never any question, here is a list of the 922r compliance parts in my AK, along with country of origin:
1. Front trunion,
Polish made
2. Bolt Carrier,
Polish made
3. Bolt, Polish made
4. Gas Piston, Polish
made
5. Buttstock, Polish
made
6. Pistol Grip,
Polish made
7. Upper and Lower
Handguards (Both count as 1 part), Polish made
8. Barrel, US made,
AK Builder #H1-31
9. Receiver, US made
from AK Builder flat, #B1-71
10. Muzzle Device, US
made, Tapco #AK0684
11. Hammer, US made,
Tapco #AK0650single
12. Trigger, US made,
Tapco #AK0650single
13. Disconnector, US
made, Tapco #AK0650single
14. Magazine Body, US
made, Tapco #MAG0632
15. Magazine Follower,
US made, Tapco #MAG0632
16. Magazine
Floorplate, US made, Tapco #MAG0632
Interestingly, it's only with rifles that it matters. Pistols and shotguns don't need to follow 922r no matter their origin. If I had made the receiver so that a buttstock couldn't be mounted it would qualify as a pistol and even though it's the exact same gun, I wouldn't need to worry about 922r(or the 16" minimum barrel length rule for that matter).
Interestingly, it's only with rifles that it matters. Pistols and shotguns don't need to follow 922r no matter their origin. If I had made the receiver so that a buttstock couldn't be mounted it would qualify as a pistol and even though it's the exact same gun, I wouldn't need to worry about 922r(or the 16" minimum barrel length rule for that matter).
Message Received
Onward to the last bit of building the AK's receiver. The last pieces of the puzzle are the rear trunnion/stock tang and center support. Like everything else, these require some special tools. Well, actually not, all you really need is a hammer, but it'll look nicer with some better tools. The tools in question this time are both rivet sets. The first bucks are for the rear stock tang. They're made from 1/4" steel with some 5/16" dimples in them to form the rivets. While you could just hammer the rivets over, the rivet bucks make for nice domed rivet heads.
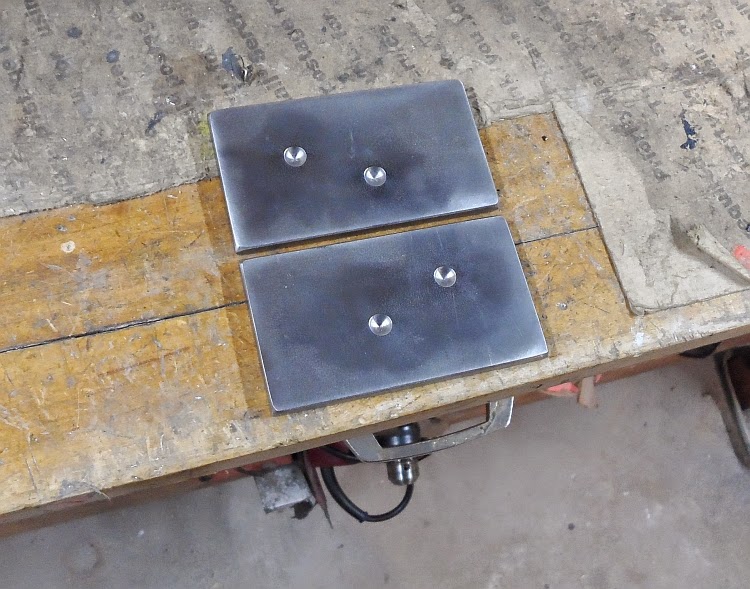
With the stock tang and rivets in place, with one buck on the back side you start by hammering the rivets down far enough that they lock into position. You can also see in this pic that I painted the inside of the receiver under the trunnion, so I don't have any bare metal that can rust.

Then, using both bucks, squeeze everything together to form the rivet heads. A hydraulic press would be nice here, but I don't have one so the vice works.

Once everything is properly squished, you should have some nicely domed rivet heads.

The very last piece of the receiver it's self is the center support. It's essentially just a long rivet with some steel tube around it, and keeps the receiver from bowing apart. You've got to be careful with this one, it only goes in one way. The pre-formed side MUST go on the right side. Instead of a full dome, it's got a flat head that is necessary to clear the safety lever. If you put it in wrong, you'll have to grind the head down to clear the safety. You can also see in this pic where the welds are for the inner rails.
 The process is the same as the rear trunnion, hammer to set, then to the vice with a dumpled buck to finish forming the head.
 And there you have it, the hard part is done. After a few hours and several special tools, we're left with a complete AKM barreled receiver.

With the stock tang and rivets in place, with one buck on the back side you start by hammering the rivets down far enough that they lock into position. You can also see in this pic that I painted the inside of the receiver under the trunnion, so I don't have any bare metal that can rust.
Then, using both bucks, squeeze everything together to form the rivet heads. A hydraulic press would be nice here, but I don't have one so the vice works.
Once everything is properly squished, you should have some nicely domed rivet heads.
The very last piece of the receiver it's self is the center support. It's essentially just a long rivet with some steel tube around it, and keeps the receiver from bowing apart. You've got to be careful with this one, it only goes in one way. The pre-formed side MUST go on the right side. Instead of a full dome, it's got a flat head that is necessary to clear the safety lever. If you put it in wrong, you'll have to grind the head down to clear the safety. You can also see in this pic where the welds are for the inner rails.
Wednesday, June 4, 2014
The Mighty Stick of Justice
Behold the Mighty Stick of Justice, righting wrongs around the world!
 The wrong in this case is the hood on the Viper. Like many Gen I and II Vipers, the hood springs on my car aren't the greatest. They will hold the hood up ok as long as the car is level and there is no wind. Jacking the car up or having the slightest breeze blowing from the front will cause the hood to come crashing down. It definitely can't be left unattended at a car show or cruise night for fear that the hood could slam down on somebody. So, I decided to make a prop rod. Traditional prop rods going from the cowl to the hood look bad. It's a Viper, no matter how fancy the prop rod is, it always looks out of place. Mine is much less obtrusive. It's made from a 1 1/4" wood dowel, and is 24" end to end. The top side is notched, the bottom is ground at a slight angle, and it was primed/sanded/painted so that you really can't tell it's wood. The top end hooks into the hood hinge like so:

The bottom end wedges into the conveniently bare spot of the frame seemingly left open for just such a devise here:
 When it's installed, it blends in with the rest of the engine compartment and is virtually invisible to "regular" people. At the last cruise night I went to, I asked everyone who looked at the car if they noticed it, and the universal answer was "No."

It holds the hood rock solid and is wedged in such a manner that it can not come out on it's own. The only drawback is that you need to remember to take it out before trying to close the hood. I've found that it's not much of an issue because the hood doesn't budge with it there. As soon as you touch the hood and it doesn't move, you remember that the Mighty Stick of Justice is in place. It also stores conveniently behind the seat.
The bottom end wedges into the conveniently bare spot of the frame seemingly left open for just such a devise here:
It holds the hood rock solid and is wedged in such a manner that it can not come out on it's own. The only drawback is that you need to remember to take it out before trying to close the hood. I've found that it's not much of an issue because the hood doesn't budge with it there. As soon as you touch the hood and it doesn't move, you remember that the Mighty Stick of Justice is in place. It also stores conveniently behind the seat.
Subscribe to:
Posts (Atom)