Thursday, March 10, 2016

I heart bondo

Seriously, at this rate I'll have the car out again before I'm done posting all the stuff I did last fall...  With the hood fiberglass done, it's time for bondo.  I've already posted why Bondo brand bondo is terrible and should be avoided at all costs.  My biggest complaints are that it spreads poorly, and sands hard.  I mean, it works, but you end up using more effort and going through more sandpaper than with other fillers.  There are much, much better products for not a whole lot more money.  My filler of choice is Evercoat Rage Gold.  It's about $20 more per gallon than Bondo, but the time and sandpaper it saves are well worth it.  Concidering the $800 I'm likely to spend on just primer, paint, and clear, an extra $20/gallon for filler is nothing.

The first thing I did was sand down all the fiberglass with 80 grit sandpaper.  All the 'glass was sanded close to the final panel height, and all the left over paint was removed from the repair area.  Then I mixed up a big batch of bondo and covered the whole area in one go.  The big blue tarp not only helps keep the dust out of the engine compartment, it also catches drips in the bondo.

If you catch the filler at just the right point while it's hardening, you can remove a whole lot of material very quickly.  Using my longest sanding block and 80 grit paper, I sanded the whole area down.  You want to use the longest sanding block you can because you'll end up with a flatter result.  NEVER use power tools for your final filler work.  If you do bodywork all day every day, you're probably good enough to get away with it, but if you're inexperienced, power sanders will leave you with a very wavy surface.  It quickly becomes apparent when sanding where the highs and lows are.  The highs get sanded down some more, and the lows get more filler.  Ideally, you want no more than 1/8" of filler thickness, any deeper than that could conceivably crack(though that's unlikely) and should be filled with fiberglass instead.  Pinholes in the fiberglass should be ground out too, to avoid problems down the road.

You'll notice that I bondoed right over the edge of the hood scoop hole too.  Since much of that area is new too, it also needed some work.  With the scoop as a guide, I used my die grinder, some square files, and a sandpaper covered popsicle stick to remake the scoop relief.  Here it is in progress:

I want to be sure that the curve of the hood matches the curve in the fascia.  To make sure they match, I made a simple template with foam core posterboard.  It'll get me closer than I can eyeball(and no, I'm not holding it straight in the top pic).


Tuesday, February 23, 2016

LEDing the way

The headlights on my '95 Impala SS are just awful.  The combination of poor lens design and barely adequate wiring makes for little light down the road.  They are so bad that I can drive around with my high beams on without passing drivers flashing their lights at me.  Generally speaking, upgrading the headlights is a lot of work.  The wiring is sized just big enough for standard wattage lamps, switching to higher watt bulbs requires relays be added or risk melting the wiring.  I'm also on my 3rd dimmer switch in this car, the previous two melted.  I've avoided upgrading the headlights partly because of cost, and mostly out of laziness.  But I came across a new solution, LED bulbs.  The price of LEDs has dropped significantly over the past few years, and they now make drop in replacements.  LEDs also use much less power for the same(or more) light output than standard bulbs, which greatly reduces strain on the wiring and switches.  So I took the plunge and bought some.

To my surprise, the headlights already in the car were already upgraded to PIAA "Star White" bulbs(which explains my melted dimmer switches).  Far from being white, they put off a fairly standard yellowish beam.  You can also see that around the base of the bulb the plastic is charred and melted a bit.  These bulbs run HOT.  I bought the LEDs on e-bay for around the same price as many of the "upgraded" standard bulbs.  They are 80w 8000Lm bulbs, that's an entire 50 watts less than the PIAAs, and they put out more light.   Here's what the new bulb looks like.  The old bulb is on the left, the new LED bulb on the right:

Installation is as simple as removing the old bulb, putting in the new one, and plugging the harness into the existing plug.  It's immediately apparent that the new bulbs are brighter.  Once again, old on the left, new on the right:


So, how do they actually work?  Well, the jury is still out on that one.  There is no question that they put out more light, but how they put it out leaves me a bit underwhelmed.  The pattern is much more diffuse with the LEDs.  They light up the sides of the road better, but don't seem to project out as far.  Since half my driving is at night down country roads, my biggest concern when driving is deer jumping out in front of me.  Having the sides of the road illuminated better could help avoid them.  Though the highs are definitely brighter, there isn't as distinct a difference between the high beams and low beams either. 

Lows:

Highs:
I'll give it awhile to get used to them, but for now I'd call it a wash.  On the plus side, I shouldn't melt any more dimmer switches :)


Saturday, January 30, 2016

This just in...three months ago...

From time to time, I fall off the face of the internet and people won't hear from me for weeks or months at the time...  At this rate, it'll be warm again before I get all the work I did last fall posted.  Anyway, back to our regularly scheduled program...

I saved the biggest crack in the Viper's hood for last.  This crack goes all the way across the hood from the scoop to the headlight.  The lower corner was cracked off too.

Like everything else, this giant crack was never repaired right.  Even though the crack was actually fixed with fiberglass, all the damage wasn't removed.  There is still a lot of delamination along the edges of the crack.

The surprises never end when redoing someone else's work, you never know what you're going to find.  In this case, a lag bolt, just chillin' between the top and bottom layers of fiberglass.  No reason for it to be there, it wasn't holding anything.  This is about as far down as I ground the fiberglass too.  While it's still mostly solid, it's paper thin and is only there to provide enough backing to keep the new fiberglass from sagging.

While I'm thinking about it, I'm not sure if I ever explained why I'm using fiberglass mat instead of woven cloth.  Thickness for thickness, woven cloth is stronger than mat but it's harder to work with.  It doesn't go around corners as well as mat does.  Being easier to work with isn't the primary reason through, the real reason is shrinkage.  Fiberglass and bondo shrink a tiny bit for awhile after they set up.  If you don't properly cure, then post cure your work it will shrink more.  Even if you do it right, fiberglass and bondo will still shrink a tiny bit over time as the remaining VOCs slowly evaporate out.  This is the biggest reason why I wanted to get the fiberglass and major bodywork work done last fall, and wait to paint it next summer with many hot days in the sun in between, to give the bodywork time to shrink before final sanding, priming, and painting.  If/when the bodywork does shrink, the weave of the fiberglass may become visible.  Our eyes and brains are GREAT at picking out patterns.  If you use woven cloth, your eye will be drawn to the obviously square weave pattern of the cloth, and it will be very noticeable under the paint.  Mat on the other hand has fibers meshed in a random pattern.  If you do get enough shrinkage to see the weave, the random pattern will be much less noticeable.  It won't draw the eye like woven cloth will.

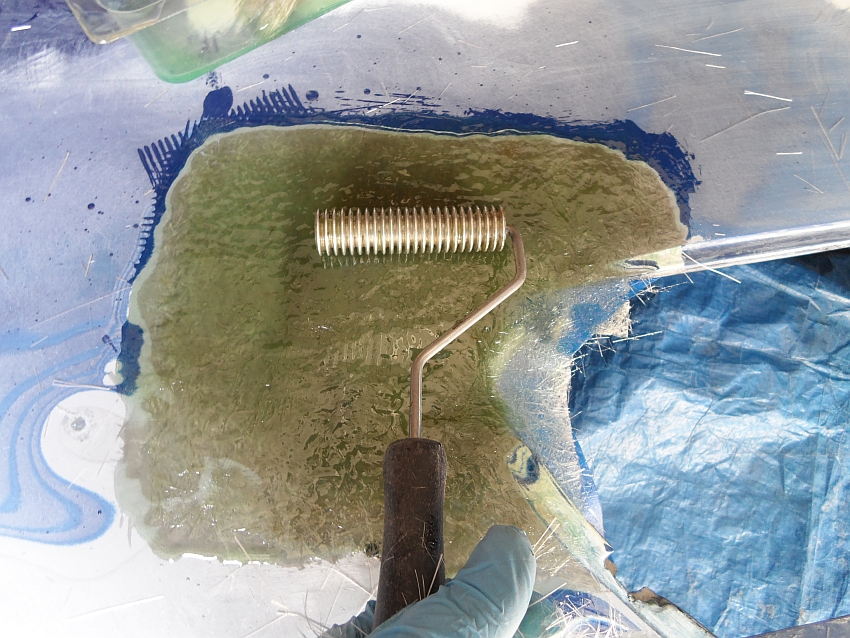
For this repair, I used pieces of fiberglass big enough to cover the whole area.  Generally speaking, the bigger the piece you can use, the better.  On things like the bottom of the hood with all it's curves big sheets just don't work, but on big flat outer surfaces, they work great.  I used an entire 8 sq/ft package of fiberglass mat on just this one layup.  This is part of the reason I did all the small spots first, so the top layers of fiberglass could be done in big sheets.

After grinding that down, it was time for the last bit of fiberglass work on the hood.  You'll remember from earlier posts that the front lip was pretty cracked up.  When I did the back, I ground the lip to a very thin outer shell and layed 'glass in behind it.  For the topside, I ground it back until I hit the new 'glass I put in, then layed full length strips across the nose. 

With just some more grinding and trimming, that's about it for the fiberglass repairs on the hood.  Everything else from here on out is body filler work.  Also keep in mind that even though I layed fiberglass over existing paint, it's a huge no-no for finish work.  Anyplace there is fiberglass over paint, it's still higher than the finished surface needs to be.  Before adding bondo and doing the final bodywork, all the high spots in the fiberglass(where it's overlapping any paint) will be sanded down and ALL of the paint will be sanded off the repair areas.  But more on that later...

Friday, December 25, 2015

At this age sometimes it just stops working...

Here's a brief side note in our hood repairing saga.  I've been going on and on about how you have to do things right when fixing fiberglass.  It's not hard to do, but it is easy to mess up little things and have problems down the road.  This is one of those little things.  It's not uncommon to see Gen I and II Vipers with bubbles in the paint, even on cars that have never been wrecked or repainted.  They look just like rust bubbles would on a steel car.  My car is no exception, two places on the hood had these bubbles.  They're easy to see when you're looking at the car, but very hard to photograph in 2D.  To make the bubble stand out, I lightly sanded over it so you can see it clearly.
Then I started sanding down into it with my DA.  Even though my hood has been repainted several times, it wasn't re-work that caused this bubble.  It goes all the way down to the fiberglass.  The original factory primer lost adhesion to the fiberglass.  A large chunk of it was no longer stuck down, and that's what caused the bubble.  It's also why some cars have bubbles when the body is hot but they seem to disappear again when the body cools down, the loose paint gets hot and expands more than the fiberglass beneath it.
It just goes to show that even the experts can sometimes have trouble getting everything to work right with fiberglass.


Sunday, December 6, 2015

Next!

Just a little update because I'm so far behind on my posting.  Continuing my theme of smallest to biggest, I fixed some more cracks on the Vipers hood.  Same process as the last ones and like all the others they looked like tiny imperfections until I started grinding into them.  Same location too, the corners of the hood scoop hole create stress points where cracks will start if flexed enough.  You can so see that I've got a tarp laid out under the hood.  It's there to keep most of the dust out of the engine compartment, and catch any drips of fiberglass resin or Bondo.  For the time being, I'm also not worried about fiberglassing over the paint.  Normally that's a huge no-no, but the whole area will be sanded down to bare fiberglass before the bodywork is completed, and none of the paint overlapped areas will still be there once that's done.


Saturday, November 7, 2015

Gotta start somewhere

Time to actually start fixing the top of the Viper's hood.  I started with the crack in the upper passenger's corner of the hood scoop.  As you can see in the pic, after it was "fixed" it continued to crack.  You can also see towards the bottom of the pic another crack that never got addressed at all:
Grinding into the crack revealed another problem.  Just like the area further down the hood, some of the fiberglass has delaminated.  There are some fibers that have broken loose from the rest of the panel.  You can see too that though the main crack had some new fiberglass over it, it was still very much there.
When you start grinding onto these things, it's actually fairly easy to see the cracks and delamination.  As you're grinding, you just keep following the cracks until you get back into solid fiberglass.  If you're not ready for it, it can start to look pretty grim as you keep grinding, and grinding, and you're still chasing the crack.  With this crack for example, I ended up having to grind out a sizable chunk of hood to get rid of all the damage.  Much of it goes all the way down to the inner panel.
The rest of the repair is the same as any of the other repairs I've showed.  I do have another bit of how-to to add though.  As you're laying up fiberglass, you are going to get bubbles in the resin.  Bubbles can cause problems down the road, particularly if they're close to the surface.  You can, to some extent, use a bondo spreader to work the bubbles out, but it doesn't always work for small bubbles.  Fortunately, there's a tool for that.  For around $15, you can buy a fiberglass roller.  It's made specifically for rolling out fiberglass, and works great for working out bubbles.
The only down side to a fiberglass roller is that you have to use it and get it clean before the resin starts to set.  If the resin sets before it's clean, you may as well throw it away.  Dunking it in a tub of acetone will help dissolve the resin, as well as slow down the reaction giving you a few more minutes to get it clean.

Monday, October 26, 2015

That's just not right, Pt 2.

With the hood back on the car, I could finally get started on the important part, the top side(although really since the top is just for decoration while the bottom actually provides the structure, it should be the other way around).  The "repairs" on the top of the hood are another exercise in how not to do things.  Instead of diving right in with my grinder, I used my DA to sand the paint off, exposing the "repairs" in all their "glory."

The first thing I noticed was that this hood has been painted FIVE TIMES.  I don't mean there were five coats of paint on it, there were five distinct base/clear layers.  I know the bumper skin was repainted because it's flaking in places.  I had no idea that the hood it's self had been repainted, much less five times.  All the damage I found was from the crash that wrecked it just before I got it, so I don't know why the hood was painted so many time.  Anyway, lets look at a picture, because you're all really here for the pictures, right?
One pic, lots of trouble...
1.  There is a crack here repaired with fiberglass.  As you can see, the fiberglass is laid OVER the paint.   Paint is not a suitable substrate for fiberglass.  It wasn't properly ground down, and will have adhesion issues.   The whole repair could literally pop off the part because the only thing holding it on is paint.
2.  Cracks filled with bondo.  They didn't even bother to grind out the crack on the right(that's the one we took an in depth look at a few posts back).  It's no wonder it recracked, there is no structure holding the crack together.
3.  Loose/delaminated fiberglass.  We'll take a closer look at this area later on
4.  In a one-two punch, here we have more fiberglass on top of paint, and more crackes just skimmed with bondo.
5.  A crack that was ground a bit, but not completely gone so the crack continued to spread.
6.  Fiberglass laid in without a proper bevel.  These are major cracks and in several areas the only thing the new 'glass is holding onto is the vertical edge of the old 'glass.  In time, these crack would reappear.

Here's a closer look at area 2, where the crack reappeared.  You can see there is nothing holding the cracks together but a bondo bandaid. It's a wonder that it lasted as long as it did before recracking.


Here's an up close look at area 3.  The impact from the crash caused some of the fiberglass to delaminate.  You can see the ragged dark edges towards the center of the pic where some fibers of the top layer of fiberglass broke loose from the rest of the sheet.  They were just skimmed with bondo.  This sort of damage may or may not ever develop into a full crack, but it will definitely cause paint adhesion problems as the broken layer of fiberglass can move independently of the rest of the sheet.  You can also see a myriad of still existing cracks under the fiberglass repair on the left side of the picture.


One more picture, because everyone likes pictures.  Area 4 is basically all the other problem areas combined in one area.  There is just so much wrong in this picture...