Showing posts with label 3D printing. Show all posts

Saturday, February 26, 2022

Some Lo-Point Love

I have a confession to make.  This might cost me some followers, but here goes.  I like Hi-Points.  There, I said it.  I especially like 3D printed Lo-Points because they're dirt cheap to put together from a Hi-Point parts kit.  I have a whopping $50 in this gun(and $20 of that was the magazine, and $10 was shipping).  Also, in a bit of irony, of all the 3D printed pistols I've made, this one has the nicest trigger by far.

I decided to dress up my Lo-Point a bit, because I can.  It is purely a cosmetic dress-up piece for an already printed frame. My frame is a Freeman1337 V2, it may fit original Hi-Point frames too, but I can't confirm since I don't have one to test. It fits my frame with my C9 parts kit, but YMMV. The inside of the "barrel" is sized for 3/4" copper plumbing tube(available at any hardware store). It may be fine without the copper tube installed, but the muzzle blast will probably erode the plastic fairly quickly. You may need to file the magwell to get drop free mags. The handguard piece gets glued to the bottom of the magwell and the nose piece attaches to the Pic rail on the frame with 6-32 screws so that the nose is still removable(I've heard rumors of people who actually clean their Hi-Points and it needs to be removable to get the slide off the frame).

Files are available for download here:  https://www.thingiverse.com/thing:5264553


Friday, December 24, 2021

SCR-ish update

It's funny how fast time gets away from you.  It's been almost two years since I stared my 3D printed SCR style bolt action AR project.  It seemed like I was always waiting for something and time kept creeping by.  In that time I've had a lot of people asking me for the files but I didn't have them ready yet.  None of the people that I gave the files to for beta testing followed through.  I also wasn't super happy with how the safety detent worked, so I wanted to do some more work on it.  I had enough parts to put together a 2nd one of my own, but didn't have the motivation. 

I've also been shopping around for another 22lr to plink with lately.  Then I saw Bear Creek's Black Friday ad advertising their new dedicated 22lr upper.  The lightbulb went off and I bought one.  My SCR style rifle was designed to be a bolt action because there was no room for an AR recoil system, and I wasn't super keen on replicating the real SCR's setup on a 3D printed receiver.  But, 22lr ARs don't need the stock recoil system, it's self contained in the upper.  So, I printed out the receiver and buttstock parts, and pinned on my brand new Bear Creek 22lr upper.  I've gotta say, this thing is great and a lot of fun to shoot.  The bolt/barrel setup is proprietary to Bear Creek, but the mags are CMMG and RTB compatible so mags are easy to get.  The optic is a $30 Amazon red/green dot because I love cheap optics on cheap guns.  I don't have a whole lot of rounds through it yet, and so far it's functioned flawlessly.  I hope to actually get the files posted on Weapons Guild by New Years.


PSG-Done

It happened again, I fell off the face of the internet.  Life, work, and whatnot.  Anyway, back to our regularly scheduled program.

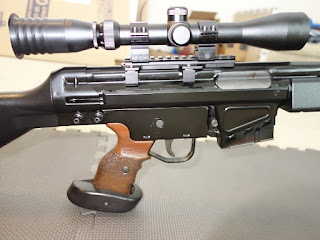
I actually finished the my PSG-1 clone, the PSG-None(because there are no actual PSG-1 parts on it), back in April.  I took the pictures, and then left them to stare at me from my desktop for the next 8 months.  To recap, this is an Apex CETME C kit and barrel on an RTG G3 receiver flat bent on the 3D printed jig I designed, PSG-1 style reinforcement rails made by me, with 3D printed PSG-1 style furniture designed and 3D printed by me.  This is a low dollar build and I've had good results with cheap optics before, so the scope is a $35 CV Life from Amazon with a 3D Printed TPU eye bellows.  I also converted a G3 UB training bolt to use with the DAG blue plastic training ammo(see details a few posts ago).  Without wasting any more words here's how it turned out(clamp on bi-pod just for pictures):


Years ago, I 3D printed a costume prop PSG-1 for a friend.  It wasn't overly accurate, but at the time I didn't really know any better.  Just for kicks here's a picture of the original print I did along with my actual rifle.


Saturday, March 6, 2021

Still falling...block

Just an update on my 3D printed falling block rifle.  I had a question on how strong the 3D printed barrel threads will be, or how much force it would take to blow the barrel forward out of the receiver.  Someone much smarter than me did the math on the thread shear strength using the rough numbers for PLA, and came up with a minimum of 6,815 lbf, with "ideal" threads giving me 13,583 lbf.  That's well over the amount of force that the DAG training ammo can generate.

I think I've got my design far enough along that I can make a test print.  I'm not sure what I want to do with the top of the handguard.  I don't really want a top handguard, but it looks like it's missing something without it.  I can't make the front of the receiver smaller or longer because of the barrel nut.  I like the Space Cowboy look, so I might end up with some sort of optic mount(my Savage Axis barrel doesn't have a front sight on it anyway).  


Monday, March 1, 2021

La Llama XV esta completa

I'm done with my little Llama XV 22lr.  After test firing, I cleaned the frame and painted it.  I tried something new with the paint, and I'm not really happy with how it turned out, but it will do for now.  I tried to replicate the nickel plating on the metal as best I could.  I use Rustolium Chrome spray paint and topped it with a matte clear.  It looks ok, but it didn't seem to stick to the print well and it chips super easy.  Next time I'll try a base coat of SEM Color Coat under the top coats because that stuff sticks to prints great.  The entire frame as well as the grip panels are 3D printed and here's how it turned out.  It's easy to forget just how small the Llama XV is when you see it alone in pics, so I included my partially printed full size 1911-ish in some of the pics for scale.


Sunday, February 21, 2021

Help! I'm falling... a 3D printed falling block rifle

New project time, because apparently I don't have enough projects going on...

Ever since I discovered the very low power plastic DAG 7.62x51/308 training ammo(10g plastic bullet with a total range of only 300 meters), I've been looking for projects to use it with.  I also decided that I wanted a lever gun of some sort, for no reason I can explain.  And, obviously if you're here, you know I do a lot of 3D printing.  So I decided to combine all three into a new project.  I'm going to 3D print a lever operated rifle specifically for the DAG training ammo.

I want to use as many 3D printed parts as I can, mostly because I don't feel like machining anything.  "Locked breech" and "3D print" don't generally go together, so I decided to go with a single shot falling block action because of it's high strength in a smaller size.  With a falling block, it's easy to get a whole lot of strength without having a massive receiver.  It's also a very simple action with very few parts(and if the print proves to be too weak, easy to replicate in metal).  I'm going to use an AR15 hammer/trigger, and a floating 1911 firing pin(mostly because I have all these parts on hand already).  The DAG training ammo has a smaller case head than standard cartridges, and the action is designed around that so standard 308 WILL NOT FIT.  For the barrel, I'm going to use one from a Savage because of the way it threads into the receiver with a locknut to adjust the headspace.  I'll also be using the 3D printed stock I designed for my SCR style project, mostly because I have it and it fits me well.

Still very much a work in progress, but here's how the action looks so far.  The "H" shape of the breech block gives me four locking lugs and a whole lot of surface area and shear area.  Napkin math using PLA numbers and the Lilja equation says that that the locking block should be able to handle 2100lb of bolt thrust with a safety factor of 2.  I have no idea how much power this training ammo has, but it's pretty wimpy, and for reference a 22LR makes about 900lbs of bolt thrust.  My biggest concern is that the case head might start crushing the plastic on the breechface, and if it does, I'll make a metal insert for it.

Here's how it looks with the breech closed and and ready to fire:

When the lever is opened, it pulls the block down, the nose of the lever then hits the extractor lever pulling the case out, and the block cams the hammer back to half cock(I'll cut a half cock notch into the AR hammer).  Once closed again, the hammer can be cocked the rest of the way with the new lever attached to it and sticking out the side of the receiver(which isn't ideal, but I can't come up with anything else that will work with the AR FCG).


Sunday, January 31, 2021

Llamas spit.

I finally got my 3D printed Llama frame to were I'm satisfied with it.  It took 11 tries to get it right.  On a normal 1911, I'd have printed a few, got it close, then fit the parts to the frame like you would with any new frame.  That wasn't an option here though because Llama parts are hard to come by and I can't afford to screw anything up so I basically had to fit the frame to the parts.  

I had a heck of a time with magazines too.  Llama mags are expensive, and I'm not positive that they would work because the Llama grip angle is slightly different from the standard 1911 frame my print is based off of.  I tried to make a printed one...and mags are hard...  I ended up using a Browning 1911-22 mag.  The Browning 1911-22 is a similar size to the Llama, but uses the standard 1911 grip angle.  I had to add a little clearance for the slide stop, and file out the mag catch slot a little to get it to lock it, but otherwise it works great!


It actually works...and I didn't lose any fingers!  I put about 30 rounds through it before tearing it all down for inspection.  I had some trouble with light strikes, about 1/4 of the rounds needed a second smack of the hammer to go off.  New mainsprings are completely unavailable, so I'll take it out and do some measuring to find a replacement.  Because of limited space and unavailable parts, the ejector is part of the printed frame.  Though I don't have many rounds through it, the ejector doesn't show any signs of damage from the shells hitting it.


Sunday, January 3, 2021

A 3D printed PSG-1 style furnature set for your CETME

I didn't use a punny title for this post because I'm an attention whore and a descriptive title will pop up better in Google searches.  This post is going to be all about the 3D printed stock set that I designed for my CETME based PSG-None project.  I'm going to assume that if you're here you know how to print and finish parts so I won't go into detail on that, but it's still going to be a long post(see my previous post on how to make your prints look like not prints HERE).  Also keep in mind that these are not identical to actual PSG-1 parts, they are just a close approximation.  The few necessary HK G3 parts(primarily the recoil assembly) are easy to get and fairly cheap as surplus.  It was actually cheaper to buy a used recoil assembly with a green surplus stock than it was to buy the recoil assembly alone.  This will also help with your 922r parts count too, as long as you print these in the US.

We'll start at the back and work our way forward.  The buttstock is made to work with a standard G3 recoil assembly, G3 recoil buffer, and wood stock G3 sling hardware.  I got surplus wood stock sling hardware kit from RTG.  It was much rustier that the pic, but was also cheap, so I cleaned up the parts and cold blued them.  I cut the pin tubes in half using a jewelers saw because the kerf is only .015" wide and wouldn't remove much material.  I used JB Weld to bond the hardware into the stock

The comb on the stock is adjustable.  The comb has a big tab on the bottom and the stock has a matching slot to keep things in alignment.  It's not spring loaded like a real PSG-1, but it doesn't really need to be.  It attaches and adjusts with a single 1/4" screw.  In this pic you can also see the two 1/2" holes in the back of the stock for some 1/2" hardwood dowels.  Superglue works best for gluing the dowels in place.  On the print, you'll probably have to chase the holes with a 1/2" drill bit for the dowels to fit.

I took some liberties with the buttpad and decided to attach it with screws instead of the spring clips found on real HKs.  The holes are sized for 10-24 countersunk screws.  It is also non-adjustable.  It's printed in Ninjaflex TPU flexible filament to help absorb some of the recoil.  The recoil assembly attaching holes are also sized for 10-24 screws, and it is made to also use the large screw that goes into the buffer from the back side.  Here's how it looks all together(I haven't decided how I want to finish the cheekrest yet, so it's still a raw print, and I need to replace the cheekrest bolt with a button head 1/4-20).


Next up is the pistol grip. The palm rest is adjustable for both height and angle.  You can see how I printed the textured part HERE.  It will probably take a little fitting to work with your trigger housing as CETME's aren't exactly known for their precision tolerances, and I've never tried it on a G3 lower.  The palm rest hole is sized for a 10-24 socket head screw, through on the left side, and threading into the right side.


The next piece isn't part of the stock, but it is printed so I'll include it with this set.  The real PSG-1 uses an expensive Hensoldt scope with a rubber bellows.  I am using a cheap scope, and it didn't look right without the bellows, so I made one.  It will fit on any scope with a 39mm diameter rear eyepiece.  It MUST be printed in TPU flexible material, otherwise you'll break your face when it recoils.  The file is made to print in Vase mode with 0 top/bottom layers so it's only 1 wall thick.  Any thicker than that and it will be too rigid.  It's also got a separate base piece that should be set to non-vase and 100% infill to be used with Cura's Per-Model settings, similar to how the fuzzy skinned grip above was set up.  If you want to be clever and not use the Per-Model method, you can sink the model so that the base flange below the bed, then use 10-15 brim lines on the print to get a similar, all be it thinner, result.

The last piece is the handguard.  The stock and grip will for with either HK or CETME rifles, but the handguard is CETME specific because they use different cocking tubes. This will also work with CETMEs that have the triple frame installed on the barrel if you want the MSG-90 look, or you just don't want to semi-permanently modify your pre-built rifle.  The handguard won't sit as far back on the receiver and may have a bit more wiggle in it, but it will still work. This thing is long enough that it gets printed in 3 pieces.  This handguard makes the barrel free floating(unless you have a triple frame installed).  The pieces of the handguard have holes in them for 1/4" hardwood dowel to align things and hold them together.  Like the stock, superglue is the best adhesive to use here.  Because I have a tendency to shoot until my gun is very hot, I bent up some aluminum sheetmetal to wrap around the inside and act as a heatshield so I don't accidentally melt my stock.  The handguard attaches to the cocking tube with a 1/4" countersunk screw, and an expanding wellnut wrapped in electrical tape inserted into the cocking tube.  It's not a great solution and I'll probably come up with something better in the future, I just haven't gotten that far yet.  If all else fails, a standard 1/4" nut can be JB Welded into the end of the cocking tube.


So, how's it look with everything assembled?  Not too bad.  A lot of little tweaks left to do, but it's mostly done at this point.  I still have to find or make a shorter 5rd mag for it(they are available, but spending $25 on a 5rd mag when surplus 20rd's are only $5 just grates against my cheapness).  I'm going to get some lower scope rings for it too, these tall ones are just what came with the scope and I just don't like them.  I still need to paint it obviously and that may take a while because it's too cold in the garage to paint, and the air compressor hose won't reach to the basement.  I haven't decided exactly which paint I'm going to use yet either, I think I might try something new.


Basic print settings:

Buttstock, grip pieces, and handguard:  7 walls and 15% Gyroid infill, Textured grip section Per-Model settings of 1 wall, 0 top/bottom layers, and Fuzzy Skin turned on.

Buttpad: I used Ninjaflex TPU with 4 walls and 15% infill. 

Scope bellows: TPU, vase mode, 0 top/bottom layers, Base flange Per-Model setting with Vase off and 100% infill.

Thingiverse link, finally:

https://www.thingiverse.com/thing:4787497


Saturday, January 2, 2021

Making your 3D prints look like...not prints

On all the other printed guns I've made, namely my SCR style bolt action AR, my half printed STI style 1911, and my VZ-61, I shamelessly left the 3D prints looking like 3D prints.  After all, that was the point, to make printed guns.  My PSG-None project is different though.  It's intended to be a "stand back and squint" clone of an HK PSG-1.  I'm using printed parts for all the furniture, but I don't want them to look like obviously printed parts.  

Since I have a variety of parts, I'm going to use a variety of techniques to finish them.  All my parts are printed in black so that if/when they get scratched or dinged up, they will scratch to black and it won't be visible.  If you print in bright orange and then paint it black, when scratched the bright orange will show through and be super obvious.

The first and most basic method is to just sand down your parts so that there are no more layer lines.  For this to work, your part has to be printed in the color you want, or you'll have to prime and paint after sanding.  I prefer just printing in color.  I always use wetsanding for plastics.  Dry sanding is fine for rough 80-120 grit paper, but any finer than that, and the sanding dust can melt from the friction and gum up your sandpaper.  For the palm rest on my PSG-none, I knocked it down with 80 grit dry, then wetsanded 320 and 600 grit(because that's what I had handy), then finished with a Mr. Clean Magic Eraser which is equivalent to 3,000 grit sandpaper.  There are still a few scratches showing because I'm lazy.  Since PLA is largely immune to most solvents, once dry I wiped it down with my preferred gun oil to "wet" the surface and make it a little darker.


The next method is very simple and kind of like magic.  I wanted to make some parts look like HK's textured molded plastic.  Normally this would be almost impossible to replicate, but I know of a product made just for that.  SEM 39853 Texture Coating is a spray on automotive product primarily aimed at auto repair stuff like textured plastic bumpers, dashboards, etc.  It's made specifically for plastics and bonds very well to PLA.  The first step is to knock down the high spots with 80 grit sandpaper, that's it.  If your print is clean, you don't even need to do that much, Texture Coating hides layer lines great.  

Next, spray on the SEM Texture Coating.  You can make a wide variety of textures from very fine to very rough, depending on how heavy you spray, and from what distance.  Once dry, it can be topped with paint of your choice.  My preference is SEM Colorcoat.  It's also an automotive oriented product and is made specifically for plastics, fabrics, and vinyl, and is very durable while still being flexible(if that's what you need).  It's durable enough that the steering wheel of my daily driver was painted SEM grey 7? years ago, and it hasn't worn off yet.

The last method I'm going to show is the hardest to do, and I am not very good at it.  I want to make the grip handle look like wood.  Some people are simply amazing at this technique, I...am not.  We'll be using artist's oil paints for it because they blend very well.  I started out with a base coat of brown spraypaint.  Once that was dry, I covered the textured part of my grip with a thin black wash to darken up the low spots in the texture.


Next is where the magic is supposed to happen, but again, I'm me.  Artists oils are basically just pigment suspended in Linseed oil, so they're not that much different from what you'd use on a wood stock.  A cheap set of oils is $13 at Hobby Lobby, and if you use their weekly 40% off coupon(downloadable on your phone straight from their website), you can get a set for $8.  Using a combination of Burnt Umber, Burnt Sienna, and Yellow Ochre, the idea is to basically paint on the woodgrain.  As I said, I am not good at this.  This was only my second attempt, and I'm colorblind, so that's a big help...  Since I suck at this game, my method was to basically just put on streaks of color and blend them out so it looked less uniform.  My brush strokes go the same direction as my print layer lines to help hide the print lines without having to sand them down.  The paint it's self isn't super durable so after a month or two(or more, raw Linseed oil takes forever to dry), it can be top coated with an oil based polyurethane for durability.  I'm not really satisfied with how this turned out, but I guess it will do(and the sharp streaks on the bottom will be covered by the palm rest shown above). 


Textured grips with Cura's Fuzzy Skin

Back to my PSG-None project for a bit.  The real PSG-1 pistol grip has stippling textured onto parts of it.  I could come up with some sort of bumpy surface to replicate this in Solidworks, but the face count would skyrocket, and it would seriously drag down the speed of my whole system.  Solidworks hates high face counts. 

Fortunately, there's a very simple solution: Cura has a "Fuzzy Skin" option buried in it's settings.  What it does is generate the skin of the object with random jitters so that it ends up looking rough and fuzzy looking instead of nice and smooth.  But, I don't want my whole grip to have this fuzzy skin, I want to replicate the asymmetrical texturing of the PSG-1 grip.  There's a way around it with another seldom used Cura feature: Per model settings.  This lets you place several models on the print bed and use different settings for each one.  

Basically, we're telling the machine to print two parts in the same place, at the same time, but with different print settings.  One part is the normal grip and prints like anything else would.  The 2nd part is set to only print the outer layer, using the "Fuzzy Skin" option.  It works because the plastic from the normal part melts in with the overlapping plastic from the "fuzzy" part.

That's what we're going to do here, create two models, one of the complete grip, one of just the grip section that we want textured.  To make the fuzzy grip section I just copied the grip, then hacked away the parts I didn't want.  Here are the two parts in Solidworks:

Once that's done, both models are loaded into Cura.  We set the settings that we want to use, then merge the models so they print as one piece.  I'm not going to go over exactly how to use the Per Model settings here because there are some great Youtube how-to's that can do it faster and better.  The important thing is that on your fuzzy grip section model, turn on Fuzzy Skin, set it to 1 wall, and 0 top/bottom layers.  This will print a fuzzy skin outer wall on top of whatever your main model settings are set to.  When it's done printing, here's how it will look, textured where we want, smooth where we don't:


Sunday, December 13, 2020

Llama XV progress

I'm now on V3 of my baby Llama frame.  Every iteration of this thing gets several changes and at this point my Solidworks feature tree is just a mess.  With V3, everything fits and the action hand cycles and resets like it should.  The problem now is that the safeties don't work.  It wouldn't be that big a deal, but the way it is now the thumb safety can slide up into the notch on the slide, locking the slide closed while still being able to fire.  If this happened, I think the force of the slide would blow the safeties off the back of the frame, and my hand would have a really bad day.  So back to the virtual drawing board to try to get the safeties to work.  Here's how it looks so far with everything assembled, standard 1911 magazine included for size reference: