In true Jeff fashion, I picked the easiest crack on the Viper's hood to fix first. I started with the innocuous looking little crack high up on the hood. You all remember this guy:
It doesn't look look like much, just a short bit of cracked fiberglass. Removing the paint reveals the truth:
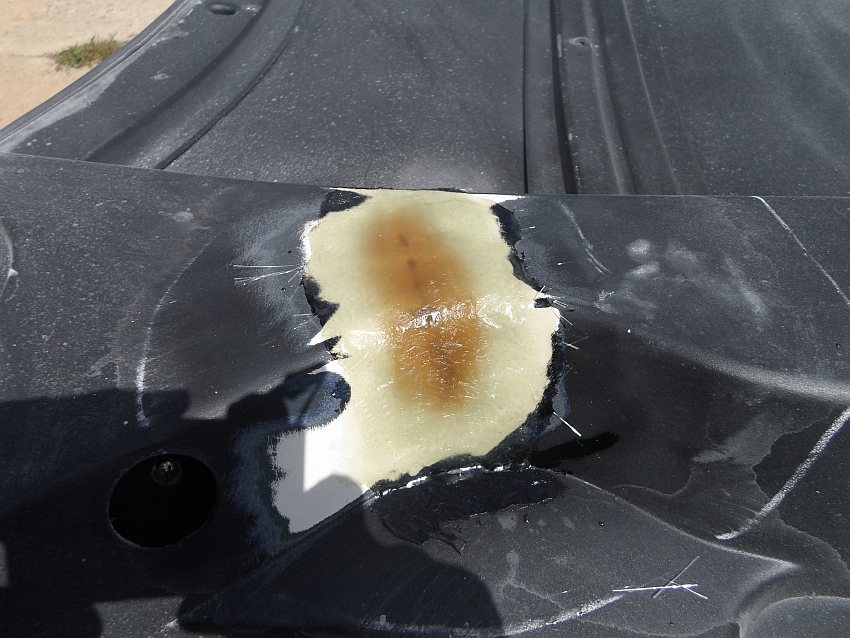
With the paint removed, the true extent of the crack can be seen. It extends half an inch further down, and an inch further across the top than was visible with the paint there. Further, the crack branches out towards the bottom. This is one area where a lot of fiberglass novices make their first mistake. They don't fully investigate the extent of the crack. If I had just ground and filled the visible crack, fully 1/3 of the crack(the hidden parts under the paint) would not have been fixed, and the crack would have kept spreading after it was "repaired." In order to properly repair the area, the whole crack MUST be ground out.
The whole repair area is about 4" wide at this point, and you can see how the ground area is beveled down to the crack it's self. The areas of the crack it's self that are still "solid" are in fact paper thin. They are there just to serve as a backing to hold the new fiberglass. What's left of the actual crack is thin enough that resin will drip down through it. Since all fiberglass repair relies on mechanical adhesion, the original 'glass is ground with a 36 grit disc to give the new resin some "tooth" to grab on to(I also ground it down further after I took the pic).
This step is the reason why so many fiberglass "repairs" crack again. Many people not familiar with fiberglass repair will just grind into the crack some and 'glass over it(or even worse, just fill it with kitty hair or bondo). By doing that you're just covering it up, not actually fixing it.
Think of it like this: You can tape over your door seams, and the side of the car will look smooth. But, there is still a giant seam between the door and the body, and the door can still easily be opened. Just because you can't see the seam anymore doesn't mean it's not there, and just because it's not visible doesn't mean it's solidly immovable. Cracked fiberglass works the same way. If you don't completely remove the crack, the two broken halves will continue to flex independently, eventually causing the "repair" to crack again.
As I mentioned before, I'm using Evercoat's SMC resin. I've decided I like it for one reason: it doesn't use standard fiberglass hardener. Unlike standard resin which uses MEKP as a catalyst, the SMC resin uses the same cream hardener that bondo uses. Tangentially related fun fact: the chemical in bondo hardener that does the catalyzing is Benzoyl Peroxide, which is also the active ingredient in Clearasil and other acne fighting products. The reason I bring up the hardener is because it makes the resin much easier to use than standard resin. The MEKP catalyst used in standard fiberglass resin is a clear liquid. Because of this, there is no good way to tell when you've got the resin and hardener and mixed well enough. Because the SMC resin uses creme hardener instead(in either red, white, or blue), it's very easy to tell when you've got it mixed well enough. I've also found that the resin starts to change color as it catalyzes, giving you a warning that you've only got a few more minutes to work.
I built up the repair area with several layers of fiberglass. You can see because of the coloring how much thicker it gets towards the center of the repair area. It's built up to slightly above the original surface so it can later be taken down to the correct height. Because the bottom of the hood is more structural than cosmetic(and the hood pad covers much of it), the 'glass will be left at the finish height, any bondo that is used is more for filling pinholes in the fiberglass, and less for cosmetic flatness.
We now have the first crack properly repaired. Only a few dozen more, and we can put the hood back on...
Sunday, September 6, 2015
Thursday, September 3, 2015
Just some quick tips
Just some quick tips about working with fiberglass for today. The first tip I have to share is to wear latex gloves when working with it. When I started the Viper's bodywork, I called it "The long and itchy road." As anyone who's ever actually worked with fiberglass will tell you, it can be a very itchy process. Fiberglass is called fiberGLASS because the cloth is literally microscopic strands of glass woven together. Your car or boat is literally made from the same material as the windows in your living room. While most people tend to thing of glass as solid, it's not. When you get it thin enough, it becomes very flexible which is why fiberglass cloth doesn't just shatter when you bend it. When you work with it, particularly when grinding, the air is filled with tiny glass shards that can get embedded in your skin. It doesn't cause any harm, but can itch like crazy. Gloves will help cut down on the itching a ton. Additionally, you don't want to breathe too much of it. Just like doing the occasional brake job won't give you mesothelioma, occasional fiberglass work and breathing in small quantities won't cause permanent damage, but you still want to avoid breathing it when you can. For heavy grinding or sanding, a dust mask is a good idea. It's also a good idea to have some "fiberglass working clothes" that you can take off immediately after you get in the house. You don't want to track itchy dust all over the place.
Speaking of dust, fiberglass and bodywork work tend to make a lot of it. Ideally, you want yo do your grinding and sanding outside on a breezy day so you're not working in a cloud of dust. Outside on a breezy day isn't always an option though. Either the weather won't cooperate or, like with my current project, I can't physically get the hood out of the garage by myself. This is where being popular helps. I always put my biggest fan right next to where I'm working. It'll blow the dust away from where I'm working, and (mostly) out of the garage.
Next is the matter of Post Curing. People think of fiberglass as an immovable solid, but it's not. Fiberglass can, and will, move all over the place, particularly as it's curing. Left on it's own, fiberglass can take weeks, or even months to fully cure and settle down to it's final shape. Even "fully cured" fiberglass will move a bit more on it's first day in the hot sun. This is where post curing comes in. While it's not so important on the bottom of a hood, on exterior panels, it's critical. Since we don't have the time to wait, we can speed things along in helping the 'glass take it's final set. The idea is to raise the temperature of the 'glass to speed up any remaining curing. Ideally, you want the glass to get up to 140°F, and stay at that temperature for a few hours. The sun works great, but isn't always available. Infrared heaters are the next best thing, but most people don't have access to those either. What a lot of people do have is halogen lights. Just set up your halogen light shining on the panel. If the light is too far away, the panel won't heat up enough. If it's too close, the panel will overheat. Find the best distance for your light to heat and hold the panel at 140°F. Since these lights are generally small, and the panel shape is complex, you should move it around every few hours so all the new glass gets baked.
Incidentally, this is the reason so many kit cars have such low quality panels. Even if the mold is straight, the parts are demolded too soon after laying up, and then are shipped out without post curing. This leads to very friendly panels that wave at everything. It's also why so many fiberglass cars with fresh bodywork look great this year, but terrible next year. When I was building kit cars for a living, we would let new parts sit in the mold for at least a week, usually longer, and then spend another week post curing them.
The last tip I have is of "don't burn your house down" importance. First off, always test your mixture before actually starting the repair. Mix up a batch of resin, and make sure it cures. Liquid fiberglass hardener in particular goes bad quickly after it's been opened, so I ALWAYS use a fresh tube of hardener if mine has been open more than a few days. Trust me, you don't want to have to peel off and re-do partially set fiberglass because your hardener failed and it won't fully cure.
Second, all compounds where you mix part A with part B to cause curing are exothermic. That means that they give off heat as they start to cure. Fiberglass, bondo, JB Weld, 5 min epoxy, etc, all produce heat as they cure. The amount of heat is determined by how fast they cure, and how thick the mass(thicker means more heat). If over catalyzed, fiberglass resin and epoxy especially can get tremendously hot as they cure. I tend to mix my resin a little "hot"(with too much hardener) to make sure it kicks off OK. I have, a time or two, mixed resin so hot that it's started smoking. It won't get that hot on the panel because the resin layer is relatively thin, but it will get that hot in the mixing cup. NEVER NEVER NEVER throw away mixed resin until it's cured and back to room temperature. It could start your garbage can on fire. Always set the cup on something non-flammable and non-meltable because that too can cause issues. Here's an example from this project. The bottom of this cup was flat when the resin was mixed. As it cured, it got hot enough to warp and melt the bottom of the cup.
Speaking of dust, fiberglass and bodywork work tend to make a lot of it. Ideally, you want yo do your grinding and sanding outside on a breezy day so you're not working in a cloud of dust. Outside on a breezy day isn't always an option though. Either the weather won't cooperate or, like with my current project, I can't physically get the hood out of the garage by myself. This is where being popular helps. I always put my biggest fan right next to where I'm working. It'll blow the dust away from where I'm working, and (mostly) out of the garage.
Next is the matter of Post Curing. People think of fiberglass as an immovable solid, but it's not. Fiberglass can, and will, move all over the place, particularly as it's curing. Left on it's own, fiberglass can take weeks, or even months to fully cure and settle down to it's final shape. Even "fully cured" fiberglass will move a bit more on it's first day in the hot sun. This is where post curing comes in. While it's not so important on the bottom of a hood, on exterior panels, it's critical. Since we don't have the time to wait, we can speed things along in helping the 'glass take it's final set. The idea is to raise the temperature of the 'glass to speed up any remaining curing. Ideally, you want the glass to get up to 140°F, and stay at that temperature for a few hours. The sun works great, but isn't always available. Infrared heaters are the next best thing, but most people don't have access to those either. What a lot of people do have is halogen lights. Just set up your halogen light shining on the panel. If the light is too far away, the panel won't heat up enough. If it's too close, the panel will overheat. Find the best distance for your light to heat and hold the panel at 140°F. Since these lights are generally small, and the panel shape is complex, you should move it around every few hours so all the new glass gets baked.
Incidentally, this is the reason so many kit cars have such low quality panels. Even if the mold is straight, the parts are demolded too soon after laying up, and then are shipped out without post curing. This leads to very friendly panels that wave at everything. It's also why so many fiberglass cars with fresh bodywork look great this year, but terrible next year. When I was building kit cars for a living, we would let new parts sit in the mold for at least a week, usually longer, and then spend another week post curing them.
The last tip I have is of "don't burn your house down" importance. First off, always test your mixture before actually starting the repair. Mix up a batch of resin, and make sure it cures. Liquid fiberglass hardener in particular goes bad quickly after it's been opened, so I ALWAYS use a fresh tube of hardener if mine has been open more than a few days. Trust me, you don't want to have to peel off and re-do partially set fiberglass because your hardener failed and it won't fully cure.
Second, all compounds where you mix part A with part B to cause curing are exothermic. That means that they give off heat as they start to cure. Fiberglass, bondo, JB Weld, 5 min epoxy, etc, all produce heat as they cure. The amount of heat is determined by how fast they cure, and how thick the mass(thicker means more heat). If over catalyzed, fiberglass resin and epoxy especially can get tremendously hot as they cure. I tend to mix my resin a little "hot"(with too much hardener) to make sure it kicks off OK. I have, a time or two, mixed resin so hot that it's started smoking. It won't get that hot on the panel because the resin layer is relatively thin, but it will get that hot in the mixing cup. NEVER NEVER NEVER throw away mixed resin until it's cured and back to room temperature. It could start your garbage can on fire. Always set the cup on something non-flammable and non-meltable because that too can cause issues. Here's an example from this project. The bottom of this cup was flat when the resin was mixed. As it cured, it got hot enough to warp and melt the bottom of the cup.
Sunday, August 30, 2015
Right on point
This is just a small update to the EBR(If you haven't been following along, it's an "AR styled" Mossberg 715T 22LR, really just a 702 Plinkster is a plastic shell). The factory open sights on the 715T are OK, but not great. I decided early on to add some optics. I didn't want a scope, but I wanted something. I decided to go with a "red dot" or "holographic" sight. Since it's a cheap gun, I went with a cheap sight, an AIM sight I got on Amazon for around $35. The rail it's sitting on came with the gun, and is hollow so you can still see the iron sights under the holo sight.
If you've never looked through a holographic sight, they're pretty neat. It's kind of like having a laser sight, except that it doesn't project a dot on the target. The big hoop has a piece of glass in it, and a reticle is projected onto the glass. It can only be seen if you're looking straight through the sight from the back.
You can look through it with both eyes open and have nearly completely unobstructed vision. It's supposed to help with fast target acquisition. I've actually has it since shortly after I got the gun, I just forgot to post about it. Even the pics are old. It's worked very well for me in the past few years(especially for $35).
If you've never looked through a holographic sight, they're pretty neat. It's kind of like having a laser sight, except that it doesn't project a dot on the target. The big hoop has a piece of glass in it, and a reticle is projected onto the glass. It can only be seen if you're looking straight through the sight from the back.
You can look through it with both eyes open and have nearly completely unobstructed vision. It's supposed to help with fast target acquisition. I've actually has it since shortly after I got the gun, I just forgot to post about it. Even the pics are old. It's worked very well for me in the past few years(especially for $35).
Saturday, August 29, 2015
Crack? You want some crack?
I'm still not entirely sure how I want to tackle the Viper's cracked
quarter panel yet, so the next stop on the Itchy Road is the hood. The hood on this car is a case study on how not to fix fiberglass. Since I have so much experience with fiberglass, I knew what I had to work with when I first saw the car. But, a lot of it might have gone unnoticed to the average car person. To the untrained eye, it didn't look too bad, just a few cracks and some shoddy bodywork. A little cracking around one of the headlights:
Some tiny cracks around the scoop:
And this crack right here. This crack is very telling, and hints at the real extent of the damage. The important key here is that this crack appeared in an already repaired portion of the hood. It was not there when I got the car, but has appeared in the two years I've been driving it. This is a huge giveaway that it was not repaired properly the first time. I automatically assumed when I got the car that I would have to redo all the work that had been previously done. This crack confirms it.
Under the Plasti-Dip, you can see more of the previous repair. Like the crack on the front edge, the sink marks weren't there when I got the car. Remember last post when I said standard primer surfacer shrinks? Here's visible proof. Standard two part urethane primer surfacers are still 25%-50% solvent, and it can take months for all the solvent to finally evaporate and for the primer stop shrinking. The thicker you put it on, the more it shrinks (which is why I love the virtually shrinkless Duratec). If you were to rush into paint, you'd now have these giant sink marks in your nice shiny paint.
That pretty much covers the top of the hood. The bottom side is also cracked. Even if I didn't have the visible cracks on the bottom of the hood, the crack appearing on the front edge tells me there's structural damage to it that needs to be fixed. So, off the hood had to come. It's not overly heavy, just big and awkward. You have no idea how hard it was to not drive the car through town like this...
Like I said, the bottom of the hood is cracked. But, it's not just cracked, it's cracked. I pulled the hood liner, and it's a good thing I did. The bottom of the hood is covered in cracks, many of them in the previously "repaired" areas, and many of them hiding under the hood liner.
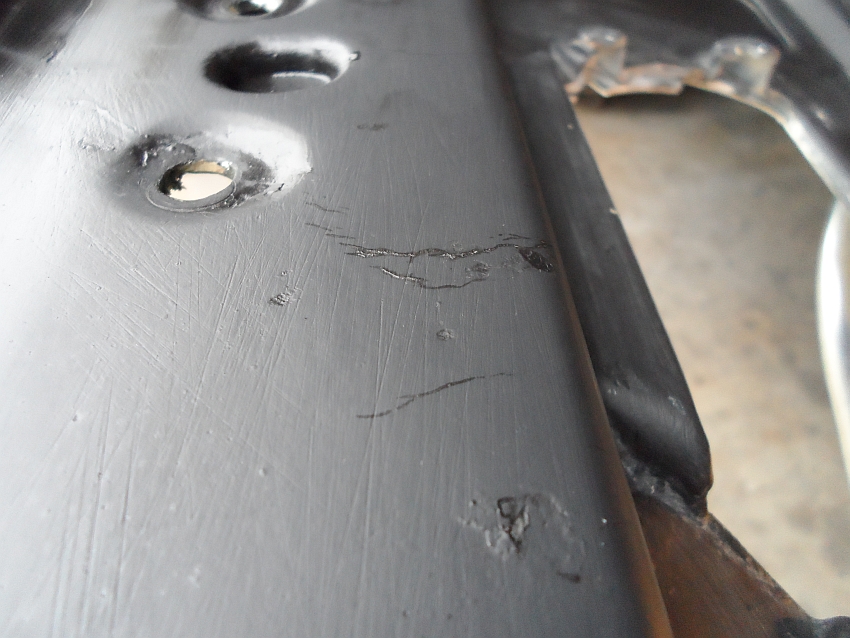
One of the previously "repaired" areas, cracked once again.
Just above where the hood hinge bolts on. Both sides are cracked in this area.
The cracks in the end of this groove are directly under where the top side of the hood cracks from improper closing. I can't help but wonder if the groove creates a weak point that makes the hood flex more there and crack.
Another one of the previously "repaired" areas, with new cracks.
You can just see a horizontal crack just below the hood latch hook in a "repaired" area.
And this one way up here towards the top of the hood, for no apparent reason...
Many of the cracks are visibly bright white, so they're easy to spot. They're white because the broken edges of fiberglass vibrate against each other while driving, creating dust which then migrates out of the crack. But, not all cracks are so cooperative. There's an easy way to check for the less visible cracks too. A simple wipe down with mineral spirits will do. Wipe down the panel with a heavy dose of mineral spirits, then wipe it mostly dry. As the final bits of mineral spirits evaporates, any hidden cracks will seep mineral spirits onto the dry panel, making any small cracks show up. This is another one of the "repaired" areas:
All in all, there were 27 major cracks visible on the bottom side of the hood, and dozens more minor ones. Many were in areas that had already been "fixed." This is why when working with fiberglass, it's imperative to find a bodyshop that knows what they're doing. Had this car been finish bodyworked and painted, it would now need to be done again, and $10K worth of body and paint work would have basically been thrown away. Based on what I had seen with the hood on the car, I had expected the bottom of the hood to take a weekends worth of work. Turns out the damage is far more extensive than I thought...
Some tiny cracks around the scoop:
And this crack right here. This crack is very telling, and hints at the real extent of the damage. The important key here is that this crack appeared in an already repaired portion of the hood. It was not there when I got the car, but has appeared in the two years I've been driving it. This is a huge giveaway that it was not repaired properly the first time. I automatically assumed when I got the car that I would have to redo all the work that had been previously done. This crack confirms it.
If you remember way back, I painted over the striped portion of the primer spot with Plasti-Dip. It was a surprisingly effective way to hide the primer. With the stripes unbroken, the casual passer by didn't notice the primer. As I explained a bit then, aside from the zero prep work Plasti-Dip requires, one of the main reasons I used Plasti-Dip was it's easy removability. When you decide you don't want it there anymore, you literally just peel it off:
Under the Plasti-Dip, you can see more of the previous repair. Like the crack on the front edge, the sink marks weren't there when I got the car. Remember last post when I said standard primer surfacer shrinks? Here's visible proof. Standard two part urethane primer surfacers are still 25%-50% solvent, and it can take months for all the solvent to finally evaporate and for the primer stop shrinking. The thicker you put it on, the more it shrinks (which is why I love the virtually shrinkless Duratec). If you were to rush into paint, you'd now have these giant sink marks in your nice shiny paint.
That pretty much covers the top of the hood. The bottom side is also cracked. Even if I didn't have the visible cracks on the bottom of the hood, the crack appearing on the front edge tells me there's structural damage to it that needs to be fixed. So, off the hood had to come. It's not overly heavy, just big and awkward. You have no idea how hard it was to not drive the car through town like this...
Like I said, the bottom of the hood is cracked. But, it's not just cracked, it's cracked. I pulled the hood liner, and it's a good thing I did. The bottom of the hood is covered in cracks, many of them in the previously "repaired" areas, and many of them hiding under the hood liner.
One of the previously "repaired" areas, cracked once again.
Just above where the hood hinge bolts on. Both sides are cracked in this area.
The cracks in the end of this groove are directly under where the top side of the hood cracks from improper closing. I can't help but wonder if the groove creates a weak point that makes the hood flex more there and crack.
Another one of the previously "repaired" areas, with new cracks.
You can just see a horizontal crack just below the hood latch hook in a "repaired" area.
And this one way up here towards the top of the hood, for no apparent reason...
Many of the cracks are visibly bright white, so they're easy to spot. They're white because the broken edges of fiberglass vibrate against each other while driving, creating dust which then migrates out of the crack. But, not all cracks are so cooperative. There's an easy way to check for the less visible cracks too. A simple wipe down with mineral spirits will do. Wipe down the panel with a heavy dose of mineral spirits, then wipe it mostly dry. As the final bits of mineral spirits evaporates, any hidden cracks will seep mineral spirits onto the dry panel, making any small cracks show up. This is another one of the "repaired" areas:
All in all, there were 27 major cracks visible on the bottom side of the hood, and dozens more minor ones. Many were in areas that had already been "fixed." This is why when working with fiberglass, it's imperative to find a bodyshop that knows what they're doing. Had this car been finish bodyworked and painted, it would now need to be done again, and $10K worth of body and paint work would have basically been thrown away. Based on what I had seen with the hood on the car, I had expected the bottom of the hood to take a weekends worth of work. Turns out the damage is far more extensive than I thought...
Tuesday, August 18, 2015
The long and itchy road
I've been putting this off for two and a half years. I have to fix the body on the Viper. It's not a huge task, but a big one. The fiberglass bodywork is cracked in several places, some of them quite severely. An attempt had been made by the previous owner to fix the hood, but(unsurprisingly), the repairs cracked. That's not unexpected, I assumed that I'd have to grind out and redo that work anyway. The body damage is what made this car so cheap(relatively speaking anyway). To pay a shop to do the work would likely be $10K plus. Conveniently, I used to build kit cars for a living, so I know a thing or two about working with fiberglass.
The plan is to get the primary bodywork done this year, then paint it next summer. I have a good reason for this. Bodywork of any type will shrink a bit, fiberglass especially so. By waiting to paint it, the fresh bodywork will have several months to fully cure and shrink as much as it's likely going to. To prepare for bodywork, I haven't waxed the car all year, and I washed it repeatedly with Dawn dish soap. This should have left the surface free of wax buildup that would cause problems down the road. The repair area also gets wiped down with Wax and Grease remover.
I decided to start with the easiest repair since it didn't involve actually taking anything off the car. The passenger side quarter panel had a crack in the forward edge. It doesn't really look like much, just some chipped paint and a hint of a crack:
But, it's more damaged than it appears. Using just a pick and a knife, I broke out all the loose 'glass surrounding the damage. This is just the stuff that was already broken loose from the underlying fiberglass. You can see how much was actually damaged.
Up next is the best(or worst) part, taking a grinder to one of the best sports cars America's ever produced. To repair cracked fiberglass, you MUST grind out the whole crack. You can't just bridge across it with more fiberglass. If you do not completely grind the crack away, it WILL show up again down the road. I used my trusty Harbor Freight 7" grinder with a 24 grit disk. It's an astonishingly good grinder for what it cost, and has served me very well over the years.
You want to grind the crack completely out, and grind back the surrounding area where you'll be laying on new 'glass. With a grinder this big and a disk this aggressive, you've got to be careful not to grind too far.
Then we have to lay in some new fiberglass. Body filler alone, even fiberglass reinforced filler, wouldn't be strong enough and would likely crack again at some point. We also need to re-bond the fibers that have broken loose but aren't broken off, and bondo alone won't do that. Additionally, the Viper's body panels are made from SMC. It's still fiberglass, but a slightly different kind than you're used to. Because of this, you can't use standard fiberglass resin, it won't stick well. According to Evercoat, it's because of the mold release built into the SMC's resin. You either need to use epoxy resin, or an SMC specific polyester resin. I'm using Evercoat's SMC Fibreglass Resin. You also want to use fiberglass mat, not the woven cloth. The reason is that if/when it does shrink, you won't really notice the random pattern of the mat. If you use cloth and it shrinks, the square weave showing through will be very obvious. I put on a few layers of 'glass, adding more to build up the corner that was ground away. The tape comes in handy here, it'll help keep you from getting resin on things you don't want resined.
The repair goes all the way to the unground paint. Normally you wouldn't want to put resin over shiny paint because the resin won't stick well to it, but it doesn't matter in this case because that whole area will be ground back past that point anyway.
Up next, we get to use one of my all time favorite bodyworking products. My most favorite is SEM Color Coat plastic/vinyl/fabric paint. My second most favorite is this stuff, Duratec primer surfacer:
It's made specifically for fiberglass, and is essentially a sprayable catalyzed gelcoat(it also works fantastic on metal too). It's basically fiberglass resin with a lot of solid binders in it, and it catalyses with fiberglass hadener. Unlike most primer surfacers, it has virtually zero shrink. You can basically put it on as thick as you want, and it will work just fine. Duratec even says a build of .040" is acceptable. At $100/gallon, it's comparatively cheap too. Because it's made specifically for fiberglass, it will help seal the fresh 'glass better than most products will. Using my trusty grinder, I ground down the new 'glass until it was below my final surface height, then covered it with Duratec. I didn't spray it on for this part. Because it doesn't shrink, and most of it will get sanded off anyway, I put it on with a brush. Seriously. It works just fine that way and is much easier to deal with(less masking, less cleanup, etc).
One of the reasons I love Duratec is that it sands super easy and doesn't clog the paper. After knocking down the high spots in the Duratec with 80 grit paper, it was on to bondo. Like kleenex and sawzall, bondo, even though a brand name, has become the generic term for body filler. Bondo brand bondo is actually one of the worst fillers on the market. Granted, it's better than it used to be, but it's still not great. It sands like a rock, it absorbs moisture like a sponge, and it cracks easier than most other fillers. For just a few more bucks a gallon, you can get much better products. I'm using Evercoat Rage Gold. It goes on smooth, and it sands like nothing. I roughed it in with 80 grit, then finished with 220. The Rage Gold sands well enough that I didn't need any intermediate grits.
When doing bodywork, you always want to use the longest sanding block possible. Too short of a block can leave waves, and avoid hand sanding at all costs because you'll leave waves and finger grooves. I used primary an 8" sanding block for this small area. If you're new to bodywork, do not use power tools. Making panels flat with a hand block takes skill and practice. Making panels flat with power tools is nearly impossible. It's far too easy to sand too much off with power sanders, and you're likely to get waves and ripples that you won't be able to feel, but will see in the final paint. You can see in the pic that our repair area is spreading too. The repair needs to be feathered out into the non-damaged area to get a perfect blend.
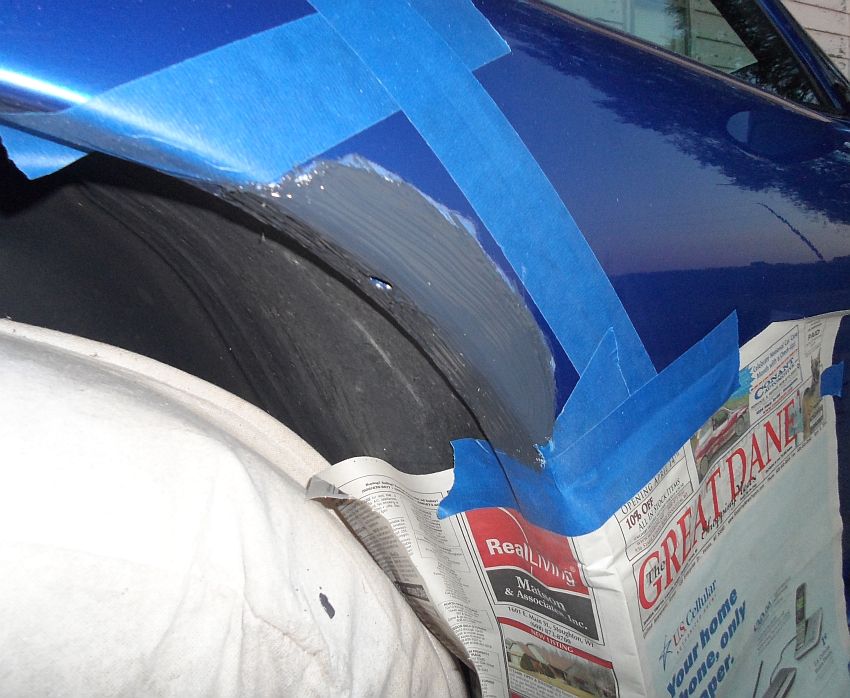
After two coats of bondo, I was satisfied with the repair. Body filler will absorb moisture(which is why you should never wet sand it). It's less of an issue on fiberglass because the underlying panel can't rust, but it's still an issue. Many 2K primer surfacers will absorb moisture too. Since we don't want that happening, and the car won't be painted until next year, we once again turn to our good friend Duratec. It's completely waterproof, and will seal the bodywork. This time though, I did spray it. You'll notice I sprayed out past the repair and over shiny paint. Normally, you wouldn't want to do this, because the primer won't stick well to the shiny paint. But, this isn't a usual case. When I do the final bodywork just before paint, it will be block sanded down closer to the repair area, and the whole panel will be primered. The Duratec now is primarily for protection from the elements. You can see I did much more making this time too. My HVLP guns don't have that much overspray, but it's easier to do a little extra masking than clean off overspray.
Another thing with Duratec, since it's catalyzed like fiberglass resin, you MUST IMMEDIATELY CLEAN YOUR PAINT GUN. When properly mixed, Duratec sets up in 20 minutes or so. Once it's set, it's set. Unlike standard 2K paints and primers, there is nothing that will dissolve it. If it sets in your paint gun, you'll be buying a new paint gun.
With the Duratec set, I could unmask everything. I'm left with a repair that's 95% finished, and completely weatherproof so I can still drive my car. It took me a weekend of not working very hard to do this repair. The hood and left quarter are next, they'll be much more involved...
The plan is to get the primary bodywork done this year, then paint it next summer. I have a good reason for this. Bodywork of any type will shrink a bit, fiberglass especially so. By waiting to paint it, the fresh bodywork will have several months to fully cure and shrink as much as it's likely going to. To prepare for bodywork, I haven't waxed the car all year, and I washed it repeatedly with Dawn dish soap. This should have left the surface free of wax buildup that would cause problems down the road. The repair area also gets wiped down with Wax and Grease remover.
I decided to start with the easiest repair since it didn't involve actually taking anything off the car. The passenger side quarter panel had a crack in the forward edge. It doesn't really look like much, just some chipped paint and a hint of a crack:
But, it's more damaged than it appears. Using just a pick and a knife, I broke out all the loose 'glass surrounding the damage. This is just the stuff that was already broken loose from the underlying fiberglass. You can see how much was actually damaged.
Up next is the best(or worst) part, taking a grinder to one of the best sports cars America's ever produced. To repair cracked fiberglass, you MUST grind out the whole crack. You can't just bridge across it with more fiberglass. If you do not completely grind the crack away, it WILL show up again down the road. I used my trusty Harbor Freight 7" grinder with a 24 grit disk. It's an astonishingly good grinder for what it cost, and has served me very well over the years.
You want to grind the crack completely out, and grind back the surrounding area where you'll be laying on new 'glass. With a grinder this big and a disk this aggressive, you've got to be careful not to grind too far.
Then we have to lay in some new fiberglass. Body filler alone, even fiberglass reinforced filler, wouldn't be strong enough and would likely crack again at some point. We also need to re-bond the fibers that have broken loose but aren't broken off, and bondo alone won't do that. Additionally, the Viper's body panels are made from SMC. It's still fiberglass, but a slightly different kind than you're used to. Because of this, you can't use standard fiberglass resin, it won't stick well. According to Evercoat, it's because of the mold release built into the SMC's resin. You either need to use epoxy resin, or an SMC specific polyester resin. I'm using Evercoat's SMC Fibreglass Resin. You also want to use fiberglass mat, not the woven cloth. The reason is that if/when it does shrink, you won't really notice the random pattern of the mat. If you use cloth and it shrinks, the square weave showing through will be very obvious. I put on a few layers of 'glass, adding more to build up the corner that was ground away. The tape comes in handy here, it'll help keep you from getting resin on things you don't want resined.
The repair goes all the way to the unground paint. Normally you wouldn't want to put resin over shiny paint because the resin won't stick well to it, but it doesn't matter in this case because that whole area will be ground back past that point anyway.
Up next, we get to use one of my all time favorite bodyworking products. My most favorite is SEM Color Coat plastic/vinyl/fabric paint. My second most favorite is this stuff, Duratec primer surfacer:
It's made specifically for fiberglass, and is essentially a sprayable catalyzed gelcoat(it also works fantastic on metal too). It's basically fiberglass resin with a lot of solid binders in it, and it catalyses with fiberglass hadener. Unlike most primer surfacers, it has virtually zero shrink. You can basically put it on as thick as you want, and it will work just fine. Duratec even says a build of .040" is acceptable. At $100/gallon, it's comparatively cheap too. Because it's made specifically for fiberglass, it will help seal the fresh 'glass better than most products will. Using my trusty grinder, I ground down the new 'glass until it was below my final surface height, then covered it with Duratec. I didn't spray it on for this part. Because it doesn't shrink, and most of it will get sanded off anyway, I put it on with a brush. Seriously. It works just fine that way and is much easier to deal with(less masking, less cleanup, etc).
One of the reasons I love Duratec is that it sands super easy and doesn't clog the paper. After knocking down the high spots in the Duratec with 80 grit paper, it was on to bondo. Like kleenex and sawzall, bondo, even though a brand name, has become the generic term for body filler. Bondo brand bondo is actually one of the worst fillers on the market. Granted, it's better than it used to be, but it's still not great. It sands like a rock, it absorbs moisture like a sponge, and it cracks easier than most other fillers. For just a few more bucks a gallon, you can get much better products. I'm using Evercoat Rage Gold. It goes on smooth, and it sands like nothing. I roughed it in with 80 grit, then finished with 220. The Rage Gold sands well enough that I didn't need any intermediate grits.
When doing bodywork, you always want to use the longest sanding block possible. Too short of a block can leave waves, and avoid hand sanding at all costs because you'll leave waves and finger grooves. I used primary an 8" sanding block for this small area. If you're new to bodywork, do not use power tools. Making panels flat with a hand block takes skill and practice. Making panels flat with power tools is nearly impossible. It's far too easy to sand too much off with power sanders, and you're likely to get waves and ripples that you won't be able to feel, but will see in the final paint. You can see in the pic that our repair area is spreading too. The repair needs to be feathered out into the non-damaged area to get a perfect blend.
After two coats of bondo, I was satisfied with the repair. Body filler will absorb moisture(which is why you should never wet sand it). It's less of an issue on fiberglass because the underlying panel can't rust, but it's still an issue. Many 2K primer surfacers will absorb moisture too. Since we don't want that happening, and the car won't be painted until next year, we once again turn to our good friend Duratec. It's completely waterproof, and will seal the bodywork. This time though, I did spray it. You'll notice I sprayed out past the repair and over shiny paint. Normally, you wouldn't want to do this, because the primer won't stick well to the shiny paint. But, this isn't a usual case. When I do the final bodywork just before paint, it will be block sanded down closer to the repair area, and the whole panel will be primered. The Duratec now is primarily for protection from the elements. You can see I did much more making this time too. My HVLP guns don't have that much overspray, but it's easier to do a little extra masking than clean off overspray.
Another thing with Duratec, since it's catalyzed like fiberglass resin, you MUST IMMEDIATELY CLEAN YOUR PAINT GUN. When properly mixed, Duratec sets up in 20 minutes or so. Once it's set, it's set. Unlike standard 2K paints and primers, there is nothing that will dissolve it. If it sets in your paint gun, you'll be buying a new paint gun.
With the Duratec set, I could unmask everything. I'm left with a repair that's 95% finished, and completely weatherproof so I can still drive my car. It took me a weekend of not working very hard to do this repair. The hood and left quarter are next, they'll be much more involved...
Saturday, August 15, 2015
Dinged Up-date
It's been a busy few weeks for the Dinged Up Dodge. It started with the whole cam sensor thing where I took apart a perfectly good running car for no other reason than to test a theory. While playing around with the cam sensor, I discovered something much more potentially disastrous than a cam sensor that might some day go bad. I had an intake leak.
Intake leaks are actually pretty easy to check for. First, I heard some hissing from the middle of the intake in addition to the throttle body hiss. Then, I sprayed the seam between the intake and the heads with some brake cleaner. If the engine changes speed when you spray, it's because the brake cleaner is getting sucked into that cylinder. Anything aerosol will work, the engine will either speed up or slow down, depending on how flammable your spray is. In my case, the center cylinder on the driver's side was leaking. There was a very definite RPM change when spraying around that port. I don't know how long it had been leaking, but it could have lead to a catastrophic failure if it wasn't addressed.
As it turns out, for a huge engine in a small car, the intake comes off surprisingly easy. The hardest part was actually lifting the intake off the car by myself. It's not heavy, but it's awkward because you don't have a fender to lean over like you would a regular car. Here's everything that you need to take off except for the cowl(which comes off with just four screws after the wipers are removed). The whole intake/injector wiring subassembly just unplugs from the main harness, so even the wiring can stay put.
As soon as I lifted the intake off, I spotted the problem. The original intake gaskets were cracked. They didn't tear when I took the intake off, they were already broken. You can see a chunk of gasket stuck to the center port, the rest stayed on the block.
Here's what the port on the head looked like with the rest of the gasket removed. You can see the carbon tracks going across it.
The thing is though, it wasn't just on the center cylinder. Most of the cylinders had similar tracks. The center cylinder on the driver's side was the only one actively leaking, but any of them could have started leaking at any time.
Thankfully, modern gaskets are generally non-stick, so other than the carbon I didn't have to do much gasket surface scraping to get everything cleaned up. Also note the rags stuffed in the ports. It's important to keep crud from falling into the engine. You don't want to have to pull a head because you accidentally dropped a bolt.
I went with Cometic gaskets instead of factory gaskets. They are supposed to be the best, and they're actually pretty cheap. They also are made to go on dry, no silicone like the good old days. After getting everything bolted back together and torquing the million intake bolts in sequence, it fired right up. A quick check around the ports with more brake cleaner showed no more leaks, and life is good.
Intake leaks are actually pretty easy to check for. First, I heard some hissing from the middle of the intake in addition to the throttle body hiss. Then, I sprayed the seam between the intake and the heads with some brake cleaner. If the engine changes speed when you spray, it's because the brake cleaner is getting sucked into that cylinder. Anything aerosol will work, the engine will either speed up or slow down, depending on how flammable your spray is. In my case, the center cylinder on the driver's side was leaking. There was a very definite RPM change when spraying around that port. I don't know how long it had been leaking, but it could have lead to a catastrophic failure if it wasn't addressed.
As it turns out, for a huge engine in a small car, the intake comes off surprisingly easy. The hardest part was actually lifting the intake off the car by myself. It's not heavy, but it's awkward because you don't have a fender to lean over like you would a regular car. Here's everything that you need to take off except for the cowl(which comes off with just four screws after the wipers are removed). The whole intake/injector wiring subassembly just unplugs from the main harness, so even the wiring can stay put.
As soon as I lifted the intake off, I spotted the problem. The original intake gaskets were cracked. They didn't tear when I took the intake off, they were already broken. You can see a chunk of gasket stuck to the center port, the rest stayed on the block.
Here's what the port on the head looked like with the rest of the gasket removed. You can see the carbon tracks going across it.
The thing is though, it wasn't just on the center cylinder. Most of the cylinders had similar tracks. The center cylinder on the driver's side was the only one actively leaking, but any of them could have started leaking at any time.
Thankfully, modern gaskets are generally non-stick, so other than the carbon I didn't have to do much gasket surface scraping to get everything cleaned up. Also note the rags stuffed in the ports. It's important to keep crud from falling into the engine. You don't want to have to pull a head because you accidentally dropped a bolt.
I went with Cometic gaskets instead of factory gaskets. They are supposed to be the best, and they're actually pretty cheap. They also are made to go on dry, no silicone like the good old days. After getting everything bolted back together and torquing the million intake bolts in sequence, it fired right up. A quick check around the ports with more brake cleaner showed no more leaks, and life is good.
I wander what's going on...
I had that wandery feeling in my Beetle. That's to be expected in a 46 year old car though I suppose. I have, at some point in the 19 years I've had it, replaced all of the front suspension and steering joints, and all related bushings. Well, almost all related bushings. There was one original rubber piece left on the front of the car, the rag joint between the steering column and steering box. From about the late 50's on, most cars use a rubber joint here because it dampens road vibration so you don't feel it in the steering wheel. Old American cars are made in such a way that when the rubber fails, the column and box are still mechanically locked. Your steering will be very, very loose, but you will still be able to limp home. The VW isn't like this, there is no mechanical failsafe backup. If the rubber lets go, you've got no steering, at all. So, I decided I should probably replace the coupler(particularly since it's a $10 part). It only takes 4 bolts, and is much easier to replace than when I did the same thing on my Corvette. Here's the original coupler on the left next to my new one. You can see the cracks in the original rubber that cause some extra play in the steering.
Installation is super simple. Take the four bolt out, slip the old rag joint out and the new one in, and reinstall the bolts. It's even reasonably accessible after you've taken the wheel off.
The other thing I wandered...er...wondered about was my engine. One of the first real mods I did to the car was add a full compliment of VDO gauges. They included the standard tach and oil pressure, but also oil temp, cylinder head temp, and boost. Back when I was still running the supercharger, they all worked. But for the last 5,000 miles or so, I've been running a stock 40HP engine. Since I put this engine in, the oil pressure and oil temp(and boost, obviously) gauges haven't been hooked up. I'd broken my oil temp sender taking the blower motor out, and I never replaced it. Because of this particular engine's configuration, my VDO oil pressure sender wouldn't fit either, so I had no oil pressure readings.
I decided to finally do something about it. The oil temp sender is the easiest to install sender of any I've ever used. It simply replaces the oil drain plug. That's it. I know it seems like a bad idea to have a wire hanging off the bottom of the engine, but I've done my share of "off roading" with this car, and I've never once had the wire catch on anything.
The oil pressure sender was a whole nother ball of wax. On late model air cooled VWs, the oil pressure port stick sideways off the engine, so the VDO sender screws right on. This engine has the port sticking straight up, and right next to the intake manifold. It also uses a straight metric thread while the VDO sender is a standard 1/8" pipe tread. So, I needed an adapter to go from the metric thread to standard, and an elbow for clearance. Autometer provided the adapter, Ace Hardware the elbow.
The problem with that is that the whole thing is too tall and can't be screwed in because it hits the intake manifold. So, since both fittings are brass, and brass solders very well, I decided to just make a fitting that fit. First, I cut the threads off the 1/8" pipe elbow, and filed the stub down to where it would just slip into the adapter's female threads.
Then I soldered them up. It's pretty quick work with a torch, and there's so little pressure in the system that even standard electrical/plumbing solder is more than strong enough.
The new adapter is just barely short enough to clear the intake and thread in. Here's where it sits on the engine(the little bit of clearancing on the intake is from when I'd initially tried to get the sender to fit when I first put this engine in years ago).
And with the port now turned 90°, the big VDO sensor fits just about perfectly between the intake and distributor.
And with that, all my gauges work the way they're supposed to. Except for the boost gauge. I'll put that one on the list ;)
Installation is super simple. Take the four bolt out, slip the old rag joint out and the new one in, and reinstall the bolts. It's even reasonably accessible after you've taken the wheel off.
The other thing I wandered...er...wondered about was my engine. One of the first real mods I did to the car was add a full compliment of VDO gauges. They included the standard tach and oil pressure, but also oil temp, cylinder head temp, and boost. Back when I was still running the supercharger, they all worked. But for the last 5,000 miles or so, I've been running a stock 40HP engine. Since I put this engine in, the oil pressure and oil temp(and boost, obviously) gauges haven't been hooked up. I'd broken my oil temp sender taking the blower motor out, and I never replaced it. Because of this particular engine's configuration, my VDO oil pressure sender wouldn't fit either, so I had no oil pressure readings.
I decided to finally do something about it. The oil temp sender is the easiest to install sender of any I've ever used. It simply replaces the oil drain plug. That's it. I know it seems like a bad idea to have a wire hanging off the bottom of the engine, but I've done my share of "off roading" with this car, and I've never once had the wire catch on anything.
The oil pressure sender was a whole nother ball of wax. On late model air cooled VWs, the oil pressure port stick sideways off the engine, so the VDO sender screws right on. This engine has the port sticking straight up, and right next to the intake manifold. It also uses a straight metric thread while the VDO sender is a standard 1/8" pipe tread. So, I needed an adapter to go from the metric thread to standard, and an elbow for clearance. Autometer provided the adapter, Ace Hardware the elbow.
The problem with that is that the whole thing is too tall and can't be screwed in because it hits the intake manifold. So, since both fittings are brass, and brass solders very well, I decided to just make a fitting that fit. First, I cut the threads off the 1/8" pipe elbow, and filed the stub down to where it would just slip into the adapter's female threads.
Then I soldered them up. It's pretty quick work with a torch, and there's so little pressure in the system that even standard electrical/plumbing solder is more than strong enough.
The new adapter is just barely short enough to clear the intake and thread in. Here's where it sits on the engine(the little bit of clearancing on the intake is from when I'd initially tried to get the sender to fit when I first put this engine in years ago).
And with the port now turned 90°, the big VDO sensor fits just about perfectly between the intake and distributor.
And with that, all my gauges work the way they're supposed to. Except for the boost gauge. I'll put that one on the list ;)
Subscribe to:
Posts (Atom)