Saturday, January 2, 2021

Making your 3D prints look like...not prints

On all the other printed guns I've made, namely my SCR style bolt action AR, my half printed STI style 1911, and my VZ-61, I shamelessly left the 3D prints looking like 3D prints.  After all, that was the point, to make printed guns.  My PSG-None project is different though.  It's intended to be a "stand back and squint" clone of an HK PSG-1.  I'm using printed parts for all the furniture, but I don't want them to look like obviously printed parts.  

Since I have a variety of parts, I'm going to use a variety of techniques to finish them.  All my parts are printed in black so that if/when they get scratched or dinged up, they will scratch to black and it won't be visible.  If you print in bright orange and then paint it black, when scratched the bright orange will show through and be super obvious.

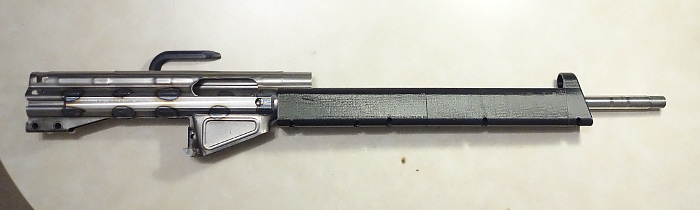
The first and most basic method is to just sand down your parts so that there are no more layer lines.  For this to work, your part has to be printed in the color you want, or you'll have to prime and paint after sanding.  I prefer just printing in color.  I always use wetsanding for plastics.  Dry sanding is fine for rough 80-120 grit paper, but any finer than that, and the sanding dust can melt from the friction and gum up your sandpaper.  For the palm rest on my PSG-none, I knocked it down with 80 grit dry, then wetsanded 320 and 600 grit(because that's what I had handy), then finished with a Mr. Clean Magic Eraser which is equivalent to 3,000 grit sandpaper.  There are still a few scratches showing because I'm lazy.  Since PLA is largely immune to most solvents, once dry I wiped it down with my preferred gun oil to "wet" the surface and make it a little darker.


The next method is very simple and kind of like magic.  I wanted to make some parts look like HK's textured molded plastic.  Normally this would be almost impossible to replicate, but I know of a product made just for that.  SEM 39853 Texture Coating is a spray on automotive product primarily aimed at auto repair stuff like textured plastic bumpers, dashboards, etc.  It's made specifically for plastics and bonds very well to PLA.  The first step is to knock down the high spots with 80 grit sandpaper, that's it.  If your print is clean, you don't even need to do that much, Texture Coating hides layer lines great.  

Next, spray on the SEM Texture Coating.  You can make a wide variety of textures from very fine to very rough, depending on how heavy you spray, and from what distance.  Once dry, it can be topped with paint of your choice.  My preference is SEM Colorcoat.  It's also an automotive oriented product and is made specifically for plastics, fabrics, and vinyl, and is very durable while still being flexible(if that's what you need).  It's durable enough that the steering wheel of my daily driver was painted SEM grey 7? years ago, and it hasn't worn off yet.

The last method I'm going to show is the hardest to do, and I am not very good at it.  I want to make the grip handle look like wood.  Some people are simply amazing at this technique, I...am not.  We'll be using artist's oil paints for it because they blend very well.  I started out with a base coat of brown spraypaint.  Once that was dry, I covered the textured part of my grip with a thin black wash to darken up the low spots in the texture.


Next is where the magic is supposed to happen, but again, I'm me.  Artists oils are basically just pigment suspended in Linseed oil, so they're not that much different from what you'd use on a wood stock.  A cheap set of oils is $13 at Hobby Lobby, and if you use their weekly 40% off coupon(downloadable on your phone straight from their website), you can get a set for $8.  Using a combination of Burnt Umber, Burnt Sienna, and Yellow Ochre, the idea is to basically paint on the woodgrain.  As I said, I am not good at this.  This was only my second attempt, and I'm colorblind, so that's a big help...  Since I suck at this game, my method was to basically just put on streaks of color and blend them out so it looked less uniform.  My brush strokes go the same direction as my print layer lines to help hide the print lines without having to sand them down.  The paint it's self isn't super durable so after a month or two(or more, raw Linseed oil takes forever to dry), it can be top coated with an oil based polyurethane for durability.  I'm not really satisfied with how this turned out, but I guess it will do(and the sharp streaks on the bottom will be covered by the palm rest shown above). 


Textured grips with Cura's Fuzzy Skin

Back to my PSG-None project for a bit.  The real PSG-1 pistol grip has stippling textured onto parts of it.  I could come up with some sort of bumpy surface to replicate this in Solidworks, but the face count would skyrocket, and it would seriously drag down the speed of my whole system.  Solidworks hates high face counts. 

Fortunately, there's a very simple solution: Cura has a "Fuzzy Skin" option buried in it's settings.  What it does is generate the skin of the object with random jitters so that it ends up looking rough and fuzzy looking instead of nice and smooth.  But, I don't want my whole grip to have this fuzzy skin, I want to replicate the asymmetrical texturing of the PSG-1 grip.  There's a way around it with another seldom used Cura feature: Per model settings.  This lets you place several models on the print bed and use different settings for each one.  

Basically, we're telling the machine to print two parts in the same place, at the same time, but with different print settings.  One part is the normal grip and prints like anything else would.  The 2nd part is set to only print the outer layer, using the "Fuzzy Skin" option.  It works because the plastic from the normal part melts in with the overlapping plastic from the "fuzzy" part.

That's what we're going to do here, create two models, one of the complete grip, one of just the grip section that we want textured.  To make the fuzzy grip section I just copied the grip, then hacked away the parts I didn't want.  Here are the two parts in Solidworks:

Once that's done, both models are loaded into Cura.  We set the settings that we want to use, then merge the models so they print as one piece.  I'm not going to go over exactly how to use the Per Model settings here because there are some great Youtube how-to's that can do it faster and better.  The important thing is that on your fuzzy grip section model, turn on Fuzzy Skin, set it to 1 wall, and 0 top/bottom layers.  This will print a fuzzy skin outer wall on top of whatever your main model settings are set to.  When it's done printing, here's how it will look, textured where we want, smooth where we don't:


Sunday, December 13, 2020

Llama XV progress

I'm now on V3 of my baby Llama frame.  Every iteration of this thing gets several changes and at this point my Solidworks feature tree is just a mess.  With V3, everything fits and the action hand cycles and resets like it should.  The problem now is that the safeties don't work.  It wouldn't be that big a deal, but the way it is now the thumb safety can slide up into the notch on the slide, locking the slide closed while still being able to fire.  If this happened, I think the force of the slide would blow the safeties off the back of the frame, and my hand would have a really bad day.  So back to the virtual drawing board to try to get the safeties to work.  Here's how it looks so far with everything assembled, standard 1911 magazine included for size reference:


Sunday, December 6, 2020

Baby on board! A Llama XV miniture 1911 clone

I saw one of these at a gun show years ago, and didn't buy it because the guy wanted $450 for it, but I always thought it was really neat.  They haven't gone down in price since then either.  Then I found a frameless parts kit on Every Gun Part, and when they had their Cyber Monday 50% off  sale I didn't hesitate, and picked it up for $100.

It's a Llama XV, a Spanish copy of the 1911 in 22LR, but unlike most 1911-22's that are still full size, this one is scaled down considerably.  It's not just shorter like a Commander or Officer frame gun, the whole thing is uniformly scaled down in all directions.  All the internal frame parts look exactly like 1911 parts, but smaller.  Since it's a 22LR blowback pistol, the plan is to 3D print the frame for it.  Since it's a fixed barrel most of the recoil stress will be on the slide stop pin and barrel seat area and I think a printed part will be strong enough to handle it.  I took the CAD files I already have for 1911 frames, and scaled them down accordingly.  The Llama isn't a directly scaled copy, so there is going to be a lot of adjusting and reprinting to get everything to fit(particularly all the pin hole locations).  This is going to be a fill in when I don't have anything else going on project, so I don't know when it'll be done.

I spent a day measuring and adjusting my frame CAD file to be close, then test printed a frame to see how things fit.  It still needs a lot of tweaking to get everything to fit and work like it should.  When you look at it, it doesn't seem that small, but when you put it next to a full size 1911, you can see how tiny it really is.  It makes a standard 1911 look huge:


Tuesday, November 17, 2020

Another one done

Though it's been done for months, I never got around to posting pictured of my M16A1 build.  To recap, the lower is a standard 80%, the barrel is a JSE 20" Lightweight profile, the sling is GI surplus, and every single other part is original Colt M16A1(with FCG parts modified for semi-auto only).  The new lower was painted with fake worn pain, everything else has it's original worn Colt finish.  I'm still want to find a "correct" 20rd Colt magazine, but this original 30 rounder will work for now.


Thursday, November 5, 2020

Are you mocking me?

I finally have enough pieces that I can mock up my PSG-None.  None of the 3D prints are glued together yet. Even though I'm likely going to paint all the 3D printed parts, I printed them in black so that if/when they get scratched, the scratch won't show as much(except for the buttpad which is red because that's the only color of Ninjaflex TPU I have).


Sunday, November 1, 2020

More faking it while making it

Because this is a low dollar range toy, I didn't want to buy a high end match barrel that cost more than all the other parts of this project combined(and I'm not a good enough shot for a barrel like that anyway).  The barrel I'm using is an 18" CETME barrel from Apex.  It is a very nice barrel, well machined and reasonably priced.  There is one problem with it though, it's 18" and not the 25.6" of the PSG-1, and it's too thin compared to the heavy barrel contour of the PSG-1.  Because of that, it looks obviously too short and too thin with my 3D printed PSG-1 style handguard.


Don't worry though, I have a plan for that.  The muzzle on the Apex barrel is threaded 5/8-24, a standard size for 30 caliber muzzle brakes and flash hiders.  So I decided that I would just make a barrel extension that threaded on.  In addition to being an extension, it's also a sleeve that slips over the barrel until it's under the handguard to make it appear that the whole barrel is heavier.  I used some 3/4" 1144 stressproof steel bar(because that's what I had handy), drilled all the way through it with a really long 11/32" drill bit(three actually, short, medium, and long, and it took me all afternoon to drill on the lathe), then counterbored it to fit over the barrel, with a smaller step 5" down for the threads, and tapped it with an $11 e-bay 5/8-24 tap.  I had my doubts about the e-bay tap because it was so cheap, but it cut great and still looks like new.  I had to get creative with the tap holder because the tap is 4" long and the threads are 5" down in the hole, and I ended up sacrificing a thin wall 12 point socket for it.  Here's where the extension sits on the barrel, if you could see a cutaway of the extension, you'd see about an inch of threads in line the barrel's muzzle.

With the extension in place, the overall barrel is the same length as the PSG-1, and looks much better with the handguard.


I also put a recessed crown on the barrel extension instead of the flat crown on the PSG-1, mostly because I don't trust myself not to ding it up.  11/32 is only .035" bigger than .308, so it's not too noticeably bigger at a casual glance, and hopefully it won't affect accuracy.  I also don't know for certain that the drill didn't wander, but being cut on the lathe all from one direction hopefully it will be close enough.