
Showing posts with label AK. Show all posts
Showing posts with label AK. Show all posts
Wednesday, February 4, 2015
Putting on the brakes
Well, just the one brake really. I had a guy ask me why the muzzle brake on the AK was crooked. As it happens, they're made that way. Mine is a US made copy of the original Polish part(for 922r compliance). The reasoning for the offset is a pretty simple one actually. The standard Soviet/Warsaw Pact firing position was more face on than the US left foot forward stance. Firing from that position, the barrel wants to kick right as well as up. Having the slant brake at an angle helps correct both climb and right drift, and pushes the gun towards the shooters left arm instead of away from the body. Interestingly, this style brake always has two stop notches, so it's reversible for left handed shooters. Those Ruskies thought of everything...

Friday, January 30, 2015
Better late than never
It recently occurred to me that, even though it's been done for nearly a year, I never posted pics of my finished AK. In my last post, I had finished the assembly and test fired it. After that, I stripped the whole thing down to refinished it. After the all the effort with mediocre results with Tru-Oil on the Mosin, I decided to refinish the wood the modern way. I sanded it down and sprayed it with semi-gloss polyurethane. Not only is it much quicker and easier to use, a few shooting sessions have shown that the PU is more durable than the Tru-Oil. It's much more scratch resistant, and just as easily repaired if it does get dinged(ie. I'm never using Tru-Oil again). I sandblasted the metal parts and sprayed them with Duracoat in HK Black. I also found a metal magazine at a gun show for cheap that I like better than the plastic Tapco one I was using, I'll paint it to match some day(I'm still 922r compliant with this magazine too). Here's what I ended up with(bipod for pics only):


Wednesday, July 9, 2014
The end is near
We're in the home stretch now. With the receiver complete and barrel installed, all the other parts can be installed on the AK. Everything is still unpainted, I wanted to get it test fired before paint just in case I had to tweak anything. Here's how it looks when it's all assembled except for the front hand guards:
 Since I want it to look nice when I'm done, I started reworking the stock too. The Polish plywood is much better than some of the other AKMs from other countries, but still leaves a lot to be desired too. My kit is based on a 1970 rifle, so it's got 40 years of dings and scrapes to take care of. Here's the wood(minus upper handguard) all sanded up and ready for some polyurethane:
 With everything assembled, it was ready for test firing. Now, I may look stupid, but I'm not dumb. There was no was I was going to hold what amounts to a home made gun in my hand and pull the trigger. While I didn't expect any trouble, I was still minorly concerned about the headspace being wrong, and the gun blowing up. More specifically, I was concerned about the dust cover being blown off the top and into my face. On an AK, all that stands between you and the bolt slamming back and forth is some sheetmetal. So out came the ratchet straps and a very long rope...

Thursday, June 26, 2014
Laying down The Law
We as a country do a lot to try and curb the acquisition and use of "non-sporting" rifles(that is, military style rifles), particularly imported ones like the AK. There is a subsection of the Gun Control Act passed in 1968 called 922r. Basically, it says that any imported "non-sporting" rifle can have no more than 10 imported parts from a list of 20 parts set down by the AFT. On the AK 47, there are 16 parts that qualify for the 922r compliance list. For my build, using a US made magazine, I am well in the clear with only 7 imported parts from the list. If I switch to a metal imported magazine, I am right at 10 imported parts and will switch out the pistol grip for a US made part to bring it back down(although it is still legal with 10 imported parts, I like the extra buffer). So that there is never any question, here is a list of the 922r compliance parts in my AK, along with country of origin:
1. Front trunion,
Polish made
2. Bolt Carrier,
Polish made
3. Bolt, Polish made
4. Gas Piston, Polish
made
5. Buttstock, Polish
made
6. Pistol Grip,
Polish made
7. Upper and Lower
Handguards (Both count as 1 part), Polish made
8. Barrel, US made,
AK Builder #H1-31
9. Receiver, US made
from AK Builder flat, #B1-71
10. Muzzle Device, US
made, Tapco #AK0684
11. Hammer, US made,
Tapco #AK0650single
12. Trigger, US made,
Tapco #AK0650single
13. Disconnector, US
made, Tapco #AK0650single
14. Magazine Body, US
made, Tapco #MAG0632
15. Magazine Follower,
US made, Tapco #MAG0632
16. Magazine
Floorplate, US made, Tapco #MAG0632
Interestingly, it's only with rifles that it matters. Pistols and shotguns don't need to follow 922r no matter their origin. If I had made the receiver so that a buttstock couldn't be mounted it would qualify as a pistol and even though it's the exact same gun, I wouldn't need to worry about 922r(or the 16" minimum barrel length rule for that matter).
Interestingly, it's only with rifles that it matters. Pistols and shotguns don't need to follow 922r no matter their origin. If I had made the receiver so that a buttstock couldn't be mounted it would qualify as a pistol and even though it's the exact same gun, I wouldn't need to worry about 922r(or the 16" minimum barrel length rule for that matter).
Message Received
Onward to the last bit of building the AK's receiver. The last pieces of the puzzle are the rear trunnion/stock tang and center support. Like everything else, these require some special tools. Well, actually not, all you really need is a hammer, but it'll look nicer with some better tools. The tools in question this time are both rivet sets. The first bucks are for the rear stock tang. They're made from 1/4" steel with some 5/16" dimples in them to form the rivets. While you could just hammer the rivets over, the rivet bucks make for nice domed rivet heads.
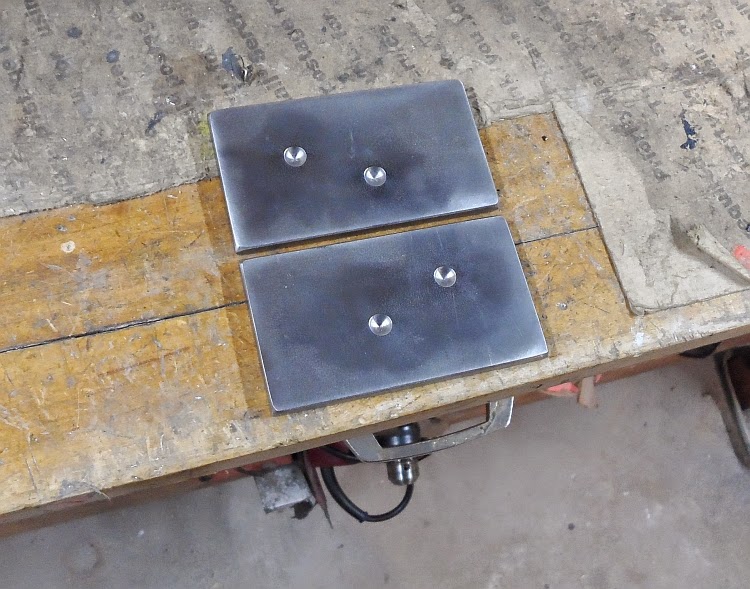
With the stock tang and rivets in place, with one buck on the back side you start by hammering the rivets down far enough that they lock into position. You can also see in this pic that I painted the inside of the receiver under the trunnion, so I don't have any bare metal that can rust.

Then, using both bucks, squeeze everything together to form the rivet heads. A hydraulic press would be nice here, but I don't have one so the vice works.

Once everything is properly squished, you should have some nicely domed rivet heads.

The very last piece of the receiver it's self is the center support. It's essentially just a long rivet with some steel tube around it, and keeps the receiver from bowing apart. You've got to be careful with this one, it only goes in one way. The pre-formed side MUST go on the right side. Instead of a full dome, it's got a flat head that is necessary to clear the safety lever. If you put it in wrong, you'll have to grind the head down to clear the safety. You can also see in this pic where the welds are for the inner rails.
 The process is the same as the rear trunnion, hammer to set, then to the vice with a dumpled buck to finish forming the head.
 And there you have it, the hard part is done. After a few hours and several special tools, we're left with a complete AKM barreled receiver.

With the stock tang and rivets in place, with one buck on the back side you start by hammering the rivets down far enough that they lock into position. You can also see in this pic that I painted the inside of the receiver under the trunnion, so I don't have any bare metal that can rust.
Then, using both bucks, squeeze everything together to form the rivet heads. A hydraulic press would be nice here, but I don't have one so the vice works.
Once everything is properly squished, you should have some nicely domed rivet heads.
The very last piece of the receiver it's self is the center support. It's essentially just a long rivet with some steel tube around it, and keeps the receiver from bowing apart. You've got to be careful with this one, it only goes in one way. The pre-formed side MUST go on the right side. Instead of a full dome, it's got a flat head that is necessary to clear the safety lever. If you put it in wrong, you'll have to grind the head down to clear the safety. You can also see in this pic where the welds are for the inner rails.
Monday, May 26, 2014
This is important.
AK 47s are known for their reliability. There are videos of guys on Youtube literally filling their guns with all kinds of stuff and still having them function. Some examples HERE, HERE, HERE, and HERE. As previously mentioned, the reason for this is loose tolerances. Everything has enough clearance in it that it takes a whole lot to make it jam. In fact, even jam won't make it jam.
There is only one place on the entire gun that actually needs to be precise, and that's the headspace. In simple terms, headspace is the amount of room the cartridge has to move fore and aft in the chamber. If your headspace is too tight, the bolt won't lock closed, causing it to blow up when fired. If the headspace is too loose, the shell case ruptures, causing it to blow up when fired. So, it's either right, or it blows up. On the AK pattern rifles, the difference between "right" and "blows up" is six thousandths of an inch(.006"). That's two sheets of notebook paper thick.
Headspace on most rifles is set by how far the barrel is installed into the receiver. Many barrels are screwed in, but the AK barrels are pressed in. A rubber mallet won't work well because the barrel depth is so critical. A press works best, but I don't have one. So, I made another special tool. The main piece is a chunk of grade 8 all thread. Grade 8 is necessary because the standard hardware store stuff isn't strong enough and will snap. The barrel end uses some copper washers to keep from marring the barrel, with some regular washers and a nut after that. The receiver end uses the bolt carrier to press against with an 1/4" steel plate behind it to keep it from getting marred up. It works pretty well, just tighten the nuts, and the barrel presses in. It's a slow process of tighten, check, repeat. Real actual headspace gauges are available, but are expensive. Instead, I used a bullet as my "Go" gauge, and the same bullet with .006" worth of aluminum tape on the back as my "No-Go" gauge. When it's set right, the bolt will close and lock on the Go gauge, and won't close on the No-Go gauge.


There is only one place on the entire gun that actually needs to be precise, and that's the headspace. In simple terms, headspace is the amount of room the cartridge has to move fore and aft in the chamber. If your headspace is too tight, the bolt won't lock closed, causing it to blow up when fired. If the headspace is too loose, the shell case ruptures, causing it to blow up when fired. So, it's either right, or it blows up. On the AK pattern rifles, the difference between "right" and "blows up" is six thousandths of an inch(.006"). That's two sheets of notebook paper thick.
Headspace on most rifles is set by how far the barrel is installed into the receiver. Many barrels are screwed in, but the AK barrels are pressed in. A rubber mallet won't work well because the barrel depth is so critical. A press works best, but I don't have one. So, I made another special tool. The main piece is a chunk of grade 8 all thread. Grade 8 is necessary because the standard hardware store stuff isn't strong enough and will snap. The barrel end uses some copper washers to keep from marring the barrel, with some regular washers and a nut after that. The receiver end uses the bolt carrier to press against with an 1/4" steel plate behind it to keep it from getting marred up. It works pretty well, just tighten the nuts, and the barrel presses in. It's a slow process of tighten, check, repeat. Real actual headspace gauges are available, but are expensive. Instead, I used a bullet as my "Go" gauge, and the same bullet with .006" worth of aluminum tape on the back as my "No-Go" gauge. When it's set right, the bolt will close and lock on the Go gauge, and won't close on the No-Go gauge.
Saturday, May 17, 2014
That's hot.
I don't have any pictures of how to place them, but with the trunnion installed, I could locate and weld in the bolt guide rails. They just get spot welded into the receiver. Here you can see the left side rail. It's also got the shell ejector on it.
 Before we continue assembling the receiver, it first needs to be heat treated. There are three areas on an AK receiver that need to be hardened. They are the holes where the trigger and hammer axis pins go, and the ejector tip that kicks out the spent shell. The AK-Builder receiver flat is made from 4130 chromoly steel, and is oil hardenable. That means, you heat it up, dunk it in oil, and it comes out hardened. Me being me, I always have a variety of flammable gasses and used oil laying around. Propane doesn't quite burn hot enough to get 4130 over it's critical temperature, so MAPP gas needs to be used. First step, heat the area we want hardened. The holes are spaced far enough apart that they need to be done one at a time.
 Once it's as hot as it's going to get, it gets dunked in the oil:
 I didn't really think this one through. Since I don't drink coffee, I don't have coffee cans laying about, so I used a plastic bucket. It works fine, except that I forgot that it melts. The ring right at the top of the oil started melting away...oops...
Hardening this way actually makes the metal too hard, and it becomes brittle. It needs to be tempered. So into the oven it goes at 500° for 45 minutes. This will draw the hardness back to a more reasonable level so it's hard without being brittle. Here's how it looks now. Much less pretty than before, but since it'll be painted anyway, the discoloration doesn't matter.

Hardening this way actually makes the metal too hard, and it becomes brittle. It needs to be tempered. So into the oven it goes at 500° for 45 minutes. This will draw the hardness back to a more reasonable level so it's hard without being brittle. Here's how it looks now. Much less pretty than before, but since it'll be painted anyway, the discoloration doesn't matter.
Front trunnion
Because the receiver on an AK is just sheet metal, it needs some other bits attached to it to actually be functional. One of the most important is the front trunnion. It's the piece that holds the barrel. Like all the other pieces, it gets riveted in. We can't just slid it in and rivet it though, there are no holes in the receiver for the rivets, and because the trunnion slides into the receiver, you can't see the holes to mark them. Now, I could measure, mark, drill undersize, and file the holes to an exact fit, but even typing that sounds like a lot of work. There's a much simpler way. Enter the Post-It note. You can see here the three holes we need to transfer, with the Post-It note attached to the top of the trunnion:
 With the Post-It flipped down, a pencil is used to find the holes the same way we all did to make textures in grade school:
 Then the trunnion gets slid into the receiver. You'll notice that I've got the magazine in place too. That's because the trunnion locates off the magazine, and the magazine locates off the trigger guard, and that's why the trigger guard was our first step.
 The Post-It note is now outside the receiver, while the trunnion is inside, and we know exactly where to center punch the rivet holes.
 With the holes located and drilled, we have to install the rivets. It's once again time for a special tool. We'll call this one the Harbor Freight Bolt Cutter Rivet Smasher Tool™. It's one of those tools who's name describes everything about it. It's a Harbor Freight 24" bolt cutter with rivet smashing jaws. Most people modify the stock jaws. I didn't want to because the bolt cutters cost me a whopping $14 and I might actually want to cut bolts with them some day. So, I made my own jaws from some 3/8" steel plate. The skinny side has a flat face for smashing the rivet, the round side has a 5/16" dimple to support the rivet head:
 With everything ready to go, I painted the inside surfaces with Duracoat so that there wouldn't be any bare metal in where moisture might get and I couldn't clean.
 Here's the HFBCRST™ in action. It works pretty slick, and smashes the rivets right over.
 Here's what we end up with. The rivets are smooshed flat on the inside, and the heads are still nice and rounded on the outside. Even though the receiver is already classified as a firearm, it still is no where near being operable, but we're one step closer.

Saturday, May 10, 2014
En Garde!
AKs are best known throughout the world for their incredible reliability. That reliability is due in large part to the loose tolerances they are built with. Everything in the mechanism fits loose enough that they can be packed full of sand and mud and still work. Given that though, there are some places where tight tolerances must be maintained, and they are primarily in the parts that make up the complete receiver. Everything in our receiver is located off the magazine, and the magazine locates off the trigger guard. That means that installing the trigger guard is our first step, and everything else will locate off it. Because AKs are sheet metal, they were originally riveted together. The internet rages with "rivet VS screw" debates, and both work equally well. I think the rivets look better. Plus, I get to make more special tools for them, and that's half the fun.
To rivet the trigger guard on and make sure it's square, I needed another a jig. The jig holds the trigger guard and all five of the necessary rivets. Like the bending jig, they are available, but too expensive for a single use. Mine is an aluminum base with a steel top plate. Here you can see the jig with the dimples for the rivet heads:
 Here's how the trigger guard and rivets sit in the jig:
 After getting everything aligned and clamped down, I used a punch to smash over the rivets on the inside of the receiver:

 With all five of the rivets smashed, we're done with the second step in our AK build and we have something that is starting to look like a gun.

To rivet the trigger guard on and make sure it's square, I needed another a jig. The jig holds the trigger guard and all five of the necessary rivets. Like the bending jig, they are available, but too expensive for a single use. Mine is an aluminum base with a steel top plate. Here you can see the jig with the dimples for the rivet heads:
Get Bent
With all "Parts Kit" guns, the receiver is destroyed or missing entirely. As shown in my first AK post, with AK variants it's the latter. To lower the cost and speed up production, the Soviets switched from a milled steel to a stamped sheet metal receiver when they switched from the original design of the AK47s to the AKMs in the mid 50's. This makes AKM receivers fairly easy to make with some skills and the proper tools. There is a thing in the AK world known as a Receiver Flat. It's basically a flat piece of sheet metal with some holes stamped in it. The BATF has determined that a flat is not a firearm and because of this, they can be sold to anyone without having to go through a licensed firearms dealer. Here's what the AK receiver looks like(not my pic):
 To build an AK receiver, we'll need some special tools. The very first step is to get the thing bent. A regular brake won't work because the bends are deep and at 90°. To make sure everything stays straight and square, a special bending jig is required. Like everything else, jigs are available online, but are far too expensive for a one time use. So, I made my own using some 1/4" angle iron, some 3/8" plate, and a hunk of aluminum. After making a jig to make the jig, here's what I ended up with:
 There's not much to it, but the spacing needs to be fairly exact. The receiver flat gets bolted between the "T" steel and the aluminum block. I don't have any pictures of the actual thing, so just pretend that this cardboard is our flat:
 Then you put the jig in a press, and press the thing down. The aluminum block acts as a guide to make sure it gets pressed straight.
 When it's removed from the jig, you're left with a bent AK receiver(again, not my pic):

Congratulations, you've just turned a piece of sheet metal into a firerarm. The instant it's bent, even though it's no where near being complete and shootable, it's now a firearm in the eyes of the BATF. With the flat bent, the rest of the parts can be mocked up and test fit:

Congratulations, you've just turned a piece of sheet metal into a firerarm. The instant it's bent, even though it's no where near being complete and shootable, it's now a firearm in the eyes of the BATF. With the flat bent, the rest of the parts can be mocked up and test fit:
Monday, April 21, 2014
How many Poles does it take to screw in a lightbulb?
The Polish may have trouble dealing with modern lighting techniques, but they make a darn good AK-47. The AK is the most famous and influential gun in history. It's the most common gun in the world, and no gun has had more influence on both freedom and oppression. Both friend and foe alike, it's the official standard military rifle for 106 countries around the world, and is one of the most reliable weapons ever devised. Even US Special Forces often use it on covert missions. Often seen as the gun of rebellion and evil intent, it's also been used for good much like out M16/M4/Ar-15 has. For example, the people of Mozambique credit it with so much influence during their struggle for freedom that they put it on their flag. Since I have an AR-15(ish) gun, I decided I needed it's counterpart. Also, with the Mosin done, I wanted another project and decided to stick with the Russians. It also continues my theme of dirt cheap ammunition.
You can buy these things called Parts Kits for many firearms, they are typically from fully automatic military weapons. What they do is take disassemble the gun and destroy the receiver beyond it's usefulness and repairability according to ATF regulations. Then, they sell you the leftovers and you build or buy your own receiver to reassemble it. As long as it built for personal use and not intended for sale, you can build as many guns as you want. There are a few very important caveats. It CAN NOT be made into a fully automatic weapon, and CAN NOT be made as to be easily convertible to full auto. With imported parts kits, there are also regulations as to the number of foreign made parts you can have in it. We'll get more into that later.
I decided on a Polish parts kit. The is the undisclosed project I've mentioned a few times. Technically, it's an AKM, not an AK-47. '47 was the year it was first introduced, and the M is for modified as the design was changed for cheaper/faster manufacturing by the Soviets in the 50's. All later AKs are of the AKM variety. The Polish guns are of middle quality, not as good as Russian or Bulgarian, but better than Romanian and Chinese. I also went with a fixed stock instead of a folder because I like the more classic look. As with most AK parts kits, mine was missing the receiver completely. This particular gun was made in 1970, and except for the front trunnion, all the serial numbers on all the parts match. Here's how it looked when I got it, all laid out and the missing receiver quite obvious:

You can buy these things called Parts Kits for many firearms, they are typically from fully automatic military weapons. What they do is take disassemble the gun and destroy the receiver beyond it's usefulness and repairability according to ATF regulations. Then, they sell you the leftovers and you build or buy your own receiver to reassemble it. As long as it built for personal use and not intended for sale, you can build as many guns as you want. There are a few very important caveats. It CAN NOT be made into a fully automatic weapon, and CAN NOT be made as to be easily convertible to full auto. With imported parts kits, there are also regulations as to the number of foreign made parts you can have in it. We'll get more into that later.
I decided on a Polish parts kit. The is the undisclosed project I've mentioned a few times. Technically, it's an AKM, not an AK-47. '47 was the year it was first introduced, and the M is for modified as the design was changed for cheaper/faster manufacturing by the Soviets in the 50's. All later AKs are of the AKM variety. The Polish guns are of middle quality, not as good as Russian or Bulgarian, but better than Romanian and Chinese. I also went with a fixed stock instead of a folder because I like the more classic look. As with most AK parts kits, mine was missing the receiver completely. This particular gun was made in 1970, and except for the front trunnion, all the serial numbers on all the parts match. Here's how it looked when I got it, all laid out and the missing receiver quite obvious:
Subscribe to:
Posts (Atom)