Showing posts with label Impala SS. Show all posts

Tuesday, February 23, 2016

LEDing the way

The headlights on my '95 Impala SS are just awful.  The combination of poor lens design and barely adequate wiring makes for little light down the road.  They are so bad that I can drive around with my high beams on without passing drivers flashing their lights at me.  Generally speaking, upgrading the headlights is a lot of work.  The wiring is sized just big enough for standard wattage lamps, switching to higher watt bulbs requires relays be added or risk melting the wiring.  I'm also on my 3rd dimmer switch in this car, the previous two melted.  I've avoided upgrading the headlights partly because of cost, and mostly out of laziness.  But I came across a new solution, LED bulbs.  The price of LEDs has dropped significantly over the past few years, and they now make drop in replacements.  LEDs also use much less power for the same(or more) light output than standard bulbs, which greatly reduces strain on the wiring and switches.  So I took the plunge and bought some.

To my surprise, the headlights already in the car were already upgraded to PIAA "Star White" bulbs(which explains my melted dimmer switches).  Far from being white, they put off a fairly standard yellowish beam.  You can also see that around the base of the bulb the plastic is charred and melted a bit.  These bulbs run HOT.  I bought the LEDs on e-bay for around the same price as many of the "upgraded" standard bulbs.  They are 80w 8000Lm bulbs, that's an entire 50 watts less than the PIAAs, and they put out more light.   Here's what the new bulb looks like.  The old bulb is on the left, the new LED bulb on the right:

Installation is as simple as removing the old bulb, putting in the new one, and plugging the harness into the existing plug.  It's immediately apparent that the new bulbs are brighter.  Once again, old on the left, new on the right:


So, how do they actually work?  Well, the jury is still out on that one.  There is no question that they put out more light, but how they put it out leaves me a bit underwhelmed.  The pattern is much more diffuse with the LEDs.  They light up the sides of the road better, but don't seem to project out as far.  Since half my driving is at night down country roads, my biggest concern when driving is deer jumping out in front of me.  Having the sides of the road illuminated better could help avoid them.  Though the highs are definitely brighter, there isn't as distinct a difference between the high beams and low beams either. 

Lows:

Highs:
I'll give it awhile to get used to them, but for now I'd call it a wash.  On the plus side, I shouldn't melt any more dimmer switches :)


Saturday, February 28, 2015

It's gosh darn cold out...

Lots of words and few pictures this time.  I live in Wisconsin.  The thing about Wisconsin is that sometimes it can get cold.   Really cold.  The past few weeks, the average temp has been in the low teens, with lows below 0°F.  Normally, it's not such a big deal, I'm generally outside for all of a minute or so, on my way to and from the car.  But then two weeks ago, the heater fan in the Impala died. 

So I suffered for a few weeks, driving 40 miles a day, in a car with no heater.  Actually, not a new experience for me.  My '69 Beetle doesn't have a heater worth mentioning either, so I've driven my share with frostbite threatening.  But, it was a cold two weeks none the less.  The new replacements on the market use a smaller fan blade and don't put out the volume of the originals.  So, I replaced the fan with a used original. 

There's another thing that is a bit peculiar about these cars.  The heater cores are well known for plugging up.  When that happens, hot water can't circulate, so the heater doesn't put out much heat.  I flushed, and reverse flushed my heater core when I swapped on the silicone hoses from the Caprice back in October.  But, with the new fan, I noticed that my heater wasn't blowing hot, just warm.  And, when I'd hit a stop light so the car was idling, the temp would drop even further, down to tepid.

So today, I braved the 9°F weather, and flushed/backflushed(and repeat a few times) my heater core.  It's not hard to do, just clamp off the heater hoses(I use needle nose vice grips wrapped in electrical tape so I don't chew up the hoses), then disconnect the hoses at the firewall and shove the garden hose on the heater core fittings one at a time.  Reconnect the hoses and be on your way.  You probably won't even need to add any coolant, though you'll want to check to be sure.  And try not to do it in the driveway, you'll end up with an ice puddle...

With the new fan in, and heater core cleared, the heater pumps out more heat than most people will ever need.  How much heat you ask?  Well, here is my dash vent after a 15 minute drive...


Wednesday, February 25, 2015

My car was A-salt-ed

I talk with a lot of people around the country on various forums.  There are, believe it or not, people who have never seen road salt.  Sure, they hear about how we use salt on out roads in the great white North, but they have very little concept of what that actually means for us.  This is what a car looks like after 20 miles on a WI road during the winter.  Even with daily washings, you still end up with everything covered in the stuff.  All the white stuff in this pic is salt from WI roads...

Friday, February 13, 2015

Finally presentable

With the major paint touch ups done,  I could finally get the outside of the Impala cleaned up.  I think that this may have been the first time this car was waxed in the past decade.  I also hand polished some of the dull spots on the body.  The whole thing needs to be machine polished, but the weather wouldn't allow it.  That will be a next summer job.  With the paint in decent shape, and the wheels looking right, the car is finally presentable without embarrassment.


Wednesday, February 11, 2015

I'm moving outside

It's not just the inside of the Impala that hadn't been cared for, the outside was pretty beat up as well.  For starters, the right tail light was shattered.  The guy said it happened almost right after he got it.  Because the shift rod was missing a $0.14 cotter pin and 5 minutes worth of work, it wouldn't actually lock into park, and the guy said it rolled into a truck in a parking lot.  Here's how it looked when I got it:
Now, I've never been a big fan of the factory ribbed tail lights as it is.  Once again the Caprice helped me out.  At some point in it's life with the city of Rockford, Il, the tail lights were replaced with smooth 91-92 tail lights.  After painting the center chrome strip black, they look right at home on the SS.
The right front corner light lens was cracked on the Impala too.  Again, the Caprice had the answer, but it was a different one this time.  Many, many years ago, I grazed a deer with the left front corner of the Caprice.  It hit just hard enough to crack the corner lens and wrinkle the fender.  When I repaired it, I had to buy a pair of corner lights.  As luck would have it, now that I needed the other side, I already had it.
This car had been repainted twice with rather poor prep, and the bumpers had been bumped into things.  As such, the paint on the bumpers was largely peeling or missing.
Since this is a low dollar winter car, I decided spray paint is good enough.  Despite what you might think, spray paint is actually pretty good stuff when properly used.  The B and C pillars, and trunk lid of the Caprice were spray painted some 9 years ago, and still looked good when I sold it(see reference pics here).  After peeling off any flaking paint and scuffing anything shiny, I used Dupli-Color DA1600 Gloss Black.  It's actually a pretty close match for the factory black.
My car also suffered the same thing as many of these cars do, Peeling Spoiler Syndrome.  With time, the factory paint starts to lift off the fiberglass spoiler.  I ended up using a razor blade to scrape all of the paint off of it(which was actually very easy and quick to do), then I scuffed it up and painted it too.  Ready for paint here:
I also went around and touched up all the other spots of missing paint.  It's by no means perfect, but since I was racing the weather, it's good enough for now.


Monday, February 9, 2015

More than meets the eye.

My favorite TV show ever is Transformers.  It has been since I was six.  The age of the Internet has provided me the opportunity to show that in a way that wasn't really possible before.  For many years now, all my vehicles has had an Autobot symbol on it someplace.  They're never the same style, and rarely in the same place.  The Impala is no different and needed some Autobot pride.  Since my new grill didn't come with the factory Chevy bow tie, it was the logical place to put it.  This emblem was originally chrome, but I thought it stood out too much, so I covered it in some black chrome vinyl that I had laying about.


Sunday, February 8, 2015

Don't I look Dashing

The dash in the Impala is all in one piece now.  Basically, except for the A pillar covers, everything gray in this picture used to be blue.  All the dash pieces are out of my Caprice, the steering wheel and column are from the salvage yard(but were also blue).  Everything is painted with SEM 15393 Medium Gray, a perfect match for the stock Impala color.  The HVAC panel is out of the Caprice because the Impala one had more of that awful woodgrain on it.  The radio is actually from a '90's Cavalier, but was likewise swapped from the Caprice where it's lived for the past decade(the tape deck allows use of my MP3 player with a cassette adapter).


Thursday, February 5, 2015

HUDs for everyone!

I've always kind of though the Heads Up Displays sometimes found on high end cars were pretty neat.  They install in your dashboard and project your speed onto the windshield so you don't have to look down at the speedometer.  By and large, they're just a gimmick, but a pretty cool one.  The whole installing in the dash part can get complicated though.  Additionally, like many older B-body, the digital speedometer in the Impala has a habit of blinking off so you have no idea how fast you're going.  I came across a way to kill two birds with one stone.  I'm actually using my smart phone for something...smart.  I downloaded an app called DigiHUD.  It's basically just a GPS based speedometer, but it has a mirrored display setting.  With the numbers mirrored, and the phone set on the dashboard, it projects correctly up onto the windshield.  It's free to download, and as easy to use as setting your phone on your dash.  No hacking apart the dash, no wiring, nothing.  There is a very slight ghosting of the letters as the light bounces off both the inside and outside of the glass, but it's hardy noticeable(it shows up in the pic MUCH worse than in real life).  It's also got a built in compass, trip and max speed reached readouts, if you're into that kind of thing.  Everyone who likes cars should give this app a try.


Monday, February 2, 2015

Check out my rimz yo

One of the things I always liked about the '94-96 Impala SS's was the wheels.  They may seem blase now, but in the mid 90's, a 17" aluminum wheel on any production vehicle was something to behold.  My Impala didn't come with the stock wheels though, it had run of the mill 15" steel Chevy van wheels on it.  The guy said the original wheels had been stolen, which gives more evidence that this was, at some point, a theft recovery car.  The car just doesn't look right without the original wheels so I e-bay'd myself some. 

Since this was to be primarily a winter car, two things needed to happen.  First, I had to protect my new used wheels.  When the factory clear coat on the wheels chips, water gets in, and the aluminum starts to corrode.  This is what leads to the spider veiny look you often see on older wheels.  To protect my wheels, I sprayed them with clear Plasti-dip.  Plasti-dip followed by a coat of Meguiars Ultimate Quick Wax gives the wheels a durable, easy to clean, protective finish.

The second, and more important addition, was some snow tires.  I didn't used to be a believer in snow tires until I bought a set for my old Caprice.  I still remember the first time I drove on them.  I stomped on the gas, and the car took off.  I jammed on the brake, and the car stopped.  It was amazing.  I've had snow tires on my winter cars ever since.  For the Impala, I'm using the Bridgestone Blizzak WS80 in 235/55-17.  These are literally the best snow tires money can buy for this car, and so far they've been worth every penny.


Monday, January 19, 2015

A big fat phony

Little known fact that most people would never guess: The oil pressure gauge in 94-96 civilian Caprices and Impala SSs is a fake.  It's nothing more than a fancy idiot light.  If there is more than 5psi of oil pressure, the needle moves up to a set point and does not change.  In all likelihood, GM did this to alleviate warranty claims.  The gauge it's self is perfectly real, but it's hooked up to a simple on-off pressure switch and fed through a resistor to make it read about 3/4.  Only the police Caprices got actual pressure senders, and gauges that move.

Because the gauge is real, and all the wiring is there, it's easy to make it work.  There are two options for actual pressure senders.  The first, and most obvious choice, is the factory police sender.  It's a direct swap for the original Impala sender, however it tends to be expensive, and is calibrated for 80 PSI.  Because it's an 80 psi sender, it will make the gauge read low.  A better choice is the Chevy pickup truck sender.  It is rated for 60 PSI so the gauge reads in a more "normal" range.  I'm using Napa # MPE OP6869SB, listed for a '90 Chevy 1500 pickup(though they used it for a wide range of years).  

The downside to the truck sender is that it uses bigger threads than the original sender, so you will need an adapter.  The adapter you need is 1/8" male pipe to 1/4" female pipe(picture shamelessly stolen from the internet):
Installation is as easy as unscrewing the original sender and screwing the new one in.  It's a tight fit since the sender is on the block behind the intake manifold, but it's reachable.  There is one other problem though, the resistor.  If we don't take the resistor out of the circuit, the gauge will read far, far to low.  Unlike the sender, the resistor takes some digging to get to.  It's wired in line with the gauge wire in the harness bundle stuffed above the glove box.  Since I had my whole dash out, it was right there, but if your dash is assembled it can be tough to reach.  In addition, GM seems to have found the stickiest tape in existence for their wiring harnesses.  Despite being nearly 20 years old, it's still as sticky and gooey as ever.  You can see where the resistor is in this pic.  It's the thing with the big red arrow pointing to it:
All you need to do is snip out the resistor, being sure to leave the tan wires connected to each other(these are the wires that go to the gauge).  Tape off the bare end of the tan wires, leave the black wire disconnected but tape it off too.  With the resistor gone, and new sender installed, the gauge actually works.  On my 166K mile car running Mobil 1 0W-40, the gauge reads around 5/8 cold, 3/8 hot.

Thursday, January 15, 2015

Filter the results

The Mighty Caprice™ always had a funny rattle coming from the front left corner that I could never track down.  Since I couldn't find it, I figured it was something loose behind the bumper since much of the original underbody filler panels were missing.  After doing some driving in the Impala, which has all it's panels in place, I was a bit annoyed to find that it had the exact same rattle.  I was working in the engine compartment one day, and unexpectedly found the source.

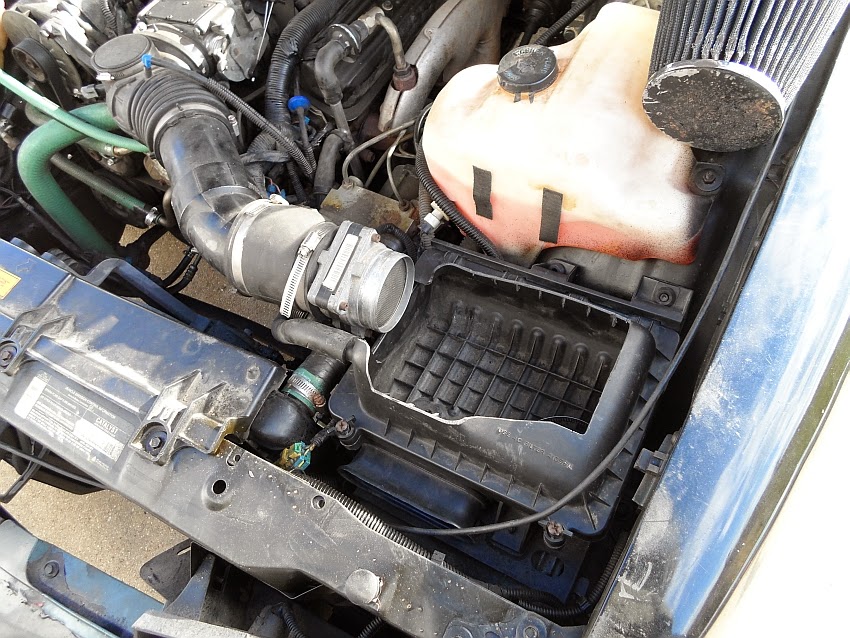
The stock B-body has two helmholtz resonators in the intake track.  They are there specifically to cancel intake noise at specific RPMs to help quiet down the car.  You can see them here, they are the big triangle shaped "home plate," and the rectangular "first base" in the lower right corner(pic shamelessly stolen from the internet).
Other than cancel noise, they don't help or hurt performance on an otherwise stock car.  Many, many years ago, I removed the resonators from the Caprice and built a "Home Depot" intake.  It consists of a hockey puck to plug the home plate hole, and replacing first base with PVC pipe.  While I was at it, I put on a K&N filter that I found cheap at a swap meet.  When I got the Impala, I didn't want all my hard work(Ha!) to go to waste so I swapped the intake onto it.
That's how it sat for nearly a decade on the Caprice.  With the hood closed, the filter couldn't really go anywhere, so I never really mounted it.  And that was the problem.  When I would go over bumps, the metal lip of the filter would rattle against the inner fenderwell.  Knowing where the rattle was coming from, I actually decided to do something about it.  Being cheap, I didn't want to have to buy anything.  Then I remembered that I had the factory airbox laying around taking up space.  Out came the sawzall and the grinder..
I hacked away at the airbox lid until the filter fit with the hood closed.  It's only job is to keep the filter from rattling around.  It's not the prettiest, but it works just fine.  You'll notice the AIR system inlet hose isn't really connected anymore too.  That doesn't matter at all because the AIR pump doesn't work on this car anyway.
As a side note, I see people running around with airboxes that are completely sealed from the rest of the engine compartment, many are even insulated.  The reason for this is to keep the intake air as cool as possible because colder, denser air makes more power.  The reality of the situation is this: from reading the intake air temp on a scanner while driving, if the car is moving the intake air temp is only a few degrees higher than ambient air temp.  The air is moving through the intake so fast that it doesn't have time to pick up any heat.  The temp difference is so small you won't see any HP gains, and all the airbox insulation in the world won't make any difference.


Tuesday, January 13, 2015

Spare some change?

Like many older B-bodys, my Impala jingled down the road.  Whenever you hit a bump, you'd hear a sound like spare change jingling in a jar.  While it's festive in the holiday season, it's embarrassing the rest of the year.  The problem is the sway bar end links.  Over time the rubber deteriorates and falls off.  When that happens, the washers on the end link bounce around causing the jingling sound.  The rubbers on my car were long gone.  Plus, the spacer was rusted to the bolt, and the spacer it's self was starting to crush on the ends from the sway bar smashing into it as the body rolled.  From the extent of the damage to the spacers, the guy must have driven it like this for the past decade.
The easiest thing to do is to just replace the whole end link.  Because the sleeve was stuck, I ended up having to sawzall through the original bolts anyway.   I replaced my end links with the Energy Suspension 9.8125G kit.

Since we're here anyway, another matter that should be addressed is the front bump stops.  The originals are just that, a hard rubber bump stop.  Not only was the original rubber pretty deteriorated, they don't really do anything to help handling.  There's a cheap upgrade here too.  GM used a special type of bump stop on their S-10 ZQ8 package.  Instead of just being a static piece of rubber, it's a urethane foam that is meant to be an active part of the suspension.  It's meant to always be in contact with the frame, and help control jounce.  It helps the car handle better for around the same cost as the original rubbers and the ZQ8 bump stops are a direct bolt on for the Impala.  GM no longer makes them, so Dorman has picked them up(any new GM parts are the same part in a GM box).  The Dorman number is 31064.  Here you can see the new ZQ8 bump stop next to the original:
With the sway bar loose, and the bump stops not doing much, the Impala floated down the road like a 70's land yacht.  I wouldn't say it handles like it's on rails, but it doesn't wallow down the road anymore.


Thursday, January 8, 2015

Chicks dig a guy with blink.

One of the fancy futuristic enhancements to the '94 B-body was it's digital dash.  No longer would we have to be slaves to a needle that told us about how fast we were going, now we would know the exact answer when the officer asks "Do you know how fast you were going?"  'Course like many "new" technologies, it's not without it's drawbacks.  In this case, the digital display starts going wonky.  Sometimes it works, sometimes it doesn't, sometimes just the odometer lights up or the speedo stays lit and odo goes out.  Any and every combination of not working can be seen, and it often blinks on and off going down the road.  For most people, the fix is relatively simple.  The digital display contacts the gauge cluster assembly through a bunch of tiny spring loaded fingers.  Over time, the fingers wear dents into the solder of the contact points on the back of the display board, and the connection becomes dodgy.  I'm not going to go through taking the thing apart, because step by step instructions can be found elsewhere on the internet.  You can see here the divots in the row of solder tabs along the bottom of the board.
The fix is pretty simple.  You just carefully touch each pad with a soldering iron, and the solder reflows into a smooth surface.  The only thing to watch out for is you don't want to accidently flow two pads together.  Here, the pads on the right side of the row have been resoldered.
With the pads resoldered, the fingers on the cluster get a gently scotch-briting to clean off any oxidation.  Sometimes it's necessary to very gently(very!) pull the fingers out a bit so they put more pressure on the contacts.  With that done and everything back together, my speedo lights up like it should.  There are some cars that this won't fix(my Caprice was one of them, I could never get it to work right), but for a majority of them, it does the trick.


I've got wood, but it's fake.

I've mentioned a few times that the Impala  came with one of those cheap woodgrain kits all over the interior.  It's basically a fake wood overlay that covers many of the plastic panels in the car.  It's supposed to make it look "classy," but is just awful.  Really awful.  On top of that, the clear was peeled off many of the panels, leaving the wood exposed.  The lower dash, window switch panels, center console, and door panel inserts were covered with it.
It's cheap, tacky looking, and just plain awful.  The worst part is that this cheap fake wood kit uses the best double sided foam tape 3M makes.  The stuff just does not come off.  Even with a heat gun and careful peeling, much of the tape stays stuck to the panel.  This is one of the main reasons I swapped the whole dash from the Caprice.  I didn't want to have to peel this stuff off the entire lower dash.
The small parts got soaked in mineral spirits overnight to soften the glue.  The big parts took lots of tedious fingernail scraping.  How anyone could think that this woodgrain looked better than the plain panels is beyond me.


Monday, December 29, 2014

An arm resting development

One of the common problems with B-bodys like the Impala is that the arm rests aren't as strong as they could be.  After 20 years of using them to shut the doors, the plastic is often cracked and they don't stay in place.  The arm rests on the Impala were particularly bad(and, ironically, in perfect condition on the Mighty Caprice™).  The plastic base was very cracked, the screw holes broken out, the vinyl cover torn, and on the Driver's side, someone had drilled new holes through it in an attempt to keep it in place(also, both were so discolored that they got a coat of SEM to get them looking nice again).  Eventually, this can lead to a cracked door panel too, as it sees some of the pulling forces.


On my passenger's side, the whole broken area was cut out so only the vinyl cover was holding the armrest on.  You can see too that someone at some point used a whole bunch on really short screws to try to hold the cover back on.  It actually works well enough that I'll leave those alone.


A permanent fix for this is so simple I can't believe I've never seen it discussed before.   I just bent up a piece of 16ga sheetmetal and screwed it down.  The armrest hold down screws go through the sheetmetal so that when you pull on the arm rest, all the load gets transferred through the metal piece into the door.  I also taped the sheetmetal to the armrest with 3M double stick foam tape, making the sheetmetal and plastic arm rest essentially one piece.  In order for this to fail, the whole armrest would need to be cracked in half.

We still need to do something about the top side though.  I wanted the arm rests clamped down tight so they wouldn't move at all, and wouldn't stress the door panel any.  Plus, there were tears and extra holes my vinyl.  So, I got some 1"x1/8" aluminum and started hacking away.  While I was at it, I upgraded from the original sheetmetal type hold down screws to countersunk stainless 1/4-20s, 1" long.  The J-nuts on the door were changed to match.  The thickness of the aluminum plate allows for a nice countersink.
With everything in place and tightened down, the arm rests are rock solid.  The arm rest and door panel are sandwiched between the door and the aluminum plate, and everything is solid enough that you can really crank it tight.   Never again will I have to worry about someone using the arm rest instead of the door pull to close the door and never again will an arm rest come off in my hand.


Wednesday, December 24, 2014

I'm feeling blue

This Impala is a strange beast.  In many ways it is leaps and bounds better than the Caprice.  And yet, in many ways, it's in much worse condition.  Take the dash board for example.  The Caprice spent much of it's life with me sitting outside in the sun.  From what I can tell, the Impala similarly spent most of it's time outside.  Yet, the Caprice dash top only has a few minor splits in the vinyl, while the Impala dash is cracked beyond repair.  So, I decided to swap the two.
Obviously, there's a bit of a color difference there.  It's OK, we can fix that.  SEM Color Coat paint is specifically made for fabric and vinyl.  I've been using it for years and it works fantastic.  It's flexible too so it won't crack or peel off soft materials.  Conveniently, their 15393 Medium Gray is an exact match for the Impala's gray.  I used around two cans to get a few good coats on the dash top.
Initially, I was just going to swap dash tops.  But, you have to take the whole dash apart to get the top off anyway, and since I planned on selling the Caprice, I thought it would look silly with a gray dash top and blue everything else.  The rest of the Caprice dash bits were in better shape than the Impala dash too, and swapping them kept me from having to peel more of that awful fake woodgrain.  So, I painted all the other Caprice dash parts while I was at it.
The Impala's steering wheel was broken when I got it.  The guy said it was like that when he got it.  Just the leather wrapping was holding the hoop on.  It was also mounted upside down, and the (unpopped) airbag was laying in the trunk.

My friend nearly drove the car into a ditch while turning because he tried to grab at the wheel and there was nothing there.  How a guy drives a car that way for 10 years, I can't imagine.  Particularly when replacement wheels are so cheap, the local salvage yard wanted $35 for a Caprice wheel.  The Impala wheel is the same as a Caprice, just leather wrapped.  The lack of leather wrapping doesn't matter to me at all.  The steering wheel wasn't the only issue though.  The shift lever mounting boss on the column was broken too, so the shift lever wasn't actually attached to anything.  It just kind of flopped around, and in anything lower than N, it would fall out when you hit a bump in the road.  Conveniently, the yard with the $35 wheel had the whole column with wheel and airbag for $100.  I was going to swap the column out of the Caprice along with the dash, but for $100, it wasn't worth the effort to change the lock cylinders in two columns and have to R&R the column in two cars.  Like my Caprice, this column was blue too, so it got a good SEMing.  The blue wheel and airbag were scrubbed and SEM'd separately.

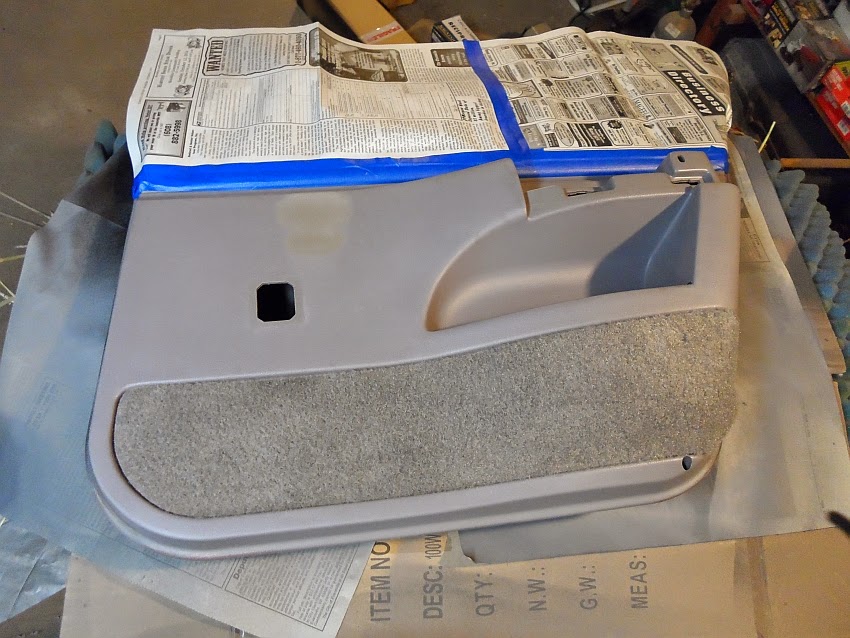
Since I had the SEM out already, one of my rear door panels had a stain that wouldn't come out.  The plastic it's self was actually discolored.
SEM to the rescue again. 
I can't say enough good things about SEM.  I love the stuff, and it did a good job chasing my blues away :)