Showing posts with label cars. Show all posts

Sunday, May 29, 2016

The last bit

With the hood done, there is only one part of major bodywork left on the Viper.  When this car hit whatever it hit(probably a pole), it slid along the driver's door and into the quarter panel.  The side sill had already been replaced when I got the car.  The door was a total loss.  Even a cheap bastard like me could see that it was more trouble that it was worth to try to fix.  The quarter panel is another matter.  It could be replaced, but the damage wasn't too bad and I'm me.

Let's have a look at the damage, shall we?  You can see from the panel gap that the bottom of the quarter is shoved back almost 3/4".


The quarter is shoved back to the point where the quarter is almost touching the sill.  It's also got some cracking along the edges where it flexed too much, and you can see from here the split in the sill.

The inner sill is all cracked up too.  None of the underlying metal is bent, but the fiberglass is cracked in several places.  You can kind of see how the bottom of the sill is shoved back a bit too.


Here's the main crack in the quarter panel.  You can see that it's buckled a bit just below where it's riveted on.  You can also see the spalling radiating out from around the visible crack indicating that the crack extends under the paint a ways.
 
Fixing these areas will be just like all the other areas, with one minor addition.  But we'll get to that next time :)

All bondo'd out

I joked earlier about having the Viper out again before finishing last fall's updates.  Turns out it wasn't that funny, because it's true.  In my last post I started bondoing the hood.  It's time to finish it off.  One of the most prominent features of the Gen II Viper is the hood scoop.  The scoop is a plastic part, and after 15 years in the sun it's not the same shape it originally was.  Additionally, the scoop on my car isn't from my car.  I assume that the original was damaged in the crash so it was replaced.  What all this adds up to is a scoop that doesn't fit like it did when it was new.  The shape doesn't quite match the hood, and, since I re-fiberglassed almost the whole perimeter of the scoop hole, the gaps are all over the place.  Since I have the bondo out already, now's the time to fix it.  The easiest thing to do is to just bondo over the whole thing and sand it down.  First I covered the scoop in blue painter's tape, then I bondoed over the whole area.  The tape both keeps the bondo from sticking to the scoop, and provides some protection so it doesn't get too scratched up while sanding.


The bondoed area is so big because it needs to blend smoothly into the rest of the hood.  We don't want the scoop area to be a distinct high spot.  You also have to make sure to allow enough room in the panel gap for primer and paint.  If your gap is too small, the scoop won't fit once the primer and paint are applied.  After blocking the area down, and some minor tweaking of the panel gap, the scoop fits good as new(actually, probably better than new).

With all the bondo done on the hood, it's time for more Dura-tec.  If you remember back when I first described Dura-tec, you'll know that it's very similar to fiberglass resin.  It catalyzes differently than standard paints and primers.  When you mix regular car paint or primer with catalyst, while the work time, or "pot life" is only an hour or so, it can still take a few days for a cup full of liquid to actually start to solidify.  Dura-tec isn't like that.  Much like fiberglass resin, once it starts to cure, it gels up quick, and the more catalyst you use, the faster it kicks off.  If it does solidify in your paint gun, you go buy a new paint gun.  Why am I mentioning this?  Because when I Dura-tec'd the hood, I had a VERY close call.  My gun started spraying like it was empty, but it wasn't.  The Dura-tec started to gel up in the paint gun.  It took a few minutes of frantic acetone scrubbing to get my gun clean before the stuff turned solid.  At any rate, I did get my hood covered, and the hood is done until it's time for final primer and paint :)

Thursday, March 10, 2016

I heart bondo

Seriously, at this rate I'll have the car out again before I'm done posting all the stuff I did last fall...  With the hood fiberglass done, it's time for bondo.  I've already posted why Bondo brand bondo is terrible and should be avoided at all costs.  My biggest complaints are that it spreads poorly, and sands hard.  I mean, it works, but you end up using more effort and going through more sandpaper than with other fillers.  There are much, much better products for not a whole lot more money.  My filler of choice is Evercoat Rage Gold.  It's about $20 more per gallon than Bondo, but the time and sandpaper it saves are well worth it.  Concidering the $800 I'm likely to spend on just primer, paint, and clear, an extra $20/gallon for filler is nothing.

The first thing I did was sand down all the fiberglass with 80 grit sandpaper.  All the 'glass was sanded close to the final panel height, and all the left over paint was removed from the repair area.  Then I mixed up a big batch of bondo and covered the whole area in one go.  The big blue tarp not only helps keep the dust out of the engine compartment, it also catches drips in the bondo.

If you catch the filler at just the right point while it's hardening, you can remove a whole lot of material very quickly.  Using my longest sanding block and 80 grit paper, I sanded the whole area down.  You want to use the longest sanding block you can because you'll end up with a flatter result.  NEVER use power tools for your final filler work.  If you do bodywork all day every day, you're probably good enough to get away with it, but if you're inexperienced, power sanders will leave you with a very wavy surface.  It quickly becomes apparent when sanding where the highs and lows are.  The highs get sanded down some more, and the lows get more filler.  Ideally, you want no more than 1/8" of filler thickness, any deeper than that could conceivably crack(though that's unlikely) and should be filled with fiberglass instead.  Pinholes in the fiberglass should be ground out too, to avoid problems down the road.

You'll notice that I bondoed right over the edge of the hood scoop hole too.  Since much of that area is new too, it also needed some work.  With the scoop as a guide, I used my die grinder, some square files, and a sandpaper covered popsicle stick to remake the scoop relief.  Here it is in progress:

I want to be sure that the curve of the hood matches the curve in the fascia.  To make sure they match, I made a simple template with foam core posterboard.  It'll get me closer than I can eyeball(and no, I'm not holding it straight in the top pic).


Tuesday, February 23, 2016

LEDing the way

The headlights on my '95 Impala SS are just awful.  The combination of poor lens design and barely adequate wiring makes for little light down the road.  They are so bad that I can drive around with my high beams on without passing drivers flashing their lights at me.  Generally speaking, upgrading the headlights is a lot of work.  The wiring is sized just big enough for standard wattage lamps, switching to higher watt bulbs requires relays be added or risk melting the wiring.  I'm also on my 3rd dimmer switch in this car, the previous two melted.  I've avoided upgrading the headlights partly because of cost, and mostly out of laziness.  But I came across a new solution, LED bulbs.  The price of LEDs has dropped significantly over the past few years, and they now make drop in replacements.  LEDs also use much less power for the same(or more) light output than standard bulbs, which greatly reduces strain on the wiring and switches.  So I took the plunge and bought some.

To my surprise, the headlights already in the car were already upgraded to PIAA "Star White" bulbs(which explains my melted dimmer switches).  Far from being white, they put off a fairly standard yellowish beam.  You can also see that around the base of the bulb the plastic is charred and melted a bit.  These bulbs run HOT.  I bought the LEDs on e-bay for around the same price as many of the "upgraded" standard bulbs.  They are 80w 8000Lm bulbs, that's an entire 50 watts less than the PIAAs, and they put out more light.   Here's what the new bulb looks like.  The old bulb is on the left, the new LED bulb on the right:

Installation is as simple as removing the old bulb, putting in the new one, and plugging the harness into the existing plug.  It's immediately apparent that the new bulbs are brighter.  Once again, old on the left, new on the right:


So, how do they actually work?  Well, the jury is still out on that one.  There is no question that they put out more light, but how they put it out leaves me a bit underwhelmed.  The pattern is much more diffuse with the LEDs.  They light up the sides of the road better, but don't seem to project out as far.  Since half my driving is at night down country roads, my biggest concern when driving is deer jumping out in front of me.  Having the sides of the road illuminated better could help avoid them.  Though the highs are definitely brighter, there isn't as distinct a difference between the high beams and low beams either. 

Lows:

Highs:
I'll give it awhile to get used to them, but for now I'd call it a wash.  On the plus side, I shouldn't melt any more dimmer switches :)


Saturday, January 30, 2016

This just in...three months ago...

From time to time, I fall off the face of the internet and people won't hear from me for weeks or months at the time...  At this rate, it'll be warm again before I get all the work I did last fall posted.  Anyway, back to our regularly scheduled program...

I saved the biggest crack in the Viper's hood for last.  This crack goes all the way across the hood from the scoop to the headlight.  The lower corner was cracked off too.

Like everything else, this giant crack was never repaired right.  Even though the crack was actually fixed with fiberglass, all the damage wasn't removed.  There is still a lot of delamination along the edges of the crack.

The surprises never end when redoing someone else's work, you never know what you're going to find.  In this case, a lag bolt, just chillin' between the top and bottom layers of fiberglass.  No reason for it to be there, it wasn't holding anything.  This is about as far down as I ground the fiberglass too.  While it's still mostly solid, it's paper thin and is only there to provide enough backing to keep the new fiberglass from sagging.

While I'm thinking about it, I'm not sure if I ever explained why I'm using fiberglass mat instead of woven cloth.  Thickness for thickness, woven cloth is stronger than mat but it's harder to work with.  It doesn't go around corners as well as mat does.  Being easier to work with isn't the primary reason through, the real reason is shrinkage.  Fiberglass and bondo shrink a tiny bit for awhile after they set up.  If you don't properly cure, then post cure your work it will shrink more.  Even if you do it right, fiberglass and bondo will still shrink a tiny bit over time as the remaining VOCs slowly evaporate out.  This is the biggest reason why I wanted to get the fiberglass and major bodywork work done last fall, and wait to paint it next summer with many hot days in the sun in between, to give the bodywork time to shrink before final sanding, priming, and painting.  If/when the bodywork does shrink, the weave of the fiberglass may become visible.  Our eyes and brains are GREAT at picking out patterns.  If you use woven cloth, your eye will be drawn to the obviously square weave pattern of the cloth, and it will be very noticeable under the paint.  Mat on the other hand has fibers meshed in a random pattern.  If you do get enough shrinkage to see the weave, the random pattern will be much less noticeable.  It won't draw the eye like woven cloth will.

For this repair, I used pieces of fiberglass big enough to cover the whole area.  Generally speaking, the bigger the piece you can use, the better.  On things like the bottom of the hood with all it's curves big sheets just don't work, but on big flat outer surfaces, they work great.  I used an entire 8 sq/ft package of fiberglass mat on just this one layup.  This is part of the reason I did all the small spots first, so the top layers of fiberglass could be done in big sheets.

After grinding that down, it was time for the last bit of fiberglass work on the hood.  You'll remember from earlier posts that the front lip was pretty cracked up.  When I did the back, I ground the lip to a very thin outer shell and layed 'glass in behind it.  For the topside, I ground it back until I hit the new 'glass I put in, then layed full length strips across the nose. 

With just some more grinding and trimming, that's about it for the fiberglass repairs on the hood.  Everything else from here on out is body filler work.  Also keep in mind that even though I layed fiberglass over existing paint, it's a huge no-no for finish work.  Anyplace there is fiberglass over paint, it's still higher than the finished surface needs to be.  Before adding bondo and doing the final bodywork, all the high spots in the fiberglass(where it's overlapping any paint) will be sanded down and ALL of the paint will be sanded off the repair areas.  But more on that later...

Friday, December 25, 2015

At this age sometimes it just stops working...

Here's a brief side note in our hood repairing saga.  I've been going on and on about how you have to do things right when fixing fiberglass.  It's not hard to do, but it is easy to mess up little things and have problems down the road.  This is one of those little things.  It's not uncommon to see Gen I and II Vipers with bubbles in the paint, even on cars that have never been wrecked or repainted.  They look just like rust bubbles would on a steel car.  My car is no exception, two places on the hood had these bubbles.  They're easy to see when you're looking at the car, but very hard to photograph in 2D.  To make the bubble stand out, I lightly sanded over it so you can see it clearly.
Then I started sanding down into it with my DA.  Even though my hood has been repainted several times, it wasn't re-work that caused this bubble.  It goes all the way down to the fiberglass.  The original factory primer lost adhesion to the fiberglass.  A large chunk of it was no longer stuck down, and that's what caused the bubble.  It's also why some cars have bubbles when the body is hot but they seem to disappear again when the body cools down, the loose paint gets hot and expands more than the fiberglass beneath it.
It just goes to show that even the experts can sometimes have trouble getting everything to work right with fiberglass.


Sunday, December 6, 2015

Next!

Just a little update because I'm so far behind on my posting.  Continuing my theme of smallest to biggest, I fixed some more cracks on the Vipers hood.  Same process as the last ones and like all the others they looked like tiny imperfections until I started grinding into them.  Same location too, the corners of the hood scoop hole create stress points where cracks will start if flexed enough.  You can so see that I've got a tarp laid out under the hood.  It's there to keep most of the dust out of the engine compartment, and catch any drips of fiberglass resin or Bondo.  For the time being, I'm also not worried about fiberglassing over the paint.  Normally that's a huge no-no, but the whole area will be sanded down to bare fiberglass before the bodywork is completed, and none of the paint overlapped areas will still be there once that's done.


Saturday, November 7, 2015

Gotta start somewhere

Time to actually start fixing the top of the Viper's hood.  I started with the crack in the upper passenger's corner of the hood scoop.  As you can see in the pic, after it was "fixed" it continued to crack.  You can also see towards the bottom of the pic another crack that never got addressed at all:
Grinding into the crack revealed another problem.  Just like the area further down the hood, some of the fiberglass has delaminated.  There are some fibers that have broken loose from the rest of the panel.  You can see too that though the main crack had some new fiberglass over it, it was still very much there.
When you start grinding onto these things, it's actually fairly easy to see the cracks and delamination.  As you're grinding, you just keep following the cracks until you get back into solid fiberglass.  If you're not ready for it, it can start to look pretty grim as you keep grinding, and grinding, and you're still chasing the crack.  With this crack for example, I ended up having to grind out a sizable chunk of hood to get rid of all the damage.  Much of it goes all the way down to the inner panel.
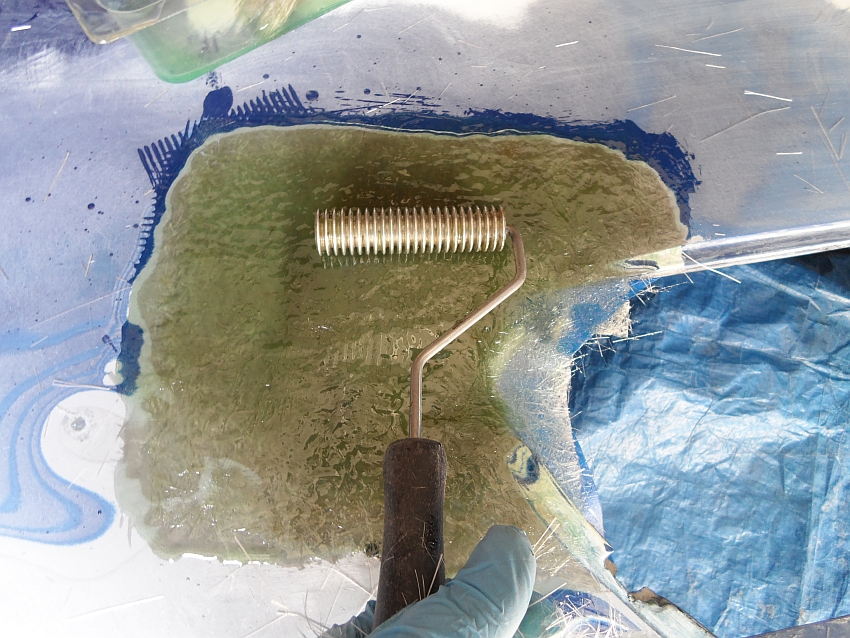
The rest of the repair is the same as any of the other repairs I've showed.  I do have another bit of how-to to add though.  As you're laying up fiberglass, you are going to get bubbles in the resin.  Bubbles can cause problems down the road, particularly if they're close to the surface.  You can, to some extent, use a bondo spreader to work the bubbles out, but it doesn't always work for small bubbles.  Fortunately, there's a tool for that.  For around $15, you can buy a fiberglass roller.  It's made specifically for rolling out fiberglass, and works great for working out bubbles.
The only down side to a fiberglass roller is that you have to use it and get it clean before the resin starts to set.  If the resin sets before it's clean, you may as well throw it away.  Dunking it in a tub of acetone will help dissolve the resin, as well as slow down the reaction giving you a few more minutes to get it clean.

Monday, October 26, 2015

That's just not right, Pt 2.

With the hood back on the car, I could finally get started on the important part, the top side(although really since the top is just for decoration while the bottom actually provides the structure, it should be the other way around).  The "repairs" on the top of the hood are another exercise in how not to do things.  Instead of diving right in with my grinder, I used my DA to sand the paint off, exposing the "repairs" in all their "glory."

The first thing I noticed was that this hood has been painted FIVE TIMES.  I don't mean there were five coats of paint on it, there were five distinct base/clear layers.  I know the bumper skin was repainted because it's flaking in places.  I had no idea that the hood it's self had been repainted, much less five times.  All the damage I found was from the crash that wrecked it just before I got it, so I don't know why the hood was painted so many time.  Anyway, lets look at a picture, because you're all really here for the pictures, right?
One pic, lots of trouble...
1.  There is a crack here repaired with fiberglass.  As you can see, the fiberglass is laid OVER the paint.   Paint is not a suitable substrate for fiberglass.  It wasn't properly ground down, and will have adhesion issues.   The whole repair could literally pop off the part because the only thing holding it on is paint.
2.  Cracks filled with bondo.  They didn't even bother to grind out the crack on the right(that's the one we took an in depth look at a few posts back).  It's no wonder it recracked, there is no structure holding the crack together.
3.  Loose/delaminated fiberglass.  We'll take a closer look at this area later on
4.  In a one-two punch, here we have more fiberglass on top of paint, and more crackes just skimmed with bondo.
5.  A crack that was ground a bit, but not completely gone so the crack continued to spread.
6.  Fiberglass laid in without a proper bevel.  These are major cracks and in several areas the only thing the new 'glass is holding onto is the vertical edge of the old 'glass.  In time, these crack would reappear.

Here's a closer look at area 2, where the crack reappeared.  You can see there is nothing holding the cracks together but a bondo bandaid. It's a wonder that it lasted as long as it did before recracking.


Here's an up close look at area 3.  The impact from the crash caused some of the fiberglass to delaminate.  You can see the ragged dark edges towards the center of the pic where some fibers of the top layer of fiberglass broke loose from the rest of the sheet.  They were just skimmed with bondo.  This sort of damage may or may not ever develop into a full crack, but it will definitely cause paint adhesion problems as the broken layer of fiberglass can move independently of the rest of the sheet.  You can also see a myriad of still existing cracks under the fiberglass repair on the left side of the picture.


One more picture, because everyone likes pictures.  Area 4 is basically all the other problem areas combined in one area.  There is just so much wrong in this picture...

Saturday, October 17, 2015

SEMtastic!

It's still too cold to do any actual work on the Viper, so I'll do more posting instead.  It's time to finish the bottom of the Viper's hood.  Unlike the paint on the outside of the car, the paint on the bottom of a Viper's hood is not catalyzed.  If you wipe it with a strong solvent like lacquer thinner, it comes right off.  Because of that, I don't feel bad using non-catalyzed products to refinish it.  I'm also going to cheat just a little bit because I know my work isn't exactly as it was originally anyway.  I'm going to use a pair of SEM products.  As a company, SEM doesn't make any bad products.  Their Color Coat plastic/leather/vinyl/cloth paint beats Duratec as my #1 favorite product.  Here, I'm using a pair of products I've had good results with in the past.  The first is #39853 Texture Coat, the second is #39143 Trim Black. 
Texture Coat is just that, it's meant to give some texture to an otherwise smooth surface.  The Texture Coat is made to match OEM textured surfaces like you find on bumpers and some interior plastic parts.  You can also vary the texture by changing your spraying distance and how heavy you put it on(and as a benefit in my case, it will also hide sand scratches).  Here you can see the texture I ended up with on the Viper's hood. 
Trim Black is a satin black that very closely matches a lot of OEM finishes like you sometimes find under hoods, in fenderwells, and misc exterior trim. It's very close to the original black under the Viper's hood.  It's a good, durable, air dry paint that stick well to most surfaces.  It looks a bit shiny and uneven here, but it's still wet.  Once dry, it's a bit more satin, and very even.
The only thing left is to reinstall the hood pad and put the hood back on.  I expected the bottom of the hood to be a weekend project, but it was a month and a half before I actually got it done.  It was far more damaged, and the repair done much more poorly than I expected.  Even though it was off the car for a month and a half, because of the other demands on my time, I really probably only have 35-40 hours in it.  An actual professional bodyman probably could have had it done in 20-25 hours.


Friday, October 9, 2015

Back to the grind

Try as hard as I might, I couldn't get all the bodywork done on the Viper.  Every time I got going on it, other people would start making demands on my time.  Now, it's too cold out for fiberglass and bondo to cure properly, so I figured I might as well catch up on my blog.  When we last left the Viper, I'd just finished laying in all the new fiberglass on the bottom side of the hood.  Since the fiberglass is what makes up the structure, we could just leave it as it with some minor trimming.  But, it's the bottom side of a hood in an engine compartment that a whole lot of people ask to see so it has to look pretty too.

Before we can really start grinding, we need to know where to stop.  In a few areas where there was original undamaged fiberglass, I left some spots of the original black paint.  I know that paint is where it should be, so I know that that is where the surface should be when I'm done.  None of it is super critical on the front of the hood, but you still want to make sure the latch hooks are close enough to their original position that it will latch properly(even then, the latch has a lot of adjustability in it).  The round circle is one of the hood scoop nut recesses, the odd shaped black splotch is original paint telling me where the surface should be once we're done.
I started again with my trusty Harbor Freight grinders, first the 7" to knock down and level the big flat areas, then my 4.5" to hit the smaller areas, and finally a 2" pneumatic grinder for the tight spots.  Grinding it down serves two purposes, first to knock down any high spots, and second to roughen up the surface for additional filler work.  Here it is all ground up.  You can see the shape is roughed in pretty well.
You'll notice that three of the four the hood latch hook holes have been completely fiberglassed over.  Before I put any filler on, I want to be sure I know where they are.  Here is where Mineral Spirits works some more of it's magic.  Wiping the ground fiberglass with mineral spirits turns it transparent enough that you can see through it.  here you can see one of the hood latch hook holes under the fiberglass.  It shows up as the dark circle about in the middle of the picture.  All the holes will get drilled out before I add any filler.
Here's the part that I don't generally recommend, but am going to break my own rule and do anyway.  I've mentioned filler a few times.  Standard body fillers work good for a lot of things, but they don't have much strength.  Fiberglass is strong, but is hard to work with(and sands like concrete.).  There is a product that lands directly between the two, fiberglass reinforced body filler(often called Kitty Hair or Tiger Hair).  It's essentially bondo with chopped up fiberglass in it, and has the added benefit of being waterproof like fiberglass(and unlike standard bondo).

I don't generally recommend it for two reasons.  First, because it's fiberglass reinforced and stronger than standard fillers, a lot of people use it instead of doing proper repairs.  This hood had several areas that were just filled with kitty hair instead of being repaired properly with fiberglass.  Far too often I see kitty hair band-aids on things that need actual repair, both on fiberglass and metal cars.  Second is the bubbles...

Because of the fiberglass strands in it, kitty hair doesn't mix or spread as well as bondo(especially the long strand variety).  As a result, you often end up with large bubbles or voids in the filler that might cause problems down the road.  I decided that for the bottom side of the hood, I wanted the extra strength of the reinforced filler and would just deal with the bubbles.  You can see here the kinds of voids and bubbles you typically get in kitty hair:

You can't just fill the voids because filler won't stick to the (relatively) shiny surface of the bubble. The only way to deal with them is to grind them out first, then fill them.  Using a carbide burr in my die grinder, I ground out all the bubbles I could find.  In addition to the big obvious ones, there were also a whole lot of pinholes that needed to be filled.

Once the bubbles were ground out, I filled them with regular body filler and sanded it all smooth:

Unlike the outside of a car, the bottom side of the hood has lots of odd shapes and small contours, so it took a variety of sanding tools to work everything smooth.  For all the filler work, I used 80 grit sandpaper.  I bought a big roll of sticky back 80 grit, it's the most economical way to buy it.  From top to bottom I have my rigid 6" block, a flexible 6" block, a rigid 3" block, half a tongue depressor wrapped in sandpaper, a whole tongue depressor wrapped with sand paper, and my trusty 8" Durablock.  For this kind of work, improvised sanding blocks are often necessary too. Find something that fits where you need it to fit, and wrap it in sandpaper.


Even though most of the surface is covered in filler, it's not very thick.  Just like laying the fiberglass down, I worked a section at a time until I had the shape I wanted.
Once the filler was sanded down, I renewed my love affair with Duratec primer-surfacer.  It's just such a wonderful product, and it's made specifically for fiberglass to boot.  The repaired areas of the hood got a healthy dose, followed by sanding with 220 grit paper.  Normally, you'd want to sand much finer than that for paint or you'll get sand scratches showing through, but I'm going to do something a little bit different and don't need a super fine finish.  For now, just enjoy the Duratec'd goodness...

Tuesday, September 15, 2015

Some things you just have to do right.

I've spent most of my posts explaining how to do things.  I'm going to take a minute now to explain a why.  Since I started fixing the Viper's body, one of the big things I've been harping on is the need to do things right to prevent future cracking.  I've also mentioned repeatedly how the previous "repairs" on the car weren't done properly.  You'll notice that I always put repairs in quotes.  With cracked fiberglass, you CAN'T just band-aid it, it must be done properly or it WILL crack again.  As with many other things on this project, the hood has again provided me a perfect example to demonstrate why.
 
Lets take a closer look at this crack here.  As I mentioned a few posts back, this crack appeared after the car had been "repaired."  That much is obvious because it's cracked through the primer that covers the "repair."  The question is why did this "repaired" crack come back?

Without the paint covering it up, the reason was very apparent on the bottom of the hood.  Here's where the crack is on the bottom side of the hood.  The white is the original panel.  All the 'glass on the bottom is stuff I added during my repairs(and before I repaired the front lip).  The stuff in the middle is just kitty hair(fiberglass reinforced filler) from the previous "repair."  You can see that not only is the crack still very much there, there are voids in the kitty hair and much of it isn't actually bonded to anything.  The crack is basically just bondo'd over.  While it might have looked smooth from the outside the structure is cracked and has no strength.
Grinding into the back side of the crack further shows how poorly this crack was "repaired."  Not only was the crack only glossed over on the top side, just below the surface on the back side there is no more filler.  There is just a large void under the crack.  So, we're left with a still cracked panel that has no reinforcement behind it. 
It's no wonder that this crack reappeared.  There's almost nothing holding the shattered fiberglass together.  The top side just has a skim coat of filler covering the crack.  The back side has a little filler just kind of holding the pieces together.  This, right here, is why so many repaired fiberglass panels crack again.  Covering up a crack doesn't address the problem, it just makes it look nice temporarily.  You can't actually repair a crack in fiberglass, you must completely remove the crack and replace it with new fiberglass.  If you just cover a crack with bondo or even a layer of fiberglass, it's not a matter of if the crack will reappear, but when.

Sunday, September 13, 2015

ODing on crack

Working from the back forward, I got all the minor cracks in the Viper's hood fixed.  All that I had left was the front end.  I decided to do the repair in four stages, the two corners, the center section, and the front lip.  The previous owner of this car slid the passenger front corner of the nose under something.  When that happened, that corner of the hood was shattered.  I started with the most crunched area, the passenger front corner.  I assumed from the beginning that I would have to redo all of the previous work, but I didn't know just how bad it was until I started grinding away at it.
Almost the moment I started grinding, I started finding poorly laminated "repairs," and layers that weren't really connected to anything.  So I kept grinding.  And grinding.  And grinding.  Even though it had already been "fixed," there were still tons of cracks in the original fiberglass.  Like the previous repairs I've done, I ground out any and all cracks I could find.  I also ground out nearly all of the previous repairs.  Anything of the old repair that I did leave I left strictly as a backing for the new fiberglass I'd be putting in.  You can see just how much of the nose was replaced.  The white is the original panel, the darker color was part of the previous "repair".  Also, there was a block of wood under the "repaired" fiberglass.  Basically, I needed to rebuild the whole corner of the hood.
Ideally, you'd want your new fiberglass to be one big piece.  Because of all the curves and corners on this thing, that is neither practical nor possible.  You will never get a single big sheet of 'glass to go around all those corners and lay down flat.  Trying it will just lead to frustration and more grinding, trust me on this.   The next best thing is overlapping layers of smaller pieces.  Smaller pieces will lay down easier, and go around corners better.  Any time I do fiberglass work, I always plan where and how I'm going to position my pieces before I mix my resin.  I cut and lay my pieces down about where they will be laminated onto the panel, then lift the whole thing off and lay the pieces out on cardboard in the order and approximate location where they will go.  Pre-planning all this before I mix the resin allows for quicker layup, as well as keeps my scissors from getting sticky from cutting 'glass with resin covered gloves.  Here you can see how all the overlapping layers of fiberglass will be placed.
With everything planned out, all I had to do was mix up the resin and lay it up.  The pieces go on one at a time.  Lay a piece of mat on, saturate it with resin, work the bubbles out, and repeat.  Most of the new fiberglass is laminated to 1/4" thick, with many areas being even thicker.  You'll notice the color of the resin is different here.  As I've mentioned before, the Evercoat SMC resin uses standard bondo hardener.  I decided to use blue hardener this time, mostly because I have a big tube of it. 
With that done, I moved onto the other corner.  This corner wasn't nearly as damaged.  It also hadn't actually even been repaired.  Only one crack was "fixed," the rest were left from the accident.  So, like everything else, I ground out all the cracks, and the previous repair material.
Same deal as last time, cut the mat, plan the layers of fiberglass, and add some resin.
The third area I needed to fix was the center section.  This area had a big crack going through it and instead of laying in more actual fiberglass, it was just filled with Kitty Hair(fiberglass reinforced body filler).  Kitty hair in useful for some things, fixing cracks in fiberglass isn't one of them.  So, once again, I ground out the cracks and previous repair material.  This repair also overlaps my previous corner repairs.  Now, fiberglass won't stick very well to shiny surfaces, and cured fiberglass is (relatively) shiny.  Any time you put new 'glass over cured 'glass, you need to grind the shiny off of it.  24 and 36 grit grinding wheels work best.  Even though you don't have interlocking layers, if it's ground back like this the fiberglass should never have delamination issues.  Here you can see the cracks ground out, and my previous repairs ground back so the latest layer of fiberglass will stick.
Same routine, cut, plan, add resin.
The last section to do is the front lip.  I decided to do the front lip as it's own separate section because it has so much damage.  I decided I would just rebuilt the whole front edge.  It's also easier to manage as it's own section, and I wanted to lay it up very thick.  For the new front lip, I decided that the bulk of it would be built from the bottom, and only the outer surface would be rebuilt from the outside.  To do it I ground back all the fiberglass, both old and new, until I just had a very thin edge left to use as a guide/backstop. 
To backfill the lip, I laid in lots of long strips of fiberglass.  All in all, most of the lip ended up being around 1/2" thick.
That's all the fiberglass that needed to be added to the bottom of the hood.  It may not look like much, but to give you a sense of how thick most of the new fiberglass is, I used almost 30 sq/ft of fiberglass mat and 3/4 gallon of resin.