Showing posts with label Kawasaki. Show all posts

Sunday, October 11, 2015

Just a little sprocketing

I mentioned some time ago that my Dad is rebuilding a Suzuki RE5.  The frame is set up to use later Suzuki Katana wheels.  Things like this are rarely a direct swap.  In this case, aside from basic wheel fitment issues, the Katana is made to use a 520 size chain, while the RE5 uses a 530 chain.  Swapping the RE5 to a 520 chain is pretty straight forward, but you need to buy a matching front sprocket and a chain.  It was decided that it would be easier to just adapt the RE5 rear sprocket to the Katana hub. 

The first thing I did was drill the new bolt holes.  In stead of doing the math to figure out where to put the new holes, I just drew up the bolt patterns in Solidworks.  From that, it was very easy to measure how far from center in X and Y the new holes had to be.  After center finding the hub hole, I drilled all the new holes.
Here you can see the new holes.  One new hole overlaps one of the old holes.  With a 5 hole pattern(RE5) and a 6 hole pattern(Katana) so close in diameter, you will always have an overlapping hole somewhere in the pattern.  On something like this, it doesn't make much difference.  Even a modern high power 2L sportbike doesn't have anywhere near enough torque to shear off the bolts. 
Then I set about enlarging the hub hole, it needed to be opened up by about 1/4".  The easiest way to do this on a manual mill is with a boring bar.  I had a whole long explanation of how these things work and how to use them, but it was just boring...
That's really all there is to it.  I don't have a pic of the RE5 sprocket on the Katana hub, but it fit like a glove. 


Thursday, September 3, 2015

Just some quick tips

Just some quick tips about working with fiberglass for today.  The first tip I have to share is to wear latex gloves when working with it.  When I started the Viper's bodywork, I called it "The long and itchy road." As anyone who's ever actually worked with fiberglass will tell you, it can be a very itchy process.  Fiberglass is called fiberGLASS because the cloth is literally microscopic strands of glass woven together.  Your car or boat is literally made from the same material as the windows in your living room.  While most people tend to thing of glass as solid, it's not.  When you get it thin enough, it becomes very flexible which is why fiberglass cloth doesn't just shatter when you bend it.  When you work with it, particularly when grinding, the air is filled with tiny glass shards that can get embedded in your skin.  It doesn't cause any harm, but can itch like crazy.  Gloves will help cut down on the itching a ton.  Additionally, you don't want to breathe too much of it.  Just like doing the occasional brake job won't give you mesothelioma, occasional fiberglass work and breathing in small quantities won't cause permanent damage, but you still want to avoid breathing it when you can.  For heavy grinding or sanding, a dust mask is a good idea.  It's also a good idea to have some "fiberglass working clothes" that you can take off immediately after you get in the house.  You don't want to track itchy dust all over the place.

Speaking of dust, fiberglass and bodywork work tend to make a lot of it.  Ideally, you want yo do your grinding and sanding outside on a breezy day so you're not working in a cloud of dust.  Outside on a breezy day isn't always an option though.  Either the weather won't cooperate or, like with my current project, I can't physically get the hood out of the garage by myself.  This is where being popular helps.  I always put my biggest fan right next to where I'm working.  It'll blow the dust away from where I'm working, and (mostly) out of the garage.

Next is the matter of Post Curing.  People think of fiberglass as an immovable solid, but it's not.  Fiberglass can, and will, move all over the place, particularly as it's curing.  Left on it's own, fiberglass can take weeks, or even months to fully cure and settle down to it's final shape.  Even "fully cured" fiberglass will move a bit more on it's first day in the hot sun.  This is where post curing comes in.  While it's not so important on the bottom of a hood, on exterior panels, it's critical.  Since we don't have the time to wait, we can speed things along in helping the 'glass take it's final set.  The idea is to raise the temperature of the 'glass to speed up any remaining curing.  Ideally, you want the glass to get up to 140°F, and stay at that temperature for a few hours.  The sun works great, but isn't always available.  Infrared heaters are the next best thing, but most people don't have access to those either.  What a lot of people do have is halogen lights.  Just set up your halogen light shining on the panel.  If the light is too far away, the panel won't heat up enough.  If it's too close, the panel will overheat.  Find the best distance for your light to heat and hold the panel at 140°F.  Since these lights are generally small, and the panel shape is complex, you should move it around every few hours so all the new glass gets baked.

Incidentally, this is the reason so many kit cars have such low quality panels.  Even if the mold is straight, the parts are demolded too soon after laying up, and then are shipped out without post curing.  This leads to very friendly panels that wave at everything.  It's also why so many fiberglass cars with fresh bodywork look great this year, but terrible next year.  When I was building kit cars for a living, we would let new parts sit in the mold for at least a week, usually longer, and then spend another week post curing them.

The last tip I have is of "don't burn your house down" importance.  First off, always test your mixture before actually starting the repair.  Mix up a batch of resin, and make sure it cures.  Liquid fiberglass hardener in particular goes bad quickly after it's been opened, so I ALWAYS use a fresh tube of hardener if mine has been open more than a few days.  Trust me, you don't want to have to peel off and re-do partially set fiberglass because your hardener failed and it won't fully cure.

Second, all compounds where you mix part A with part B to cause curing are exothermic.  That means that they give off heat as they start to cure.  Fiberglass, bondo, JB Weld, 5 min epoxy, etc, all produce heat as they cure.  The amount of heat is determined by how fast they cure, and how thick the mass(thicker means more heat).  If over catalyzed, fiberglass resin and epoxy especially can get tremendously hot as they cure.  I tend to mix my resin a little "hot"(with too much hardener) to make sure it kicks off OK.  I have, a time or two, mixed resin so hot that it's started smoking.  It won't get that hot on the panel because the resin layer is relatively thin, but it will get that hot in the mixing cup.  NEVER NEVER NEVER throw away mixed resin until it's cured and back to room temperature.  It could start your garbage can on fire.  Always set the cup on something non-flammable and non-meltable because that too can cause issues.  Here's an example from this project.  The bottom of this cup was flat when the resin was mixed.  As it cured, it got hot enough to warp and melt the bottom of the cup.


Friday, July 24, 2015

H1, Chapter 5

More work on the H1.  The pic doesn't really show, but the fins aren't just sanded clean, but fully polished. The paint and sand the fins trick works nice and is pretty quick, but having to actually fully polish the edges of the fins turned out to be really time consuming.

More shiny bits.  I still have some final buffing to do, but I ran out of polishing compound.  I also left the big gouges and scrapes. There's not enough metal left in some of them to sand out. And they character and are a nod to the bike's previous life(but mostly I'm just lazy).

You'll remember I flipped the headlight ears upside down to get the headlight lower. The point of that was to get the gauges mounted lower. I finally got that part done. The pod still uses the same mounts, it's just on the other side of the top triple clamp. I had to cut off then drill out the factory studs on the bottom of the pod. Those studs are cast in so the won't come out, and they're harder than @#$%(for no apparent reason). Took me 2 hours and many drill bit resharpenings to get the holes drilled through. Then it was just a matter of trimming the center cover to clear the triple clamp. I'll seal it up when I do the final assembly. I'm still using the stock rubber mounts, and some stainless bolts that I'll polish nice and shiny. The ignition key still works just fine, and the pod sits like it was made to be mounted there.


The gauge pod was the last of the major "before it comes apart" fabrication.  With that done, I stripped the bike down as far as I'm going to. Once I get everything cleaned, I'll paint the frame, swingarm, and engine case.  Just pulling the forks off really transformed it from "most of a motorcycle" to "a pile of parts" haha.

Got my frame cleaned and painted(and yes, I took the rear wheel off before I did it).  Most of the factory paint was still in very good condition, so I only painted the parts that are visible when the bike is assembled.  It also saved me the trouble of having to strip off the wiring harness.  I've seen lots of black cylinders on H1s and H2s, but I don't know that I'd ever seen an engine with black cases. Since I've got a black and shiny theme going on, I decided the cases should be black too. I also put a fresh polish on the rear brake drum while I had the wheel off.


Sunday, June 28, 2015

H1, Chapter 4

Let's start this one with a quick pic. The trimmed part in the pic is actually the first mold I made(you can see the shiny inside). It's trimmed the way it is so that when you lay a part up in it, it leaves a very distinct line to follow when trimming the actual part. Having a guide saves a lot of time down the road. You can also trim the part while it's still in the mold, using the trimmed mold as a guide. That's what I would have done here, but I wanted to be sure this part was going to come out of the mold.  The part it's self gets trimmed with a cutoff wheel in the 4 1/2" grinder.  It gets rough trimmed, then the edges are sanded to their final shape.


Got'er trimmed and sittin' on the bike. I fit on it exactly where I wanted to, nice and comfortable, and not so upright.  You can see as well that the rear mounting tab of the tank actually sits on it. That's part of the plan, makes the tank sit where I want it as well as provides a front attaching point for the seat/fender.


Truth be told, I barely got the fender out of the mold.  I had to fight like heck with the thing to get it out of the mold.  Since the whole point of the mold was to have an easily reproducible part, I wanted something better.  So, I used my newly molded fender as a buck to make another new mold.  Like the original mold, the fender gets bodyworked, recoated in resin, and polished to help keep the new fiberglass from sticking.  In order to get the parts out of the mold easier, I decided a two piece mold was the way to go.  It's actually not a whole lot more involved than a one piece mold.  A piece of particle board gets hot glued to the buck where you want the seam to be, then you cover half the buck with fiberglass:

Once it's set, you pull the particle board off and you're left with half a mold and a flange:

Then you prep the other half of the mold and lay it up against the flange.  Before pulling the mold halves apart, it's a good idea to drill some bolt holes through the flange so they're in prefect alignment.  While I was at it, I also made molds for the seat pan, and fender undertray.  For the seat pan mold, I used modeling clay to create a gap on the seat pan lip so there's room to wrap the upholstery around the fiberglass.  I also used clay to fill the rear tank mount to lay up the seat pan mold.

Here are the three molds all ready to go:


With all 3 molds made, I could finally make part #1.


I got it trimmed and fit to the bike. I trimmed the seat area out, bonded in the under tail piece. I also glassed in some steel tube that will serve as a support for the front seat/fender mount. The same hole also serves as the rear tank mount. The rear fender mount uses stock tailpiece mount holes, and the stock splash guard still fits with some minor trimming.


The COOLEST part of this whole project is that unlike ALL the other cafe style fenders available on the market, the stock seat hinge and seat latch STILL WORK. The storage area in the tail is specifically sized to hold a can of starting fluid or quart of two stroke oil. Even the helmet hook still works :)

Got the fender primed and rough blocked, and moved on to other stuff. I did some minor porting on the cylinders. I also made myself some UFO's.  If you've never heard of UFOs, they are little plastic pieces that fill in the bottom of the slide on slide type carburetors.  They are worth a few percent HP gain on 4 strokes and are generally not worth it.  On a two stroke though, they can often add 10% more power and you generally get better low and midrange throttle response. They are commercially available, but of course they don't make them for my specific carburetors.  So, I made my own.

I got a chunk of UHMW from e-bay and went to carving with the dremel. Took some time to get the shape right so the slides would close all the way, but after the first one, it went quickly. You can't really see it because of the white plastic, but the shape is really quite swoopy. With the stock and UFO'd slide next to each other, you can really see how it helps airflow through the carb, especially at lower throttle positions.


Then I moved my headlight and gauges. I never liked how high the gauges stuck up above the handle bars.  It was even more noticeable with the drag bars. The gauges sticking up interrupted the flow of the lines of the bike. So, I decided to move everything down.  This turned out to be a super easy mod. 1: flip the headlight ears upside down and swap side to side. 2: cut off gauge pod studs and drill out gauge pod for bolts. The gauges nest perfectly on top of the headlight, and will use the stock rubber mounts with some through bolts. It brings the gauge pod down to the level of the tank, much more gooder...er better, much more better...  If you compare it to my original profile pics, you'll see how big the difference is. I'm not quite done, that's as far as I've gotten with it, you're all caught up through today.


Friday, May 29, 2015

H1, Chapter 3

I spent my weeknights trying to get that one stuck cylinder off. I got it up about an inch and now it's really stuck. More on that later.  This weeks progress, I'm still sanding foam. Good thing I live by myself, I'm making a huge mess of my basement.  I screwed up when I did my mockup. I forgot to take into account the width of the seat hinges and latch in the fender templates. Since I want to be able to use the stock hinges and latch, the fender/seat frame needs to be wider than i originally planned. I used 1" blue foam for all this stuff.

One of my other hobbies is RC airplanes so I know my way around blocks of foam and a hot glue gun.  I started by shaping the side skirts, notching around the shocks and seat hardware. Then I glued foam to the fender hump to reshape the curve. I think I'm done with the foaming. My shape is close enough, now I've got to get a gallon of bondo to get my final shape down.


Yay for Bondo!  Actually, Bondo brand bondo is one of the worst fillers on the market. It cracks to easily, it sands like concrete, and it sucks up moisture like a sponge. But, it's all I had available. I'll use a higher quality filler for the final bodywork. Little known fact: bondo eats styrofoam, but very slowly. As a result, if you bondo over styrofoam, it will eat it's way in and once it's set it grips the foam fantastically and makes a good base for further bodywork.

That's where I am. I'm basically spackling the foam with the bondo. Then I'll sand it to where I want it to use as the buck for mold #1. I hope to have the mold layed up by the end of the day tomorrow. Real actual spackle would work just as well and sand easier, but the bondo sets faster and grips the foam better. Closer and closer..


On the H1, I got my buck final sanded. For future reference: hand sanding that much Bondo with arms so sore they barely move from working out is...uh...fun...yeah, that's what it is...fun... I did learn that if I keep the shop vac near by and suck up the dust instead of blow it off, the basement stays remarkably clean. I would have had it 'glassed too, but my SuperSecret™ mold release didn't dry fast enough, it's rather cold in the basement these days...  I should have the buck glassed for mold #1 in a few days.

Since I used to work with street rods and kit cars for a living, I know my way around fiberglass. I got the buck glassed for my first mold. It's almost as simple as putting the glass on the foam/bondo, but not quite. The problem is that polyester fiberglass resin will rapidly attack foam dissolving it to nothing.

I have a SuperSecret™ and very low cost solution to that. Elmers Glue. Yup, plain old regular Elmers glue. It provides a barrier that the resin's solvents will not penetrate. I brushed 2 heavy coats onto my buck and let it dry a few days.

I used 2 full bags of the Bondo fiberglass packets they sell everywhere(24 sq/ft total), and just under 2 quarts of resin. Unlike the Bondo brand body filler, the Bondo resin is perfectly fine. For the most part, polyester resin is polyester resin. The Bondo stuff is also really just repackaged 3M resin. MAKE SURE YOU USE FRESH HARDENER. I made the mistake of not using fresh stuff once. No Bueno, it never fully set and I had to start over again. When ever you do 'glass work, it's always best to plan where you're going to put the cloth and in what order. Things get sticky quick, and trying to cut cloth at that point sucks. Here you can see all the different pieces that went into my mold. I used 12 sq/ft of woven cloth for the first layer, then 12 sq/ft of the mat for the second layer. The cloth goes around corners better, and the mat offers more build thickness.


Here's what I ended up with. You'll note the excessive use of garbage bags over the bike, and plywood to keep the floor clean. Fiberglass work of any kind tends to make a sticky mess.  I mixed the resin a little cold(slightly under catalyzed), and it's fairly cool in my basement. I wanted to make sure I'd have enough time to play with the glass to get it layed how I wanted, and to work the bubbles out. Too much catalyst will generate too much heat as it cures and melt the foam too. 

I let it sit like this for about 5 days. I want to make sure it's good and cured before I de-mold it. You don't generally think of fiberglass as something that will sag and flex, but it can, and does(especually when it gets hot). If it's demolded to quickly, it could twist or warp(that's why you NEVER buy a cheap kit car).

After all that, I seem to have miscalculated... On ALL my tests, Elmers glue made a great mold release/solvent barrier and the glass peeled right off the foam. Doesn't seem to be the case now.  My guess is that the extra long cure time is at fault, all my tests were mixed considerably hotter. So now I'm scraping foam, and I'll soon be sanding Bondo. Good thing this is only a temporary mold to make the part to make the mold...

I had to scrape the bondo out of my mold with a putty knife and a heat gun, then sand it smooth. Then I put another coat of straight resin on it. Once it set, I buffed the heck out of it with my buffer and some rubbing compound so the surface was nice and shiny. Followed that with 3 coats of wax, then 2 coats of Elmers Glue, then another thick coat of wax that I did NOT buff off.

With the mold prepped, I layed in about the same amount of glass I used for the mold, and another quart or so of resin. Let it set up for a few hours. On the advise of a coworker, the "body" guy at work, I pulled the part while it was still green(only a few hours in the mold).

Once it was set, with minimal effort the thing came right out. I think it was the wax that did it(forgot that the first time). The Elmers Glue layer peeled right off like it was supposed to. I made a part! I'm super excited 'cause I actually did something, and it worked 100% like I planned.  You know why?  Cause I'm awesome.  But seriously, when you've forgotten to eat, and are...um...uh...er...less than 100% coherent...because you've been working around styrene fumes all afternoon in a basement with inadequate ventilation, you probably shouldn't post on the internet...haha... And I forgot my camera at work, so no pics of this step.

Friday, May 22, 2015

H1, Chapter 2

I finally was able to make some progress. I got a lot taken apart so I can start cleaning and refurbishing. This whole putting the bike in the basement idea is a super good one, I didn't have to put my snowsuit on to go work on it :)  I only had one stuck cylinder I'll have to make a tool for, everything else came apart remarkably well given it's age.


I know where my seat needs to be, but I wasn't sure how and where I wanted the fender. So, I had some Photoshop fun. The tank suits it MUCH better with the Cafe style seat and fender.  I also moved the headlight and gauge pod down.  Here's my "artist's" rendition of the picture in my head.


It was Christmas Eve, and I was all alone. Ice storm canceled my plane for me. "What should do with a day all to myself?" I asks. "Work on the H1 of course!" I quickly replied. I soon realized that I was talking to myself and should probably seek help. But the Kaw was more enticing, so I got more stuff done. My one stuck cylinder is getting annoying, I've tried all the recommended tricks, and it just won't come off.  So I quit and went back to the bodywork. I got the seat and rear bodywork roughly mocked up.

The Photoshop is nice, but actually physically seeing it, even in plywood and cardboard, give a much better feel for how it's going to work, and I could start figuring out how I wanted to mount and hinge the seat.

The seat is right where I want it for my height and preferred riding position, and it's reasonably comfortable.  I had one criteria for the fender, it had to hold a can of starting fluid. This one is just big enough. I think I want to make it a little longer though.

Although I'm pretty good with sheetmetal, my plan is to make my fender and seat pan out of fiberglass. I want the seat to be able to hinge up so I've still got storage space in the fender, so it'll need to be multiple pieces. Fiberglass is just easier to work with for what I want to do(I also didn't have a welder at home at the time).

Legend has it that when Cortez set off to conquer the Aztecs, he burned his ships so that retreat wasn't an option, no turning back. I'm at the point of no return on the H1. The rear section of the frame is in my way.  It is too long and sticks out past where I wanted my fender to stop.  Out comes the sawzall :)  I whacked it off just in front of the blinker tab.  You should have heard the H1 purists on the Kawasaki Triples forum howl about how I was desecrating such a piece of history.  I was entertained by how mad people got about what I wanted do with MY motorcycle...

The next step in my fender making process was to make myself a block of foam to start carving. 2" polystyrene foam from Menards and some Gorilla Glue later, I had a pretty good size block...

Next came the fun part, shaping the foam. It should be noted that this makes a heck of a mess, and it's a sticky mess because foam loves static electricity. It also sucks to breath it, and scratches like hell if you get it in your eyes. Fiberglass and bondo dust have nothing on foam dust.

I rough roughed in the outside with a wood saw, using my cardboard pieces as templates. I also had the shop vac on right next to where I was grinding/sanding to help keep the dust under control. I started with my 4.5" grinder and carved away the bottom a little at a time so it would sit down on the frame how I wanted it to. Then I started on the top. I got the shape roughed in with the grinder, then shaped it further with sandpaper. Still a lot of shaping left to do, but it's getting there.


Friday, May 8, 2015

My H1, from start to finish...

The very first post of this blog is the video I made chronicling the rebuild and customization of my 1975 Kawasaki H1F.  I had, at one time, a whole long build thread on it, but that forum is now defunct.  Fortunately, I had the foresight to save all my posts before the forum went down for good.  Since my Dad is about to start restoring an old bike of his own, I figured that now is the time to show the journey my H1 took thinking maybe he'll pick up some tips and tricks.  To this day, I consider my H1 to be the only project vehicle I've ever actually finished.  Since this is essentially a repost of a long forum thread, the time scale will be shortened considerably, and some bits may be slightly out of context with lots of past and present tense intermingling.  I'll do my best to fix that. 

If you're not familiar with the Kawasaki H series of bikes, they were all three cylinder two-strokes, ranging in size from 250cc to 750cc.  The first of the series, the H1A, was 500cc's.  When the original H1 debuted in 1969, it was, for all intents and purposes, the world's first superbike.  No other production bike could match it's performance.  Handling was atrocious and the brakes were marginal at best, but when you got on the gas in a straight line, everything else was left behind.  While sluggish down low, when it hit the powerband it took off like a missile with eyeball melting acceleration.  It was so quick that it was dubbed the Mach III.

My bike story started like so many others, a friend's neighbor had this old bike sitting in a shed.  I'd never even heard the term "triple" when I first went to look at it.  I wasn't all that impressed at first glance, but I wanted a new project and have a fondness for Kawasaki two strokes, so it followed me home for the princely sum of $450.  It wasn't until I later did some research that I realized I'd acquired much more than a generic 70's Japanese motorcycle.  Since I'd always like the Cafe Racer style, and I can never leave well enough alone I decided to build a custom Cafe bike instead or a factory restoration.  I also I wanted to see how cost effective I could keep it, just because.

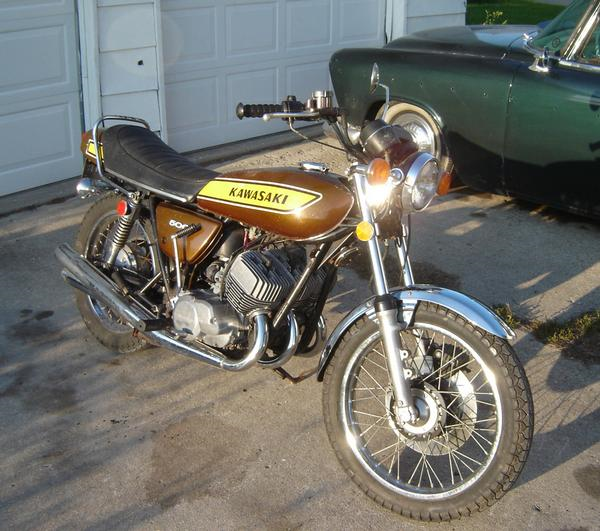
Here's how it looked when I got it home, dusty, dirty, hadn't been ridden in 15 years:


First thing I did, before I even washed, it was pull the giant windshield off :D Then I cleaned it, it actually cleaned up pretty good. I cleaned the carbs and got it running without too much fuss.  Not bad for 35 years old and 18,000 miles:

I discovered that I sit differently on it whether I'm pretending or actually riding. Since I'm going to make a seat and rear fender for it, I had to know where I'd be sitting on it with the bars I intend to make. I haven't found a supplier for the stainless tubing I'll need, so I had to make some mock up bars. It turns out that 1/2" Schedual 40 pipe is just slightly under the OD required, and I happened to have a piece laying in the garage. This is just a working mockup, I'll shorten the wires as necessary later on.


Next came a big change. I've never been crazy about the H1's gas tank. It's long and narrow. I like my tanks just opposite my women, short and fat. More to the point, traditional Cafe racers, the Triumphs, Nortons, and such, had more bulbous tanks, and many of them had knee dents in the sides. Being on a budget, I wasn't about to buy an actual British tank, or any of the aftermarket cafe style tanks. No way I'm spending as much on a tank as I did for the whole rest of the bike.

Having more time than money and being a pretty decent sheetmetal fabricator, my first thought was to make/modify a tank to suit my needs. While shopping a for a suitable donor, I discovered that a few Japanese production tanks came styled the way I want. I ended up finding a deal on e-bay of all places on a 1980 Honda CX500 tank. The best part of this tank, a petcock with a real actual "OFF" position unlike the H1's sucky vacuum petcock(pun intended).

This CX500 tanks fits beautifully. It's the same length as the H1F tank, is about 1/2" taller, and 2" wider. It looks bigger than that, but it's really not. I know it looks out of place now, but trust me, it'll work...


One thing that needed immediate changing with the new tank was the fuel lines.  The stock H1 petcock had three fuel lines coming off of it, one for each carb.  The CX500 tank only had one.  So, I made a fuel splitter.  I started with a chunk of aluminum scrap. I drilled a hole most of the way down it's length, then adjoining holes down one side and tapped them.


Out came the angle grinder. I knocked off all the corners and edges, and gave it an overall ovalish shape. With the shape where I wanted it, I sanded it smooth and polished it. I also polished the brass fittings before screwing them in. Looks pretty good for a fuel block that sits up under the fuel tank that no one will ever see :)


I also added some new Bridgestone BT45 tires and a Kawasaki Ninja EX500 front brake caliper. The dual piston EX caliper only requires a simple adapter bracket to be made, and is a HUGE improvement over the stock front caliper.  Neither of these pictures are mine, but you can see the difference.
Stock:
EX500:
After driving it around like that for a month or so, it started to get cold.  I am in WI after all.  So, into the basement it went, where the real adventure would begin...