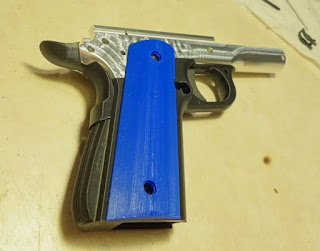
Also, I learned that if you take very close up pictures of small objects, machine marks tend to look terrible when blown up to full screen. Anyway, the first place to get attention was the mag well. I got what I could with a 1/16" end mill, but had to finish most of it with the 1/8", so I had to file the corners out to get magazine to slide freely.
The next bit to fit was the safety lever. It was very close to dropping right in, but not quite. This time, I removed material from the back side of the safety. Given a choice, it's always better to remove material from an easily replaceable part instead of something hard to replace like the frame.
Then I had to make the hammer and sear fit. Miraculously, the pin holes lined up, but like the magazine, these parts didn't fit because of the radius left in the corners. It's an awkward spot to file with standard shaped files, so I used my riffler files. If you don't have a set of riffler files, you should get one. They're like needle files, but with curved tips that make areas like this much easier to get into.
Another handy tip for when you have to work on small parts. Get yourself a ring clamp. They're cheap and they're great for holding small things securely while you work on them.
On to the grip section. I printed my "final" version in black, using 100% infill and a .08mm(.003") layer height. It didn't take much fitting at all to get the parts in. The one problem I did have is that the trigger bow it's self was to narrow for the magazine to slide through(did I mention that these are all pretty cheap parts?). I tweaked it out just lightly and now everything works like it should.
With that done, I could test fit all the bits I have fitted so far.
I can't decide what pattern I want for my grips get, so I printed a temporary blank set for now. Eventually they'll be made from aluminum to hold the upper and lower sections together. I also decided that I'd run with this 3D printed thing a bit more and use it for the grip safety too. I found a file online for a beavertail safety and printed it out. The file isn't perfect and I'll have to rework it a bit so that it functions the way it should, but this one works as a proof of concept.


No comments:
Post a Comment