This gonna be a long post, so I hope you're not busy. It's time to actually finish my Uzi and get it painted. I always dislike this part because I'm a bit of a perfectionist when it comes to painting. Comes from spending years in the car hobby. Nothing irks me more than spending a lot of time and effort on something, then ruining it with a crappy paint job. Now, on to the Uzi. My welds are good but not cosmetically perfect, and in a couple spots I wasn't as careful as I should have been with the grinder. Add in the machining marks from my machined center section, and there's no way I could just slap some paint on it without it looking terrible.
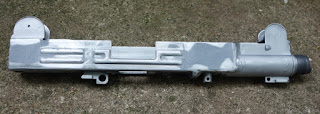
First everything was thoroughly degreased using Brake Cleaner. Brake cleaner specifically, because it won't leave a residue of any sort on the parts. Do Not use Carburetor cleaner, some brands leave a residue that could affect your paint. From this point forward, everything should be done with gloves on. The oils from your skin can ruin the finish. Nothing worse than laying down your paint, only to have a fingerprint show up. After degreasing and drying, I stared attacking it with sandpaper. I used my Harbor Freight oscillating multi-tool, the triangle shaped sanding pads work great for getting into corners. After a thorough sanding with 120 grit paper, here's what I ended up with:
You can clearly see some weld edges and the gouge I managed to put it while grinding by not paying enough attention/being in a hurry. After knocking down the high spots, I sandblasted the whole thing in preparation for the next step. I needed to both fill in the gouges, as well as make the whole thing actually flat so it doesn't look all wavy when painted. Bondo is great for cars, but it's too soft for guns, and in addition, the paint I'm going to use requires baking at 325° to cure and bondo won't handle that much heat. Instead we're going to use JB Weld. JB Weld works perfect as a high temp filler for this kind of thing. It's tough but slightly flexible, it sands easy, once cured it's impervious to just about everything, and it will hold up up to 500°F. I mixed some up and and spread it on in the places where it was needed. Try not to put too much on, remember that most of what you put on will be sanded off.
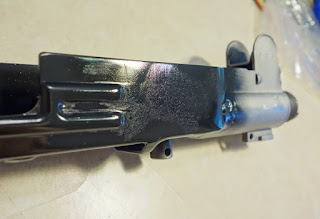
Once cured, I blocksanded the JB weld down with 80 to knock down the high spots, then 180 grit sandpaper to finish. It's important to use a sanding block or rigid backer when doing this, sanding with just your hands will lead to a wavy surface. A rigid block will assure that it actually ends up flat. I use a combination of sanding blocks and popsicle sticks with sticky backed sandpaper. Since the JB Weld is softer than the steel, you also want to make sure you don't oversand it. Oversanding will leave low spots and waves just like hand sanding will because the JB Weld sands faster than the steel. Here you can see how it looks ones it's been blocksanded. The low spots are pretty obvious.
When working on cars, a sandable primer surfacer is the next step, but that obviously won't work here because of the temp required to cure the paint. Fortunately, the paint it's self can serve as the primer. I used Duracoat on my AK and it worked well, but because it's a 2-part urethane you have to mix it then use what you mixed and clean all your equipment before it sets. On my last few projects I have used KG Gun Kote. In my opinion it's easier to use and more forgiving than Duracoat. It's very easy to apply, cures to a very tough finish, and most importantly for our purposes, sticks to it's self very well. It's always important to do a test piece first, and here's why. I got a bottle of the KG Satin Black thinking that's what I wanted, but when I did my test piece, it ended up way too shiny for my liking. No matter how I sprayed it, it always ended up too shiny, much more gloss than satin. So I got a bottle of their Flat Black, and it was just about perfect for what I wanted.
That left me with a full bottle of Satin. So I decided to use it as my primer. As I mentioned above, KG Gun Kote sticks to it's self very well meaning I could spray it on, bake it, sand it off, and recoat it without having any adhesion problems. And that's exactly what I did. Since the satin ended up so shiny, I also decided to use it to paint the insides of all the parts so that they would be a bit slicker, and easier to clean. The inside of the receiver, top cover, and grip section all got coated, as well as the outside of the receiver over the JB Welded areas. It's slightly oversanded so it's very easy to see where the JB Weld is under the paint. If you're really careful with your sanding, you can skip this
intermediate step and go straight to final paint, but knowing that I was going to do it anyway, I
wasn't too worried about it.
I sprayed the Gun Kote on thicker than recommended too because I wanted to make sure that it filled it what it needed to, and most of it was going to get sanded off anyway. Try not to paint anything you don't have to though, any paint that you intend to paint over will need to be sanded or scuffed up for the next coat to stick. Turns out Gun Kote sands really well too and makes a great primer. I blocksanded it with 320 grit paper to make sure that I didn't get any sand scratches showing in the final paint. Being the top notch planner that I am, I didn't take a picture of this same side of the receiver after sanding, so here's a pic of the other side. You can still see about how it should look with all the low spots filled.
With that bit done, it was time for final paint. After another very very through degreasing, I whipped out my trusty $10 Harbor Freight paint gun and had at it. One of the things I really, really like about the Gun Kote is that it goes on thin and air dries very quickly. Normally when I paint things, I have to carefully hang each piece so that I can cover the whole thing, but that's really tedious when you have a bunch of small pieces like this. Because the Gun Kote dries so quickly, I could paint the back sides, let it dry, flip everything over and paint the tops all in an afternoon. It's also handy for things that have to move like the folding stock. I could paint it in one position, then unfold it and hit the spots that were missed.
Gun Kote sprays really, really well straight out of the bottle. It's very easy to get nice, even coats on your parts. It dries so fast that getting dust in the finish isn't really an issue. If you screw it up and get a run or something and need to try it again, unbaked Gun Kote wipes off very easily with most solvents like lacquer thinner or acetone. For reference, I used about 3/4 of a 4oz bottle to put 2-3 coats on all my Uzi parts. Once you're happy with how it looks, into the oven it goes. I live by myself with no one to give me any dirty looks, so I just used my kitchen oven. It should be noted when placing your parts for baking that anyplace that is touching something will end up with a slight shiny spot, so try to set things on surfaces that won't show once everything is assembled. Bake for an hour at 325°F, pull it out to cool, and here's what we ended up with. Mmm...freshly baked Uzi...
So how'd we do at making this thing flat? Not perfect, but I'd say pretty darn good.


No comments:
Post a Comment