Showing posts with label Uzi. Show all posts

Sunday, July 28, 2019

I'll keep this brief

I need a case for the Uzi.  Most normal people would just go out and get a normal gun case.  I am not normal(which I will freely admit to anyone who asks).  Since this is a Uzi, I decided it needed more than a plain, boring gun case.  Back when the Secret Service used Uzis, they carried them in briefcases, so I decided that mine should have a briefcase too.  $25 later on e-bay, and I had myself a nice, used briefcase.  It's not a quickly deployable hardshell Samsonite like the SS used, but I like the leather look better(and I shouldn't have to say this, but just to be clear it is NOT an operational briefcase, just a storage case).  For padding, I used Harbor Freight foam floor mats.  Since thick EVA foam like this is a pain to cut with a blade, I used my electric turkey carving knife.  It made quick work of things.  It's made to securely hold the gun, two mags, the barrel and shroud, and a mag loader that I 3D printed.

Ordinary looking nondescript briefcase:
Uzi all safe and secure inside:


Done and done.

Well, I got my Uzi done.  After baking, I hit everything very lightly with 0000 steel wool to make it slightly less flat and feel a bit smoother, then soaked it in CLP.  I way over oiled it so the CLP could soak in between all the spot welded sheetmetal bits. The only new piece that I haven't shown before is the barrel shroud.  I don't like the anteater look that the bare 16" barrels have, and fake suppressors aren't my thing, so a US Barrel Shrouds vented barrel shroud was just the ticket.  It's a very nicely made part and it simply replaces the barrel nut on the front of the receiver.  Since I built this as a "pistol" receiver, if I ever get a 10.5" barrel for it I can remove the stock and use the original barrel nut for the short barrel. Anyway, here it is set up as a carbine.


I used Testors model paint for the safety selector.  Because the black Gun Kote is very solvent resistant, I could paint the red and white in kind of sloppy, then use a paper towel damp with mineral spirits to wipe off the excess.  Since the safety selector won't go all the way forward, I just left the FA lettering black.

The color is a bit off in the other pics because of the lighting, but this one is a pretty accurate representation of it's true color.


Friday, July 26, 2019

A Gripping Development

The last piece of the Uzi puzzle is the grips.  All of the grips that came with my parts kit were pretty beat up, and I didn't want to put well used grips on my practically new gun.  You'll remember a while back, I 3D scanned and printed the front grips because I couldn't find new ones for a price I wanted to pay.  After a few more tweaks I reprinted them in black to use as my final parts.  I also hit them with scotch-brite to knock just a little bit of the shine off. I'm still not completely satisfied with the right grip and may rescan and reprint when I have the time/motivation.

The pistol grips are a different matter though, and are easy to find.  I got a pair of genuine IMI grips still in the package from 1965.  According to the tag, these were from the German market.  I still find it incredibly ironic that the Germans of all people adopted a Jewish weapon for their defense forced.

Saturday, July 20, 2019

Work that body

This gonna be a long post, so I hope you're not busy.  It's time to actually finish my Uzi and get it painted.  I always dislike this part because I'm a bit of a perfectionist when it comes to painting.  Comes from spending years in the car hobby.  Nothing irks me more than spending a lot of time and effort on something, then ruining it with a crappy paint job.  Now, on to the Uzi.  My welds are good but not cosmetically perfect, and in a couple spots I wasn't as careful as I should have been with the grinder.  Add in the machining marks from my machined center section, and there's no way I could just slap some paint on it without it looking terrible.

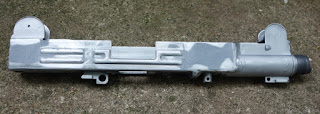
First everything was thoroughly degreased using Brake Cleaner.  Brake cleaner specifically, because it won't leave a residue of any sort on the parts.  Do Not use Carburetor cleaner, some brands leave a residue that could affect your paint.  From this point forward, everything should be done with gloves on.  The oils from your skin can ruin the finish.  Nothing worse than laying down your paint, only to have a fingerprint show up.  After degreasing and drying, I stared attacking it with sandpaper.  I used my Harbor Freight oscillating multi-tool, the triangle shaped sanding pads work great for getting into corners.  After a thorough sanding with 120 grit paper, here's what I ended up with:
You can clearly see some weld edges and the gouge I managed to put it while grinding by not paying enough attention/being in a hurry.  After knocking down the high spots, I sandblasted the whole thing in preparation for the next step.  I needed to both fill in the gouges, as well as make the whole thing actually flat so it doesn't look all wavy when painted.  Bondo is great for cars, but it's too soft for guns, and in addition, the paint I'm going to use requires baking at 325° to cure and bondo won't handle that much heat.  Instead we're going to use JB Weld.  JB Weld works perfect as a high temp filler for this kind of thing.  It's tough but slightly flexible, it sands easy, once cured it's impervious to just about everything, and it will hold up up to 500°F.  I mixed some up and and spread it on in the places where it was needed.  Try not to put too much on, remember that most of what you put on will be sanded off.
Once cured, I blocksanded the JB weld down with 80 to knock down the high spots, then 180 grit sandpaper to finish.  It's important to use a sanding block or rigid backer when doing this, sanding with just your hands will lead to a wavy surface.  A rigid block will assure that it actually ends up flat.  I use a combination of sanding blocks and popsicle sticks with sticky backed sandpaper.  Since the JB Weld is softer than the steel, you also want to make sure you don't oversand it.  Oversanding will leave low spots and waves just like hand sanding will because the JB Weld sands faster than the steel.  Here you can see how it looks ones it's been blocksanded.  The low spots are pretty obvious.
When working on cars, a sandable primer surfacer is the next step, but that obviously won't work here because of the temp required to cure the paint.  Fortunately, the paint it's self can serve as the primer.  I used Duracoat on my AK and it worked well, but because it's a 2-part urethane you have to mix it then use what you mixed and clean all your equipment before it sets.  On my last few projects I have used KG Gun Kote.  In my opinion it's easier to use and more forgiving than Duracoat.  It's very easy to apply, cures to a very tough finish, and most importantly for our purposes, sticks to it's self very well.  It's always important to do a test piece first, and here's why.  I got a bottle of the KG Satin Black thinking that's what I wanted, but when I did my test piece, it ended up way too shiny for my liking.  No matter how I sprayed it, it always ended up too shiny, much more gloss than satin.  So I got a bottle of their Flat Black, and it was just about perfect for what I wanted.

That left me with a full bottle of Satin.  So I decided to use it as my primer.  As I mentioned above, KG Gun Kote sticks to it's self very well meaning I could spray it on, bake it, sand it off, and recoat it without having any adhesion problems.  And that's exactly what I did.  Since the satin ended up so shiny, I also decided to use it to paint the insides of all the parts so that they would be a bit slicker, and easier to clean.  The inside of the receiver, top cover, and grip section all got coated, as well as the outside of the receiver over the JB Welded areas.  It's slightly oversanded so it's very easy to see where the JB Weld is under the paint.  If you're really careful with your sanding, you can skip this intermediate step and go straight to final paint, but knowing that I was going to do it anyway, I wasn't too worried about it.
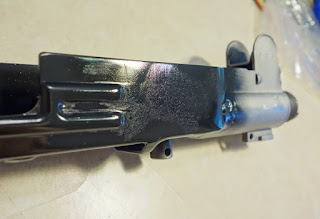
I sprayed the Gun Kote on thicker than recommended too because I wanted to make sure that it filled it what it needed to, and most of it was going to get sanded off anyway.  Try not to paint anything you don't have to though, any paint that you intend to paint over will need to be sanded or scuffed up for the next coat to stick.  Turns out Gun Kote sands really well too and makes a great primer.  I blocksanded it with 320 grit paper to make sure that I didn't get any sand scratches showing in the final paint.  Being the top notch planner that I am, I didn't take a picture of this same side of the receiver after sanding, so here's a pic of the other side.  You can still see about how it should look with all the low spots filled.
With that bit done, it was time for final paint.  After another very very through degreasing, I whipped out my trusty $10 Harbor Freight paint gun and had at it.  One of the things I really, really like about the Gun Kote is that it goes on thin and air dries very quickly.  Normally when I paint things, I have to carefully hang each piece so that I can cover the whole thing, but that's really tedious when you have a bunch of small pieces like this.  Because the Gun Kote dries so quickly, I could paint the back sides, let it dry, flip everything over and paint the tops all in an afternoon.  It's also handy for things that have to move like the folding stock.  I could paint it in one position, then unfold it and hit the spots that were missed.
Gun Kote sprays really, really well straight out of the bottle.  It's very easy to get nice, even coats on your parts.  It dries so fast that getting dust in the finish isn't really an issue.  If you screw it up and get a run or something and need to try it again, unbaked Gun Kote wipes off very easily with most solvents like lacquer thinner or acetone.  For reference, I used about 3/4 of a 4oz bottle to put 2-3 coats on all my Uzi parts.  Once you're happy with how it looks, into the oven it goes.  I live by myself with no one to give me any dirty looks, so I just used my kitchen oven.  It should be noted when placing your parts for baking that anyplace that is touching something will end up with a slight shiny spot, so try to set things on surfaces that won't show once everything is assembled.  Bake for an hour at 325°F, pull it out to cool, and here's what we ended up with.  Mmm...freshly baked Uzi...

So how'd we do at making this thing flat?  Not perfect, but I'd say pretty darn good.


Tuesday, July 2, 2019

Starting to finish

I'm at that point where I actually need to finish my Uzi.  I'm going to start with the bolt, because it's the easiest thing to finish.  As much as I like the machined look, this is an Uzi, and Uzi parts shouldn't be bright and shiny.  I could have all my parts parkerized like the originals, but I don't want to deal with shipping and the cost.  Fortunately, there is another way(and it's really easy).

For the bolt, I'm going to use Precision Tool Black( https://precisionbrand.com/product-category/tool-black/ ).  It's a blackening compound for ferrous metals, and it's super easy to use.  Just wet the metal with it, and almost instantly it turns black.  Here's the bolt, about half way covered(picture taken with my potato camera in poor lighting by the sink).
The Tool Black can't compete with industrial black oxide coatings for durability and you'll still need to keep things oiled to prevent rust, but it also doesn't require any special equipment and it goes on at room temperature.  It's literally wipe on, wait a few seconds, and rinse off with water.  I generally use a chunk of scotch-brite pad as an applicator, though you can just dunk your parts in it too.  A little goes a long way, and you could get several whole guns out of a pint bottle.  After coating the parts, a brownish-black film develops that I buff off with dry paper towels.  The rougher the surface, the blacker it gets so sandblasted parts come out very black, and polished/smooth parts tend to be a very dark gray.  Here's how my bolt looked after being treated:


Sunday, June 23, 2019

I may look stupid, but I'm not dumb

So I finally got all the pieces of the Uzi made and fitted, and working the way they're supposed to.  The only thing left to do was test it before paint(because I didn't want to paint it and find out I still had to grind on something).  While I am prone to making poor decisions, I try not to do dangerous things with guns.  Especially guns that I've made.  Double especially guns that I've made that have essentially just sheetmetal between explosions exploding and my face.  So what's a guy to do?  Get a long rope and hide behind a tree of course.  So I clamped the gun in a portable workbench and tied a rope around the trigger and pulled it from behind a big tree.
Started with one round in the gun to make sure it wouldn't explode, then stepped up to two and then three to make sure it worked as a proper semi-auto.  So how did it go?  Well, it didn't explode, and every round that it chambered fired.  But it also didn't work great.  Just about every other round FTE'd.  Stovepipe after stovepipe as the spent casings didn't want to leave the gun.  I also noticed that the casings that did properly eject didn't go far, maybe a foot or two.

I spent some time troubleshooting, tweaking my top cover clearance(which should be around .010" ), making sure everything moved nice and free, testing both mags I have and getting the same results, and finally thinking that maybe my new bolt actually needed the big ejection scallop cut in it that the factory semi Uzi bolts have(which I very much didn't want to add). 

And then I remembered to actually watch the video I'd taken.  Seeing it in slo-mo, it was clear that the bolt was short cycling, i.e. not going back as far as it should.  Between the short cycling and the spent casings not ejecting with any real force, it occurred to me that maybe the gun was fine, but the ammo wasn't.  Up to that point, I'd been using some Armscor 124gr FMJ that I bought many years ago but never used when I started a Suomi project(that never got finished...).  While it's probably fine for other 9mm guns, it just didn't seem zippy enough for the heavy Uzi bolt.  So I bought a box of Winchester NATO 124gr FMJ, which the internet told me was pretty hot, and my FTE problems went away.  Not only were the cases ejecting, they were now flying out and landing 8'-10' away.  Let that be a lesson, if something seems amiss with a gun, try some different ammo first.

Tuesday, May 28, 2019

What grade is this bolt?

Last time I posted about the Uzi, I started machining the bolt.  In what I'm sure will be a shocking surprise, in this post I'll finish it.  I got all the sides machined last time, all that's left are the ends, and just like a loaf of bread, the ends are the worse parts.

This operation to finish the back side of the bolt is one of the most nerve wracking things I've done in a long time.  All there is to it is a little bit of 3D machining, and drilling three holes.  Why was so nerve wracking?  Because the hole for the recoil spring is nearly 6" deep, through moderately hard steel, with a less than ideal coolant situation.  After more painfully slow machining/drilling with very small pecks and full retractions between pecks, it was done.  The Z axis got a workout that day, I tell you what.
With that done, there was only one operation left, but it was the most critical.  The Uzi being what it is and working the way it does, it generally doesn't require much precision.  This last operation is the only one that that really matters and it has to be exactly right.  Trimming the front end of the bolt and machining the bolt face is what will set the headspace for the gun.  Without having the headspace right, the cartridge case could rupture and the gun blow up.  It's not quite as critical with a blowback as it is with a locked breech system, but still important.  Finish drilling the recoil spring hole was no biggie but of all the painfully slow machining I've done, what's next was the slowest.  I wanted to avoid chatter in the cartridge recess/bolt face as much as possible.  To finish machine the bolt face, I had to use a 5/16" cutter hanging out of the collet 4", spinning at just a few hundred RPM, and stepping down a whole .010" at a time.  Then I had to drill the hole for the firing pin tip, and my long collet only cleared the side of the bolt by .020".  Know what's fun?  None of that.  But it worked and got the job done.

I actually did one last manual operation once the CNC work was done.  I located and drilled the through hole for the extractor retainer pin on the mill by hand.  It crosses the extractor hole off center and to drill it first might have made the extractor drill bit wander.  All in all, I think it turned out alright.  For something I reverse engineered with a calipers and machined in a tough material that I'm not very familiar with, I'm satisfied with the results.  Here it is next to my original IMI bolt:


Sunday, April 21, 2019

I hate machining steel.

Now for the hardest part of my "doing it the hard way" Uzi project, the bolt.  There are a lot of differences between semi-auto and full auto Uzi bolts, primarily because of the striker instead of the fixed firing pin.  I could have bought a factory semi-auto bolt, or I could have modified my original bolt, but as previously discussed, I'm an idiot and apparently a glutton for punishment.  I decided to just make my own.

I made a CAD model of my FA Uzi bolt, then added the necessary modifications for semi-auto use so that I could CNC machine it.  The factory Uzi bolt is 4130 steel, but I decided to make mine out of A2 tool steel.  I chose A2 because it machines alright, it's very tough without being too brittle, and most importantly, I have a large chunk of it.


I hate machining steel.  Nothing about it is any fun.  It's hard on cutters, it's painfully slow compared to aluminum, and the chips are tiny little razors just waiting to bury themselves in your skin.  I'm also used to machining aluminum but very little steel(and even less hardened steel) so I run steel very conservatively.  My little CNC mill is not fast, and it is not powerful, I could never run aluminum at the speeds I'm used to.  But for steel, I don't need high speed anyway so it works out alright.  I use carbide endmills for everything because life is too short for high speed steel, and even good carbide is cheap these days.  Also machining high speed steel with high speed steel cutters is likely just going to chew up cutters so carbide is cheaper in the long run.

My new bolt is going to take 5 setups to machine, basically machine a side, turn it in the vice, machine the next side, and so on.  I don't need to machine the top because it's already flat.  After several hours of painfully slow machining, it's starting to look like something.

Operation 1, the right side:


Operation 2, the bottom:


Operation 3, the left side:
The last two ops are the important ones, and also the most nerve wracking, so stay tuned.  Same Bat time, same Bat channel!

Monday, April 8, 2019

More spoilers

Another post full of spoilers.  First, I have a 3D printer(two actually, but who's counting).  Not really that big a deal, lots of people have them.  Second, I have a 3D scanner.  It is not the world's greatest scanner, but it works for my needs.  And what I needs now are some grips for my Uzi.

I was not happy with the grips that came with my parts kit.  The pistol grips were ok-ish, but the foregrips were just beat to death.  Scuffed and scraped with half the ribs worn off.  I definitely needed something better.  I bought some original "Excellent condition" grips from a vendor and they were better, but definitely still used.

I decided that I wanted to 3D print some new grips, but there is only one CAD file that I could find that was even remotely accurate looking, and it's proportions were so far off that the parts could not be made to fit the real gun.  And that's where the 3D scanner comes in.  Usually I scan people to 3D print mini versions of them so my scanner isn't great with small objects, but it's good enough for my needs.  The actual scanning doesn't take long at all, but there is a lot of post process clean up with involved.  To be honest, it probably would have been faster for me to just redraw them in Solidworks, but this whole project has been an exercise in doing things the hard way.

Anyway, here's what I ended up with.  I printed them in blue because only the cool kids have blue handguards.  Deal with it.  Actually, these are essentially my "rough draft" prints and blue is what happened to be in the printer at the moment.
Overall they fit ok, but not quite perfect, so I'm going to do some more editing of the STLs before reprinting them in black.  I'm not quite happy with the texture on some of the ribs either, so I'll fix that while I'm at it too.  And, not that I'm counting because it doesn't matter for a pistol build, these handguards would count as a US part for 922r.


Saturday, March 30, 2019

More legal requirements and stuff

Since my Uzi build started with a machine gun parts kit, the fire control group has some naughty bits in it that are definitely not legal for use.  We'll need to modify the lower grip assembly so that it's both legal, and usable with the striker fired semi-auto bolt.  The first thing to do is to make sure that the selector lever can't slide far enough forward into the full auto position.  That's pretty easy to do, all you need to do is weld a blocking plate into the grip assembly to limit the selector lever's travel.  I made mine out of some 1/8" steel plate and welded it in.  You can see here the plate welded in so that the selector lever can't go any further forward.
Next up is the sear.  Aside from the FA sear being a naughty bit, it won't work with the striker setup anyway.  It's not shaped right to catch the striker.  There are semi-auto sears available, but I'm cheap and it's very easy to modify the original.  Using a cutoff wheel in my Dremel, I started cutting away at the sear.  The left ear is the only one that matters because it's the one that catches the striker, but I trimmed them both, for good measure.  Here it is with the first ear trimmed:

And with the second ear trimmed:
I eyeballed the angle based on pictures of the commercially available sears.  It's not ultra critical on these things, as long as it's close enough so that the striker can't slip past the sear.  You can see here on the right side of the pic how the modified sear catches on the striker:
I wanted to check my sear engagement on the striker, so I got out my handy Sharpie and colored the sear ears.  Then after assembling things and dry firing it several times, I pulled it back apart to check the wear pattern.  Here's how much actual contact I'm getting between the sear and striker(on the left ear).  Not a lot, but enough.  More contact will lead to trigger creep, and after everything is together and working, I'll see what I can do to improve trigger feel.


Sunday, March 17, 2019

That should about cover it

In my last post I mentioned the top cover of the Uzi.  Like many of the other parts, it needs to be modified for semi-auto use too.  It's got this nifty ratchet mechanism on the charging handle to hold the bolt open.  An added safety precaution on an open bolt machine gun, and just a handy feature to have on a closed bolt semi-auto.  The problem is that the semi bolt doesn't move back as far as the FA bolt, so the original charging handle ratchet can't go back far enough to unlock and slide back forwards.  The ratchet unlocking mechanism is super simple, and activates when the spring inside hits the back of the slot.  A lot of people simply take the ratchet mechanism out for their conversions, but I like it.  All that's needed to modify it for semi-auto use is to make the slot shorter to match the shorter travel of the bolt.  Conveniently, the top cover sheetmetal is the same thickness as the receiver, so I cut a leftover piece of receiver to fit the slot.  For my conversion, I needed to add a piece .825" long.  Your results may vary, but it should be around there someplace.

Uzi build, part??


I finally got the receiver of my Uzi finished.  The biggest part left was welding on the rear most section.  Conveniently, the top cover works as the perfect gauge to set the overall length.  Using the top cover as a guide (and taking weld shrinkage into account), once it was tacked in place I clamped my copper plates inside and welded away.  Here's what I ended up with:


The last little bit left was to rivet the ejector in.  I actually bought the proper rivet and used a few of the rivet bucks I made for my AK build to set it.
Apparently, I tried too hard when I set the rivet, because the base of the ejector cracked.  Oops...  It fits into the receiver snug and it's good and tight so I think it will still work.  If it ever does start to work loose, I'll get a new one. 


Friday, February 22, 2019

I can't come up with cleaver titles anymore.

More work on the Uzi.  Last time I showed off my overly complicated CNC'd receiver bit.  This time I'm going to start putting it together.  I'm not using a jig, so I'll have to use the parts themselves to keep everything aligned.  The first thing I did was weld some bits into the new receiver.  After some careful hand fitting, I welded in the barrel restrictor ring/feed ramp, rear grip mount(removed from my original receiver chunk), and most importantly the blocking bar.  The blocking bar is necessary for all semi-auto Uzi builds.  It's sole purpose it to prevent a full auto bolt from being installed into the gun, and it must be put in before the receiver is complete.  Even before it's complete, without the blocking bar installed you are in possession of a machine gun receiver in the eyes of the law, so it's best to put it in as early as practical.  Here you can see the parts in place, as well as the weld going down the center where the two machined halves meet and where the rear grip mount welds have been ground down for clearance.


I'm going to be using my barrel to help keep things aligned.  The problem with that is that my original SMG front trunion and semi-auto barrel don't exactly match.  One of the things IMI did when they started exporting a semi-auto version of the Uzi was make the semi-auto trunion smaller in diameter so that a full auto barrel wouldn't fit.  That means that the hole in my FA trunion is .040" bigger than the barrel.  That makes for a sloppy fit and way too much wiggle room for my liking.  I was going to machine a bushing to press in, but then I decided that was way too much work because it had to be so thin.  It occurred to me that shim stock would work great for this.  I used some brass shim and made myself a bushing, carefully filing the ends so that it fits perfect.  Since this is a pistol build and I'm legally allowed to use a short barrel if I want to, I'm not worried about it being removable.  You can also see how this front stub looks practically new.  Even though it came as part of the same parts kit, it definitely didn't come off the same gun as the rest of my parts.

With that set, it was time to put things together.  I had already welded the sling swivel/front grip mount section of the receiver to the front stub using my machining jig to hold things square, so it was time to attach that to the main bit of receiver.  I'm using my barrel for alignment, and here's how everything fits together.  The rear barrel restrictor ring/feed ramp ring aligns the new receiver to the front trunion. The Uzi headspace is determined by the bolt contacting the trunion, so nothing here needs to be ultra precision.  Since the barrel is new, I've got the exposed parts covered in blue tape to keep them from getting scratched.

Now the exciting bit, welding without a jig.  I have to make sure everything stays straight, and I want to get full penetration welds, without burning through the sheetmetal. Enter the copper backer.  Steel won't stick to copper when welding, so you can weld and get full penetration without leaving blobs of weld on the back side.  I didn't actually have any thick copper sheet, and it costs more than I wanted to spend for the little amount that I needed, so I decided to think outside the box and into the home improvement store.  I bought some copper plumbing connectors, and smashed them flat.  Presto, $.49 instant copper plates.  The barrel takes care of our axial alignment between the pieces, but I still had to get the right length so that everything fit together like it was supposed to.  Since the rear grip mount is welded to the new receiver, and the front of the grip locates off the protrusion welded to the front stub, I could use the grip frame it's self to set the length of this section.  I carefully fit the parts so that there was zero gap between them, then I used a variety of vice grips to hold everything in place, backed by my copper plates.
After tack welding and checking to make sure everything was straight and in the right place, I burned in some welds.  With that done, I decided it was time to cut the ejection port in the receiver.  I also dressed the welds some, because I'm impatient.  Here's where we sit at the end of the day, actually starting to look like something.


Saturday, February 9, 2019

Spoiler Alert!

This post is going to have a lot of words and few pictures, I'll try not to write a novel, but no promises.  I'm a bit disappointed that I didn't take pictures of this process because it worked really well. 

Originally I bought an Uzi receiver flat with the intention of making a bending jig like I did with the AK.  But after reading up on it, it's not a straight square bend like the AK, the nose section of the receiver has to wrap into a tube.  I wanted to reuse my original front end and Hebrew marked rear section anyway and I decided it would be a shame to cut apart a $70 receiver flat just for the bits I needed.  So I decided to do it the hard way.

Spoiler Alert!  I have a CNC mill.  It is not big, and it is not fast, but it gets the job done.  It's a Seig X2D that I converted to CNC myself.  Maybe some day I'll give it it's own build thread.
I decided to make my receiver section on the CNC.  Why?  Because I have way too much time on my hands, apparently.  It seemed like a good idea at the time.  More important than why is how? How do you make a .070" thick sheetmetal part on a CNC mill?  Milling it from a solid block of steel would be way harder than it sounds because as the walls get thin the part looses rigidity and the side walls want to get either pushed away from or pulled into the cutter, making a vibrating mess with no chance of holding a tolerance.  So that method is out.

I decided to think more outside the box.  And into the tube.  I got some 2"x2"x3/16" wall steel tubing.  I'm using A500 grade tubing, which is about equivalent to 1020 carbon steel.  It might seem like it would be too weak for a receiver, but it's stronger than the 1010 steel used in the commercially available receivers(and flats like the one I bought).  Like the AK, the sheetmetal of an Uzi receiver doesn't see much load, so all it really has to do is hold the parts in.

So, how did I make 2" square, 3/16" heavy wall tubing into a 1.6" wide, thin sheetmetal piece?  I cheated, obviously.  This is the bit I'm kinda proud of, and I'm sorry I don't have any pictures of it.  After drawing up a CAD file based on measurements of my receiver pieces and available blueprints, what I did was machine the the sides of the receiver into the sides of the tubing, cut the middle out, weld the halves together, then machine the bottom.  In the pic of my mill above, I'm just finishing up the finish facing pass to get the bottom thickness set.  My welding jig to put the halves together was just a bar of aluminum cut to the right size, and it also served as a backer to support the thin sheetmetal sections so they wouldn't collapse in the vice for the last milling operation.  I elected not to cut the ejection port until later too so that the piece had a bit more stability while milling.  The holes for the blocking bar welds are sloppy as heck because I forgot them in the program and just used my mill as a drill press and I suck at hand drilling holes.  I'm not too concerned, they get welded over anyway.  Here's what I ended up with, one CNC made sheetmetal receiver section.