I actually had a heck of a time installing the mag catch on my PSG-None. The tutorials I'd been following didn't even mention it, and searching for "CETME Mag catch" yielded tons of posts on how to install a paddle mag release, but virtually nothing on the mag catch it's self. Since the PSG-1 doesn't use the paddle release found on standard G3s and CETMEs, I don't need to either, and that saves us a bit of work.
The biggest problem is that I didn't realize that none of the mag release holes in the receiver flat were finished, and I couldn't see how it was supposed to work. You don't know what you don't know I suppose. Once I did realize that everything needed to be opened up, I set about doing it. First was to drill the holes for the mag catch shaft. The left side gets drilled to .238" with "B" drill, and the right side gets drilled to 5/16". With the shaft holes the right size, I could see where the arm that catches the mag needed to be. I used it as a guide to scribe some lines, then carefully dremeled the window open. I left it a little undersized so that I could finish it with a file. If you make this window too big, your mags won't lock in solidly.
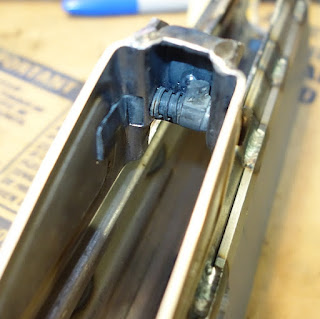
I also couldn't find any good pictures of how all the parts were supposed to fit together, or any explanation of what I did or didn't need because I wasn't using a paddle release. So here's the order and orientation the parts go in. Mag catch-spring-pivot bushing-release button(with the pin holding the button on).
Then I couldn't find any good pics of how everything was supposed to look installed either, again because everyone out there was posting about paddle release installation. So here's how it should look with all the parts installed. It's tricky getting the spring in place, and it will want to go flying if you slip. I found it easiest to use a punch to get the bushing and spring aligned in the receiver, then slide the mag catch in.
Actually getting the mags to fit into the receiver took some work too. CETMEs and HKs use a nose in, rock back style mag lock like an AK, just slamming it in like an AR doesn't really work. The front of the mag catches on a little lip on the bottom of the trunion, all the receiver sheetmetal does is keep it from wobbling. The RTG flat I'm using has just slightly too much radius on the front corners of the magwell so the mags didn't want to fit. The sheetmetal is very soft so I used a block of wood and plastic hammer to massage the magwell opening until mags fit. I also had to very slightly shorten the bottom of the magwell to match my mag catch height.
Because 5rd PSG-1 magazines are expensive and this project is not, for now I'm using standard G3 20rd mags because by golly are they cheap, probably the cheapest surplus mags on the market at the moment. I'll probably try to cut one down at some point, just to see if I can. I got some from RTG, and some from Apex. RTG's "Very Good" mags ranged from little wear so some wear(the worst one shown below), Apex's "Very Good" mags look basically brand new, hardly even showing any shelf wear. Everything I've ever gotten from Apex has been better than advertised(and they're not even paying me to say that!) This isn't the best pic because it looks like the mag isn't seated fully, but it is. This particular mag is a little bent(not unexpected for being a 50 year old aluminum military mag, and I didn't want to scratch my nice ones while trying to size the magwell ).


I could definitely use some help with getting this mag catch slot cut like you did. I don't know where the button goes/how far to cut, and as you said, no one is talking about it
ReplyDeleteVery cool, I got a question though.
ReplyDeleteHow do I get the pin out of the magazin catch button if I want to disassemble the entire Magazin catch, I am unfamilliar with it and don`t have a clue what tool I need?
As far as I can remember, the pin is just a pin so you just drive it out with a punch like you would any other pin
Delete