Saturday, March 6, 2021

Still falling...block

Just an update on my 3D printed falling block rifle.  I had a question on how strong the 3D printed barrel threads will be, or how much force it would take to blow the barrel forward out of the receiver.  Someone much smarter than me did the math on the thread shear strength using the rough numbers for PLA, and came up with a minimum of 6,815 lbf, with "ideal" threads giving me 13,583 lbf.  That's well over the amount of force that the DAG training ammo can generate.

I think I've got my design far enough along that I can make a test print.  I'm not sure what I want to do with the top of the handguard.  I don't really want a top handguard, but it looks like it's missing something without it.  I can't make the front of the receiver smaller or longer because of the barrel nut.  I like the Space Cowboy look, so I might end up with some sort of optic mount(my Savage Axis barrel doesn't have a front sight on it anyway).  


Monday, March 1, 2021

La Llama XV esta completa

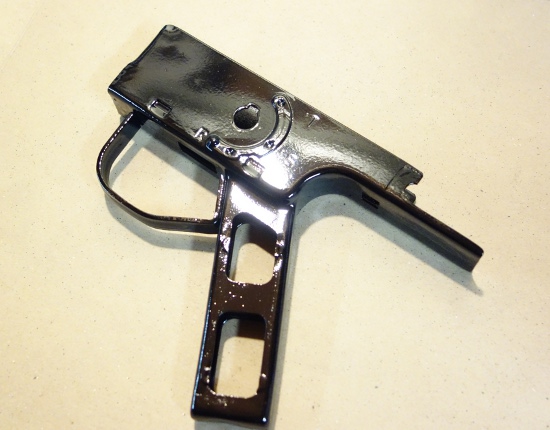
I'm done with my little Llama XV 22lr.  After test firing, I cleaned the frame and painted it.  I tried something new with the paint, and I'm not really happy with how it turned out, but it will do for now.  I tried to replicate the nickel plating on the metal as best I could.  I use Rustolium Chrome spray paint and topped it with a matte clear.  It looks ok, but it didn't seem to stick to the print well and it chips super easy.  Next time I'll try a base coat of SEM Color Coat under the top coats because that stuff sticks to prints great.  The entire frame as well as the grip panels are 3D printed and here's how it turned out.  It's easy to forget just how small the Llama XV is when you see it alone in pics, so I included my partially printed full size 1911-ish in some of the pics for scale.


Sunday, February 21, 2021

Help! I'm falling... a 3D printed falling block rifle

New project time, because apparently I don't have enough projects going on...

Ever since I discovered the very low power plastic DAG 7.62x51/308 training ammo(10g plastic bullet with a total range of only 300 meters), I've been looking for projects to use it with.  I also decided that I wanted a lever gun of some sort, for no reason I can explain.  And, obviously if you're here, you know I do a lot of 3D printing.  So I decided to combine all three into a new project.  I'm going to 3D print a lever operated rifle specifically for the DAG training ammo.

I want to use as many 3D printed parts as I can, mostly because I don't feel like machining anything.  "Locked breech" and "3D print" don't generally go together, so I decided to go with a single shot falling block action because of it's high strength in a smaller size.  With a falling block, it's easy to get a whole lot of strength without having a massive receiver.  It's also a very simple action with very few parts(and if the print proves to be too weak, easy to replicate in metal).  I'm going to use an AR15 hammer/trigger, and a floating 1911 firing pin(mostly because I have all these parts on hand already).  The DAG training ammo has a smaller case head than standard cartridges, and the action is designed around that so standard 308 WILL NOT FIT.  For the barrel, I'm going to use one from a Savage because of the way it threads into the receiver with a locknut to adjust the headspace.  I'll also be using the 3D printed stock I designed for my SCR style project, mostly because I have it and it fits me well.

Still very much a work in progress, but here's how the action looks so far.  The "H" shape of the breech block gives me four locking lugs and a whole lot of surface area and shear area.  Napkin math using PLA numbers and the Lilja equation says that that the locking block should be able to handle 2100lb of bolt thrust with a safety factor of 2.  I have no idea how much power this training ammo has, but it's pretty wimpy, and for reference a 22LR makes about 900lbs of bolt thrust.  My biggest concern is that the case head might start crushing the plastic on the breechface, and if it does, I'll make a metal insert for it.

Here's how it looks with the breech closed and and ready to fire:

When the lever is opened, it pulls the block down, the nose of the lever then hits the extractor lever pulling the case out, and the block cams the hammer back to half cock(I'll cut a half cock notch into the AR hammer).  Once closed again, the hammer can be cocked the rest of the way with the new lever attached to it and sticking out the side of the receiver(which isn't ideal, but I can't come up with anything else that will work with the AR FCG).


Sunday, January 31, 2021

Llamas spit.

I finally got my 3D printed Llama frame to were I'm satisfied with it.  It took 11 tries to get it right.  On a normal 1911, I'd have printed a few, got it close, then fit the parts to the frame like you would with any new frame.  That wasn't an option here though because Llama parts are hard to come by and I can't afford to screw anything up so I basically had to fit the frame to the parts.  

I had a heck of a time with magazines too.  Llama mags are expensive, and I'm not positive that they would work because the Llama grip angle is slightly different from the standard 1911 frame my print is based off of.  I tried to make a printed one...and mags are hard...  I ended up using a Browning 1911-22 mag.  The Browning 1911-22 is a similar size to the Llama, but uses the standard 1911 grip angle.  I had to add a little clearance for the slide stop, and file out the mag catch slot a little to get it to lock it, but otherwise it works great!


It actually works...and I didn't lose any fingers!  I put about 30 rounds through it before tearing it all down for inspection.  I had some trouble with light strikes, about 1/4 of the rounds needed a second smack of the hammer to go off.  New mainsprings are completely unavailable, so I'll take it out and do some measuring to find a replacement.  Because of limited space and unavailable parts, the ejector is part of the printed frame.  Though I don't have many rounds through it, the ejector doesn't show any signs of damage from the shells hitting it.


How to waste a day to save $30

You know, sometimes I do things that don't make sense.  Take the project in today's post for example.  I spent an entire afternoon on this, for the express purpose of saving a measly $30.  I wanted a 5rd magazine for my PSG-None because that's what real PSG-1's came with, and because it just doesn't look right with the 20 rounder.  20rd G3 mags are cheap, sometimes as low as $5 a piece if you shop around.  The 5 rounders though start at $30 for POF, and real HKs are much more.  The POFs are nice enough, but I didn't want to spend $30, so I decided to make my own.

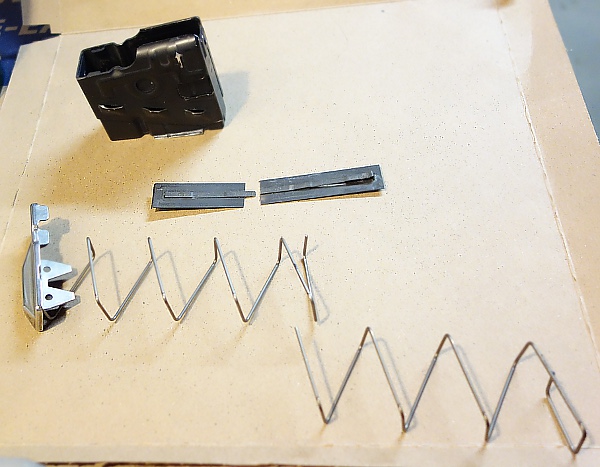
I started with a completely stripped G3 mag and whacked the bottom off.

Then I trimmed some of the bottom to make some tabs to fold over.

The tabs need to be folded over very carefully.  Whatever kind of aluminum these mags are made from, it's fairly hard and will crack if you're not careful.

I also had to shorten the rest of the bits.  I cut off about half of the spring, and shortened the reinforcement plate and strap that go across the front of the mag.  I might take another wind off the spring, but I want to see how this one feeds first.

With everything trimmed,it goes back together like any other mag.  Here we are, one afternoon and 15 rounds less later:


A little Sunday baking

I've got to paint my PSG-None.  As much as I like KG Gunkote, it goes on thin and didn't seem like it would replicate the thick factory HK epoxy finish.  I thought about using Duracoat because it looks great and is easy to use, but it's too cold out for me to spray it.  Since this is a low dollar gun, I turned to Google and settled on a highly recommended low dollar finish, Rustolium Appliance Epoxy.  It's cheap, and reportedly very tough.  Here's how it looked after it dried:


I know what you're thinking, way, way too shiny and HKs are a nice semi-gloss.  But that's ok, it's only the first step.  Even though the can doesn't say so, the internet said to bake it.  The time and temp that you bake it for will affect how the finished product looks.  I settled on 65 minutes at 400°F.  400° is low enough that it shouldn't affect the heat treatment of any hardened parts.  Baking cut the gloss down from "too shiny" to "just about perfect!"


HK G3 UB Training bolt in a CETME

I don't know if you've noticed, but 308 Win/7.62x51 is hard to come by these days, and is expensive when you do find it.  That means I've got practically no ammo for my CETME based PSG-None build, and heck if I'm paying the asking price for what is available.  A lot of militaries around the world have some sort of lower power/cheaper to shoot alternative to their standard issue rifle rounds.  Many have 22lr conversions or 22lr variants of their standard weapons for training.  HK was no exception and 22 conversion kits for HK G3 rifles are available, but they're expensive and not very common.

The Germans came up with another option for the G3.  DAG makes a blue plastic cased training round that uses 12 grains of powder with a 10 grain plastic bullet.  It kicks about like a 22lr, but the super light bullet loses energy very quickly.  It's said to be accurate to 100 meters, and has a total range of only 300 meters.  Still dangerous so treat them like any other bullet, but perfect for plinking, and best of all, it's still cheap(around $.22/rd at the moment). 

A round this weak will not unlock and cycle a standard G3, but they have that covered too.  They designed the UB training bolt, a lightweight bolt without any locking rollers that functions as a blowback with the training ammo.  It's around 5oz lighter than a standard G3 bolt carrier, and the bolt face is around .030" smaller than standard so full power 308 rounds CANNOT be used with it accidentally.  They're also reasonably cheap(around $100 at the moment).  Here's what the UB bolt looks like next to my CETME bolt, note the UB electropenciled on it, and the lack of locking rollers on the bolt head:

So this is great, right?  Cheap conversion bolt, cheap ammo, this sound perfect for...oh, right, G3 bolts don't fit in CETMEs...  The problem is that the bell on the cocking end is too big for the CETME cocking tube.  No problem, I can fix that.  First thing was to grind down the bell mouth, then using some Unknownium™ tool steel from my pile, I turned a new bushing to slip over the end, and used JB Weld to attach it.  The length difference between the G3 and CETME bolt carriers isn't a problem because the UB bolt is made for blowback it doesn't need the cocking handle cam action to unlock the rollers like a standard bolt.

A close up of the bushing, the ground ring is just bigger enough to act as a bearing surface so that the whole bushing doesn't drag in the cocking tube.

I tend to share my guns a lot, and take people shooting that aren't super experienced.  To make sure that people know to use the training bolt with training ammo, I decided to paint it.  I also painted a mag to match so that people know the blue bolt goes with the blue mag, and uses the DAG blue bullets.  As much as I like KG Gunkote, I couldn't justify the price for the little bit I needed so I decided to try high temp brake caliper paint, mostly because I want to see how it holds up.