Sunday, September 20, 2015

H1 , Chapter 6.

The next chapter of my H1 build has lots of nifty stuff in it.  At this point, I'd gotten most of my engine back together, and have most of the shiny bits bolted back on. While I was at it, I put some stiffer clutch springs in. Fortunately, it seems as though the clutch it's self was replaced not to many miles before I bought the bike, so it didn't need to worry about that.


With most of the bike it's self down to painting and bolting stuff on, the rear fender is the last big "fabrication required" project. A plain smooth fender like I've got is fine for a race bike, but this one will be street ridden. That means it's going to need blinkers and a tail/brake light. I started planning them as soon as I started planning the fender. I didn't want them to look like tacked on afterthoughts like you see on so many customs, and even a lot of factory bikes. I explored lots of options. What I decided on is very custom, very visible, and most importantly don't stick out like sore thumbs.

The blinkers are made out of 1/2" Lexan. I cut 1/2" off the bottom of the fender, 'glassed on some tabs, bolted the Lexan down and sanded to shape. I then ground out the back sides for some LED strips. I've got 21 LED's shining out through the Lexan. More on the blinkers later, but here's a rough pic so you get the general idea:

Next up is the tail/brake light. This one took some finesse to get looking how I wanted. It's a straight forward process, but involves a lot of fitting. Like the blinkers, this lens is going to sit flush with the fender so it doesn't interrupt the lines.

I'm using the oven method of plexiglass forming. I'd like to use Lexan, but it's not as forgiving as plexiglass when baking it in the oven. First thing I did was make a plaster cast of the back of the fender. I just used some modeling clay to make the walls after I'd figured out what size and where I wanted the lens.  Mixing in some plain white Elmers glue will greatly increase the strength of the plaster.  You don't need much, around 5%-10% of the water added to the plaster mix works well.
I let the plaster cure/dry out for about a week. It can take awhile for all the water to finally evaporate out of the plaster.  warming it in teh oven can help too, as long as you don't heat it up too fast(or it could crack).  Then I cut a piece of plexiglass, set it and the plaster mold in the oven and baked it at 300*F for 10 mins or so. It gets soft enough that, with some gloves on, you can smoosh the plexiglass into the plaster buck. It took a few re-heats to get the shape just right. Also, you can see the pencil on the plaster, that's about where the lens is on the fender. I found that if you draw it straight on the fender, the pencil line will transfer nicely to the plaster.

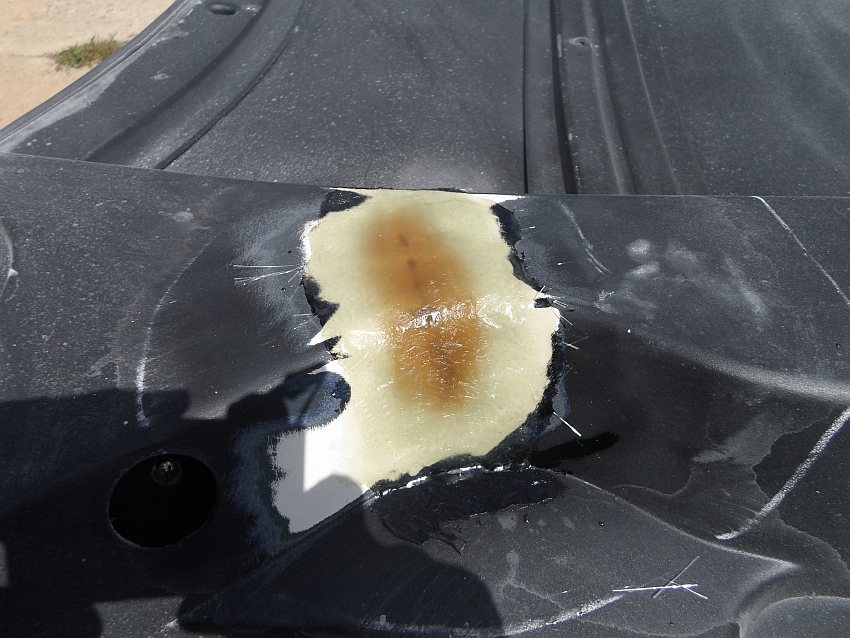
With some rough trimming, you can see how well it conforms to the fender.


The next part take a lot of grind, check, grind. Took me about a day of messing around to get it perfect. Once the hole is cut in the fender, the lens can be cut, ground, filed, and sanded to fit just right. When you're done, you've got a custom flush fit lens that perfectly matches the contours of the fender.


Then I dyed the lens. It's pretty easy, but it took a few test pieces to get the time & temperature right. Plexiglass can be easily dyed any color you want with Rit fabric dye. The secret is to heat it up. If the dye is to cold it won't take, if it's too hot the plexiglass can get soft and warp. Just under boiling seems to work best. I've had the best results with the dye heated on the stove to about 190*F, and a cook time of around an hour. More or less depending on how dark you want it, and a meat thermometer works great for watching the temp. The same process works for dying the clear fuel line the color of your choice.


If you want to use Lexan(polycarbonate) instead of plexiglass, there are a couple things to note.  First, Lexan absorbs moisture like a sponge.  If you just try to heat it to it's forming temp, you will end up with plastic full of bubbles.  This is caused by steam forming in the plastic and having nowhere to go.  You MUST pre-dry Lexan before forming it.  The general rule of thumb is to bake it at 250°F for one hour per .010" of thickness, so 1/8" Lexan should be baked for 12.5 hours.  Second, Lexan forms at a much higher temp than plexiglass.  It needs to be heated to around 375°F to be moldable.  Third, You cannot dye Lexan, it just won't work.  If you want some color other than clear, you either need to start with that color plastic, or use one of the few paints on the market that will stick to polycarbonate(regular spray paint won't stick well).  The paints made for RC car bodies(NOT standard model paint) are made for polycarbonate and are available in translucent colors.


Now, back to the blinkers.  The first thing I did was get one of THESE $10(shipped!!!) 40 LED 3rd brake lights(and if you don't shop DealExtreme, you should. They have all kinds of nifty stuff at dirt cheap prices. Shipping is sloooooow, but it's free.  The price you see is the price you actually pay, no extra shipping or handling. Stuff is so cheap, you can't afford not to buy it :D  http://www.dx.com/p/40-led-third-brake-tail-light-for-vehicles-12v-10524#.Vf97V5cqvXw

Then I opened it up, and cut the circuit board in half, giving me two 20 LED strips. I got out the Dremel and ground a slot in the back of the Lexan for the LED strips to sit in. Unfortunately, Lexan(polycarbonate) doesn't dye like Plexiglass does. The dye just doesn't take. I tried some other things, but couldn't get consistent results. That means I had to paint it. I used white, then black on the top(the white base coat helps reflect any stray light). I used SEM Color Coat, which sticks to Lexan fantastically.  The edge and bottom are painted with Duplicolor's Metalcast red. It's basically a red tinted clear in a spray can, made to give chrome an anodized look.  It also sticks to the Lexan like a champ.
http://www.duplicolor.com/products/metalCast/

Here's how it looks. It's just taped together for now, the final pieces will be siliconed together to weatherproof the circuit board. It lights up nice and bright, and reasonably evenly. The dark strip is one of the bolt holes through the Lexan. You can't really tell in the pic, but unlit, the lens is a nice deep red.  Off:

On:


Just for kicks, here's what the blinkers look like lit up when they're installed.


That's all for this chapter.  The end is approaching... :)


Tuesday, September 15, 2015

Some things you just have to do right.

I've spent most of my posts explaining how to do things.  I'm going to take a minute now to explain a why.  Since I started fixing the Viper's body, one of the big things I've been harping on is the need to do things right to prevent future cracking.  I've also mentioned repeatedly how the previous "repairs" on the car weren't done properly.  You'll notice that I always put repairs in quotes.  With cracked fiberglass, you CAN'T just band-aid it, it must be done properly or it WILL crack again.  As with many other things on this project, the hood has again provided me a perfect example to demonstrate why.
 
Lets take a closer look at this crack here.  As I mentioned a few posts back, this crack appeared after the car had been "repaired."  That much is obvious because it's cracked through the primer that covers the "repair."  The question is why did this "repaired" crack come back?

Without the paint covering it up, the reason was very apparent on the bottom of the hood.  Here's where the crack is on the bottom side of the hood.  The white is the original panel.  All the 'glass on the bottom is stuff I added during my repairs(and before I repaired the front lip).  The stuff in the middle is just kitty hair(fiberglass reinforced filler) from the previous "repair."  You can see that not only is the crack still very much there, there are voids in the kitty hair and much of it isn't actually bonded to anything.  The crack is basically just bondo'd over.  While it might have looked smooth from the outside the structure is cracked and has no strength.
Grinding into the back side of the crack further shows how poorly this crack was "repaired."  Not only was the crack only glossed over on the top side, just below the surface on the back side there is no more filler.  There is just a large void under the crack.  So, we're left with a still cracked panel that has no reinforcement behind it. 
It's no wonder that this crack reappeared.  There's almost nothing holding the shattered fiberglass together.  The top side just has a skim coat of filler covering the crack.  The back side has a little filler just kind of holding the pieces together.  This, right here, is why so many repaired fiberglass panels crack again.  Covering up a crack doesn't address the problem, it just makes it look nice temporarily.  You can't actually repair a crack in fiberglass, you must completely remove the crack and replace it with new fiberglass.  If you just cover a crack with bondo or even a layer of fiberglass, it's not a matter of if the crack will reappear, but when.

Sunday, September 13, 2015

ODing on crack

Working from the back forward, I got all the minor cracks in the Viper's hood fixed.  All that I had left was the front end.  I decided to do the repair in four stages, the two corners, the center section, and the front lip.  The previous owner of this car slid the passenger front corner of the nose under something.  When that happened, that corner of the hood was shattered.  I started with the most crunched area, the passenger front corner.  I assumed from the beginning that I would have to redo all of the previous work, but I didn't know just how bad it was until I started grinding away at it.
Almost the moment I started grinding, I started finding poorly laminated "repairs," and layers that weren't really connected to anything.  So I kept grinding.  And grinding.  And grinding.  Even though it had already been "fixed," there were still tons of cracks in the original fiberglass.  Like the previous repairs I've done, I ground out any and all cracks I could find.  I also ground out nearly all of the previous repairs.  Anything of the old repair that I did leave I left strictly as a backing for the new fiberglass I'd be putting in.  You can see just how much of the nose was replaced.  The white is the original panel, the darker color was part of the previous "repair".  Also, there was a block of wood under the "repaired" fiberglass.  Basically, I needed to rebuild the whole corner of the hood.
Ideally, you'd want your new fiberglass to be one big piece.  Because of all the curves and corners on this thing, that is neither practical nor possible.  You will never get a single big sheet of 'glass to go around all those corners and lay down flat.  Trying it will just lead to frustration and more grinding, trust me on this.   The next best thing is overlapping layers of smaller pieces.  Smaller pieces will lay down easier, and go around corners better.  Any time I do fiberglass work, I always plan where and how I'm going to position my pieces before I mix my resin.  I cut and lay my pieces down about where they will be laminated onto the panel, then lift the whole thing off and lay the pieces out on cardboard in the order and approximate location where they will go.  Pre-planning all this before I mix the resin allows for quicker layup, as well as keeps my scissors from getting sticky from cutting 'glass with resin covered gloves.  Here you can see how all the overlapping layers of fiberglass will be placed.
With everything planned out, all I had to do was mix up the resin and lay it up.  The pieces go on one at a time.  Lay a piece of mat on, saturate it with resin, work the bubbles out, and repeat.  Most of the new fiberglass is laminated to 1/4" thick, with many areas being even thicker.  You'll notice the color of the resin is different here.  As I've mentioned before, the Evercoat SMC resin uses standard bondo hardener.  I decided to use blue hardener this time, mostly because I have a big tube of it. 
With that done, I moved onto the other corner.  This corner wasn't nearly as damaged.  It also hadn't actually even been repaired.  Only one crack was "fixed," the rest were left from the accident.  So, like everything else, I ground out all the cracks, and the previous repair material.
Same deal as last time, cut the mat, plan the layers of fiberglass, and add some resin.
The third area I needed to fix was the center section.  This area had a big crack going through it and instead of laying in more actual fiberglass, it was just filled with Kitty Hair(fiberglass reinforced body filler).  Kitty hair in useful for some things, fixing cracks in fiberglass isn't one of them.  So, once again, I ground out the cracks and previous repair material.  This repair also overlaps my previous corner repairs.  Now, fiberglass won't stick very well to shiny surfaces, and cured fiberglass is (relatively) shiny.  Any time you put new 'glass over cured 'glass, you need to grind the shiny off of it.  24 and 36 grit grinding wheels work best.  Even though you don't have interlocking layers, if it's ground back like this the fiberglass should never have delamination issues.  Here you can see the cracks ground out, and my previous repairs ground back so the latest layer of fiberglass will stick.
Same routine, cut, plan, add resin.
The last section to do is the front lip.  I decided to do the front lip as it's own separate section because it has so much damage.  I decided I would just rebuilt the whole front edge.  It's also easier to manage as it's own section, and I wanted to lay it up very thick.  For the new front lip, I decided that the bulk of it would be built from the bottom, and only the outer surface would be rebuilt from the outside.  To do it I ground back all the fiberglass, both old and new, until I just had a very thin edge left to use as a guide/backstop. 
To backfill the lip, I laid in lots of long strips of fiberglass.  All in all, most of the lip ended up being around 1/2" thick.
That's all the fiberglass that needed to be added to the bottom of the hood.  It may not look like much, but to give you a sense of how thick most of the new fiberglass is, I used almost 30 sq/ft of fiberglass mat and 3/4 gallon of resin.

Sunday, September 6, 2015

The first of many...

In true Jeff fashion, I picked the easiest crack on the Viper's hood to fix first.  I started with the innocuous looking little crack high up on the hood.  You all remember this guy:
It doesn't look look like much, just a short bit of cracked fiberglass.  Removing the paint reveals the truth:
With the paint removed, the true extent of the crack can be seen.  It extends half an inch further down, and an inch further across the top than was visible with the paint there.  Further, the crack branches out towards the bottom.  This is one area where a lot of fiberglass novices make their first mistake.  They don't fully investigate the extent of the crack.  If I had just ground and filled the visible crack, fully 1/3 of the crack(the hidden parts under the paint) would not have been fixed, and the crack would have kept spreading after it was "repaired."  In order to properly repair the area, the whole crack MUST be ground out.
The whole repair area is about 4" wide at this point, and you can see how the ground area is beveled down to the crack it's self.  The areas of the crack it's self that are still "solid" are in fact paper thin.  They are there just to serve as a backing to hold the new fiberglass.  What's left of the actual crack is thin enough that resin will drip down through it.  Since all fiberglass repair relies on mechanical adhesion, the original 'glass is ground with a 36 grit disc to give the new resin some "tooth" to grab on to(I also ground it down further after I took the pic).

This step is the reason why so many fiberglass "repairs" crack again.  Many people not familiar with fiberglass repair will just grind into the crack some and 'glass over it(or even worse, just fill it with kitty hair or bondo).  By doing that you're just covering it up, not actually fixing it.

Think of it like this: You can tape over your door seams, and the side of the car will look smooth.  But, there is still a giant seam between the door and the body, and the door can still easily be opened.  Just because you can't see the seam anymore doesn't mean it's not there, and just because it's not visible doesn't mean it's solidly immovable.  Cracked fiberglass works the same way.  If you don't completely remove the crack, the two broken halves will continue to flex independently, eventually causing the "repair" to crack again.

As I mentioned before, I'm using Evercoat's SMC resin.  I've decided I like it for one reason: it doesn't use standard fiberglass hardener.  Unlike standard resin which uses MEKP as a catalyst, the SMC resin uses the same cream hardener that bondo uses.  Tangentially related fun fact: the chemical in bondo hardener that does the catalyzing is Benzoyl Peroxide, which is also the active ingredient in Clearasil and other acne fighting products.  The reason I bring up the hardener is because it makes the resin much easier to use than standard resin.  The MEKP catalyst used in standard fiberglass resin is a clear liquid.  Because of this, there is no good way to tell when you've got the resin and hardener and mixed well enough.  Because the SMC resin uses creme hardener instead(in either red, white, or blue), it's very easy to tell when you've got it mixed well enough.  I've also found that the resin starts to change color as it catalyzes, giving you a warning that you've only got a few more minutes to work.

I built up the repair area with several layers of fiberglass.  You can see because of the coloring how much thicker it gets towards the center of the repair area.  It's built up to slightly above the original surface so it can later be taken down to the correct height.  Because the bottom of the hood is more structural than cosmetic(and the hood pad covers much of it), the 'glass will be left at the finish height, any bondo that is used is more for filling pinholes in the fiberglass, and less for cosmetic flatness.
We now have the first crack properly repaired.  Only a few dozen more, and we can put the hood back on...

Thursday, September 3, 2015

Just some quick tips

Just some quick tips about working with fiberglass for today.  The first tip I have to share is to wear latex gloves when working with it.  When I started the Viper's bodywork, I called it "The long and itchy road." As anyone who's ever actually worked with fiberglass will tell you, it can be a very itchy process.  Fiberglass is called fiberGLASS because the cloth is literally microscopic strands of glass woven together.  Your car or boat is literally made from the same material as the windows in your living room.  While most people tend to thing of glass as solid, it's not.  When you get it thin enough, it becomes very flexible which is why fiberglass cloth doesn't just shatter when you bend it.  When you work with it, particularly when grinding, the air is filled with tiny glass shards that can get embedded in your skin.  It doesn't cause any harm, but can itch like crazy.  Gloves will help cut down on the itching a ton.  Additionally, you don't want to breathe too much of it.  Just like doing the occasional brake job won't give you mesothelioma, occasional fiberglass work and breathing in small quantities won't cause permanent damage, but you still want to avoid breathing it when you can.  For heavy grinding or sanding, a dust mask is a good idea.  It's also a good idea to have some "fiberglass working clothes" that you can take off immediately after you get in the house.  You don't want to track itchy dust all over the place.

Speaking of dust, fiberglass and bodywork work tend to make a lot of it.  Ideally, you want yo do your grinding and sanding outside on a breezy day so you're not working in a cloud of dust.  Outside on a breezy day isn't always an option though.  Either the weather won't cooperate or, like with my current project, I can't physically get the hood out of the garage by myself.  This is where being popular helps.  I always put my biggest fan right next to where I'm working.  It'll blow the dust away from where I'm working, and (mostly) out of the garage.

Next is the matter of Post Curing.  People think of fiberglass as an immovable solid, but it's not.  Fiberglass can, and will, move all over the place, particularly as it's curing.  Left on it's own, fiberglass can take weeks, or even months to fully cure and settle down to it's final shape.  Even "fully cured" fiberglass will move a bit more on it's first day in the hot sun.  This is where post curing comes in.  While it's not so important on the bottom of a hood, on exterior panels, it's critical.  Since we don't have the time to wait, we can speed things along in helping the 'glass take it's final set.  The idea is to raise the temperature of the 'glass to speed up any remaining curing.  Ideally, you want the glass to get up to 140°F, and stay at that temperature for a few hours.  The sun works great, but isn't always available.  Infrared heaters are the next best thing, but most people don't have access to those either.  What a lot of people do have is halogen lights.  Just set up your halogen light shining on the panel.  If the light is too far away, the panel won't heat up enough.  If it's too close, the panel will overheat.  Find the best distance for your light to heat and hold the panel at 140°F.  Since these lights are generally small, and the panel shape is complex, you should move it around every few hours so all the new glass gets baked.

Incidentally, this is the reason so many kit cars have such low quality panels.  Even if the mold is straight, the parts are demolded too soon after laying up, and then are shipped out without post curing.  This leads to very friendly panels that wave at everything.  It's also why so many fiberglass cars with fresh bodywork look great this year, but terrible next year.  When I was building kit cars for a living, we would let new parts sit in the mold for at least a week, usually longer, and then spend another week post curing them.

The last tip I have is of "don't burn your house down" importance.  First off, always test your mixture before actually starting the repair.  Mix up a batch of resin, and make sure it cures.  Liquid fiberglass hardener in particular goes bad quickly after it's been opened, so I ALWAYS use a fresh tube of hardener if mine has been open more than a few days.  Trust me, you don't want to have to peel off and re-do partially set fiberglass because your hardener failed and it won't fully cure.

Second, all compounds where you mix part A with part B to cause curing are exothermic.  That means that they give off heat as they start to cure.  Fiberglass, bondo, JB Weld, 5 min epoxy, etc, all produce heat as they cure.  The amount of heat is determined by how fast they cure, and how thick the mass(thicker means more heat).  If over catalyzed, fiberglass resin and epoxy especially can get tremendously hot as they cure.  I tend to mix my resin a little "hot"(with too much hardener) to make sure it kicks off OK.  I have, a time or two, mixed resin so hot that it's started smoking.  It won't get that hot on the panel because the resin layer is relatively thin, but it will get that hot in the mixing cup.  NEVER NEVER NEVER throw away mixed resin until it's cured and back to room temperature.  It could start your garbage can on fire.  Always set the cup on something non-flammable and non-meltable because that too can cause issues.  Here's an example from this project.  The bottom of this cup was flat when the resin was mixed.  As it cured, it got hot enough to warp and melt the bottom of the cup.