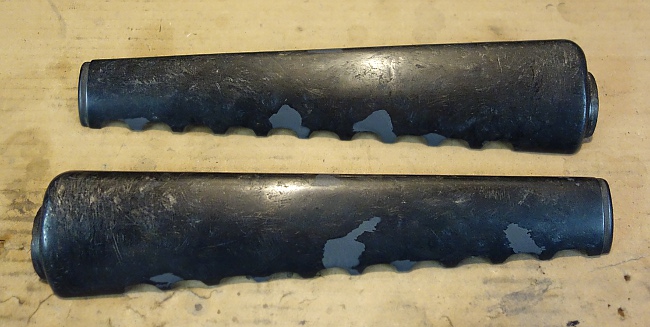
Gonna be lots of pics in this post. The worst part of my M16A1 kit by far is the handguards. For "military hardware," they are very fragile. They crack and teeth break off fairly easily. Even "good" parts kits usually have missing teeth. Mine were very rough. There were missing teeth, were cracked, had poorly done epoxy repairs, and several coats of paint.
At first glance, I thought they might be unsalvageable. Uncracked originals are available, but are much more than I want to pay. Reproductions are available cheaper, but the texture isn't right on them and they don't have the pressed fiberglass look of the originals. Also, I'm stubborn, so I'm going to play dentist and fix these broken handguard teeth.
With some patience and a good small pliers, the heat shield rivets can be pulled out. They are slightly threaded, and twist out like a very course screw. After a very good scrubbing with Dawn to get decades of oil and grime off the fiberglass, I started by removing the several layers of paint with Citristrip. Then on to my repair compound of choice, JB Weld. I stared by grinding out the back side of all the cracks with my Dremel, then using some tape as a dam, gooped on some JB Weld where the missing teeth should have been.
Once it cured, I could sand and file the teeth to shape. I used the existing teeth from one side as a guide for the other.
Then I moved onto the outside. First I ground down all the cracks, being careful not to grind all the way through the fiberglass. The grinder also leave a nice rough surface for JB Weld to stick to.
I really didn't want to paint these, so I tried mixing the JB Weld with carbon black and black paint like I did with the buttpad to darken it up, and smeared it on.
I didn't add enough coloring to the JB Weld. It looked good when fresh, but as soon as I hit it with sandpaper, it turned a much lighter grey. Using my sanding blocks, I started with 80 grit sandpaper, then 320, then 600(because those are the grits I had). The 320 and 600 I used wet. Not only does the sandpaper last longer and not clog up during wetsanding, it keeps fiberglass dust out of the air(which is itchy as heck if you get it on your skin or clothes). By sanding with a block, I got a nice flat surface.
While I was at it, I cleaned all the paint off the heat shields,
straightened the aluminum as best as I could, hit them with some
scotch-brite and reinstalled the rivets I pulled out at the beginning.
I was not satisfied with the color of the JB Weld. At all. And I didn't want to paint the whole thing, so I totally cheated. I painted the JB Weld spots, let the paint dry a few minutes, then wiped it off with a dry rag. The result was exactly what I was hoping, it turned the JB Weld black without affecting the surrounding finish.
All in all, they turned out better than I expected. I started with junk, and ended up with usable parts. It's obvious that they have been repaired, but it fits the style of the rifle. For a real restoration, a little more sanding and some paint and the repairs would be invisible.


No comments:
Post a Comment