The hardest part of this whole process, at least for me, was trying to figure out how to make sure the sight block was lined up with the upper receiver. If you don't get the alignment just right and it ends up canted you may not be able to get it sighted in. I ended up using one of my precision parallels in the rear sight channel of the upper for the back, and used the front sight ears for the front. This isn't the best way to do this, but it's the best I could come up with without making a whole dedicated jig. Once everything is aligned, a vice grip on the front of the gas block is enough to keep it in place as long as you don't knock it around too much. If you're not using smooth jawed vice grips like mine, put some padding under it so that you don't mar up the finish. Also be sure to install your barrel nut and handguard retainers before you start because you won't get another chance and your spacing will be wrong without them. Make sure your front handguard retainer is tight against the stop or it will rattle.
*Addendum: It has been brought to my attention that I could have just boresighted it to get things lined up, and now I feel stupid(especially considering that's how I roughed in the sights after I got everything assembled).
The second hardest part of this whole thing is getting it all square in the mill so that our holes get drilled straight. This requires a little bit of faith in Colt. If your sight block doesn't have a sling swivel, you can use the swivel pin hole for alignment. But if it does have the swivel riveted in like mine does, you'll have to use the gas tube pin hole. This is where the faith come in. I am trusting that Colt drilled all the holes in this thing parallel to each other. As a machinist by trade, I have calibrated eyeballs so to get everything square I used a drill bit in the gas tube pin hole as an indicator and eyeballed it so that it was parallel to my mill's spindle in both X and Y.
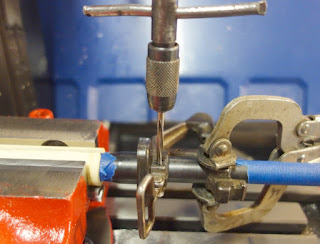
After the hole is drilled, it needs to be reamed. It needs a #2/0 tapered reamer. As much as I hate buying single purpose tools, sometimes you just have to have the right tool for the job. I bought one on e-bay for $8. I was very nervous using it because it's pretty small and I didn't want to break it.
Go slow, use lots of cutting oil, clear the chips often, and check your progress frequently. It's very easy to go too far. Using a tap handle by hand, I went 5 turns of the handle between checkings because once it starts cutting, it cuts fast. Making sure the hole is free of chips, you want the pin to be sticking up just shy of 3/16" when you drop it in with no pressure.
Once you get it that far you can take the assembly out of the vice and drive the pin home. It's best to have a proper block for this, though a block of wood will work in a pinch. I found a punch block on Thingiverse and printed it out. If you reamed your holes right the pin should be tight when it's sticking out an even amount of both sides of the sight block.
With the rear pin in, we can leave the vice grips off and do it all again for the front pin. Follow all the same steps as the first pin. If you've never used this kind of centerfinder, they're very handy. The pointy bit goes in the hole you want to locate, then you just move your X and Y around until the pointy bit is lined up with the shank. You set it by feel, so no calibrated eyeballs required.
Once all the fun and games are done, you should have your vintage used sight properly installed on your brand new barrel.
To be honest, this took me the better part of a day. Lots of checking, double checking, triple checking, and checking again. It's not particularly hard, but if you don't use jigs you really have to take your time. *Future post spoiler alert* So how did I do at lining things up? Pretty good. I had to set the rear sight about 1/3 to the right in order to get it sighted in so I didn't get it perfect, but it's more than close enough.


No comments:
Post a Comment